Thanks for the interest in my previous post. I have more to share with you.
Have you noticed there is nothing from Wendy’s Sewing Studio throughout the post? That’s because I’m working on an enormous project that I cannot tell you about. I allotted a full year to work this special project and so you’ll have to wait. Meanwhile, I’m still doing little jobs and will post them as I finish. Stay tuned, and enjoy the slide show.
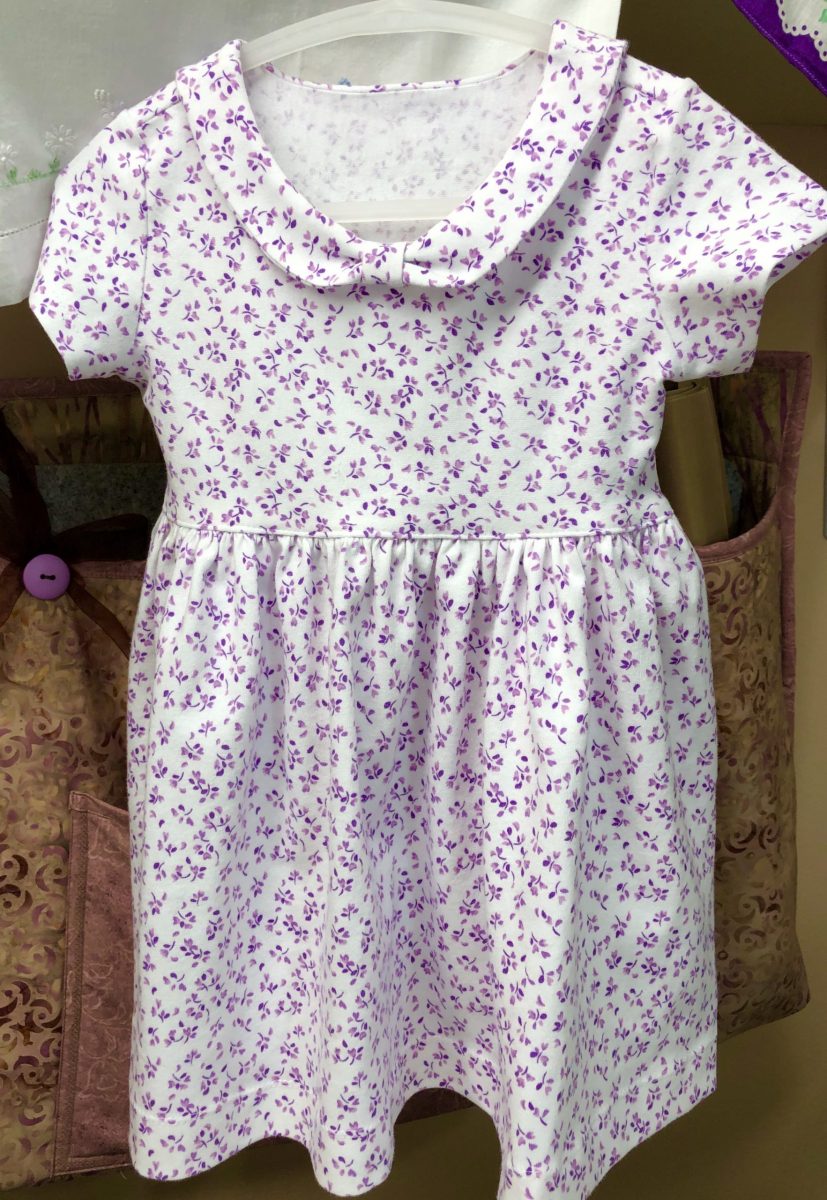
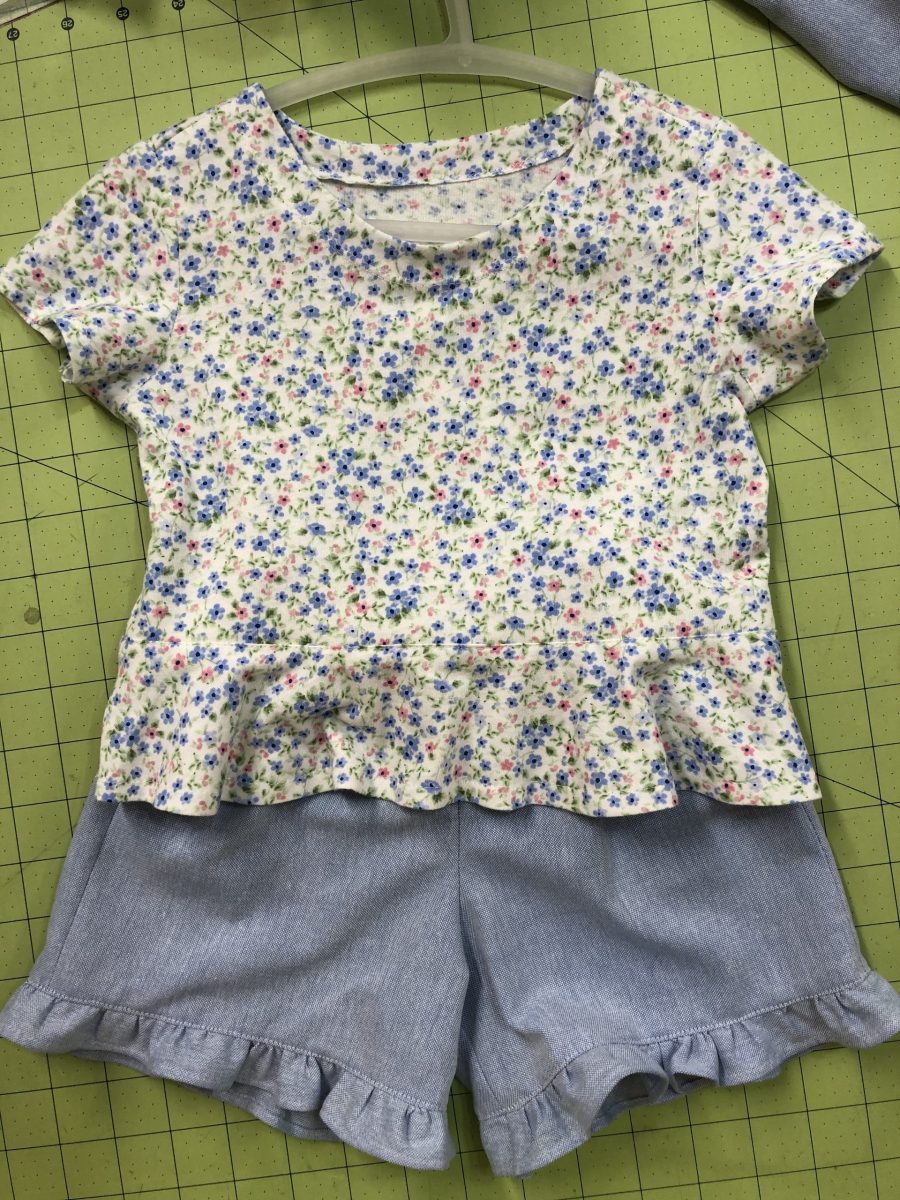
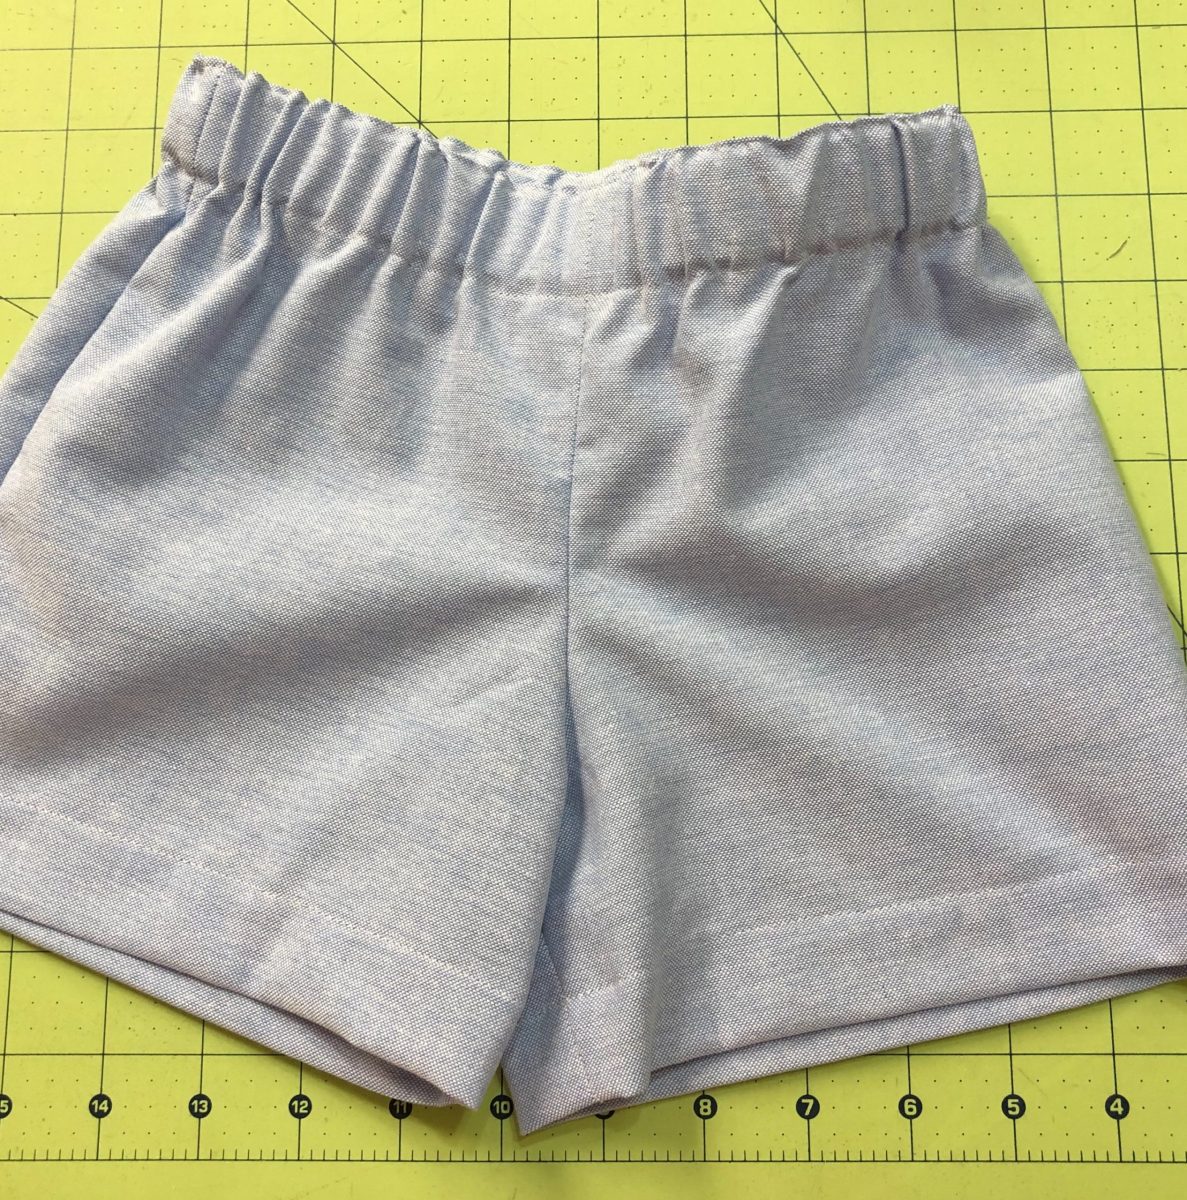
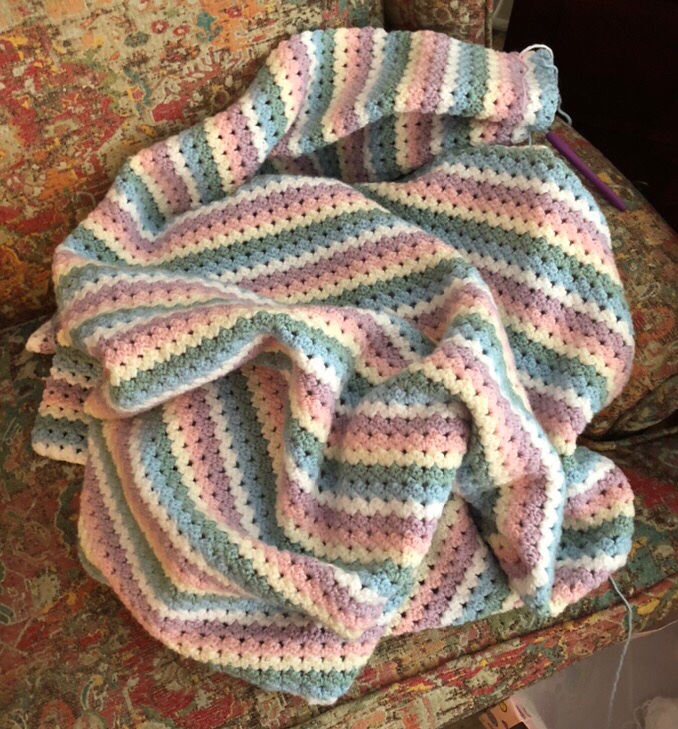
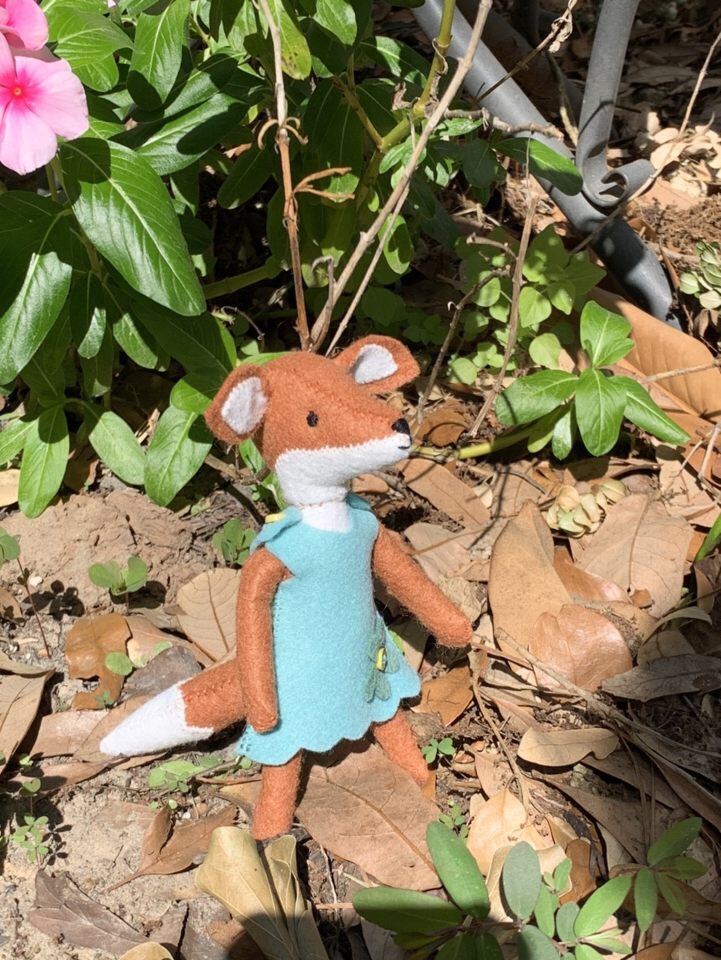
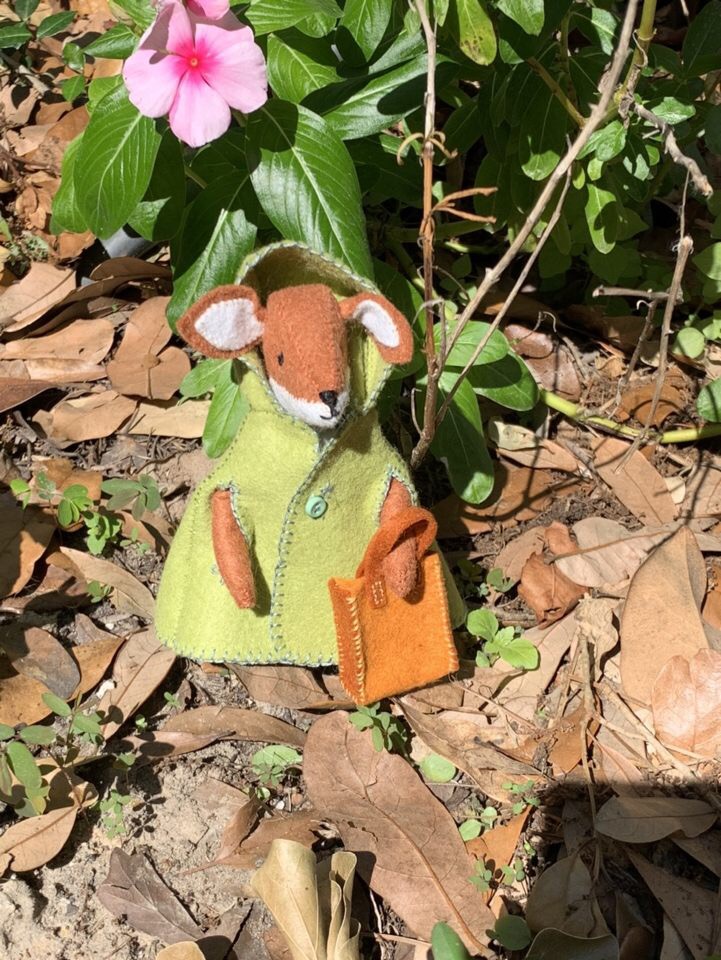
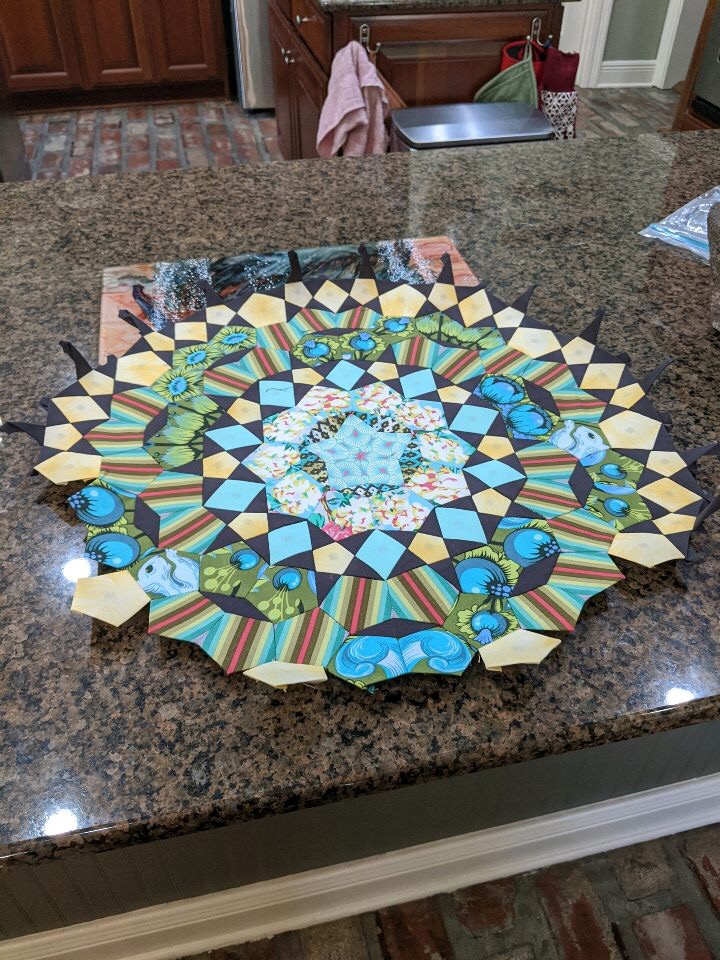
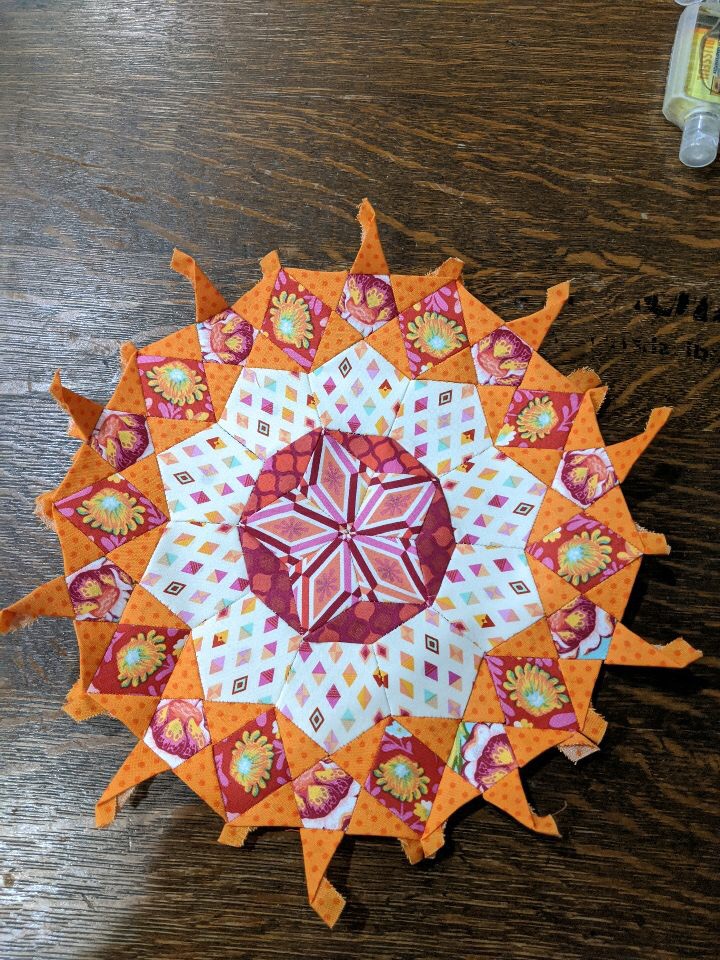
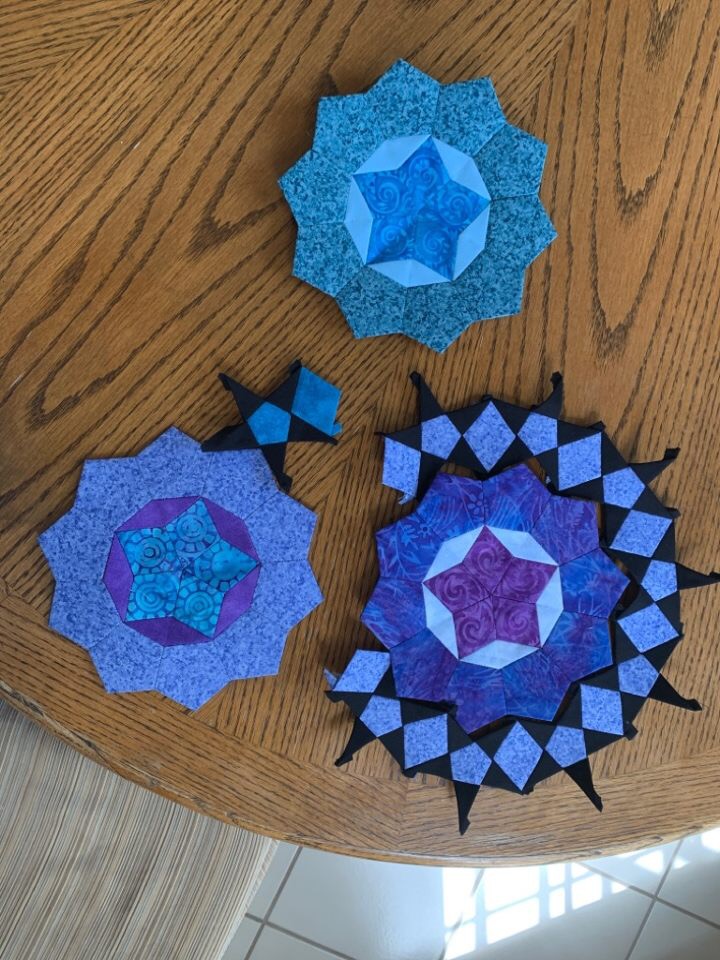
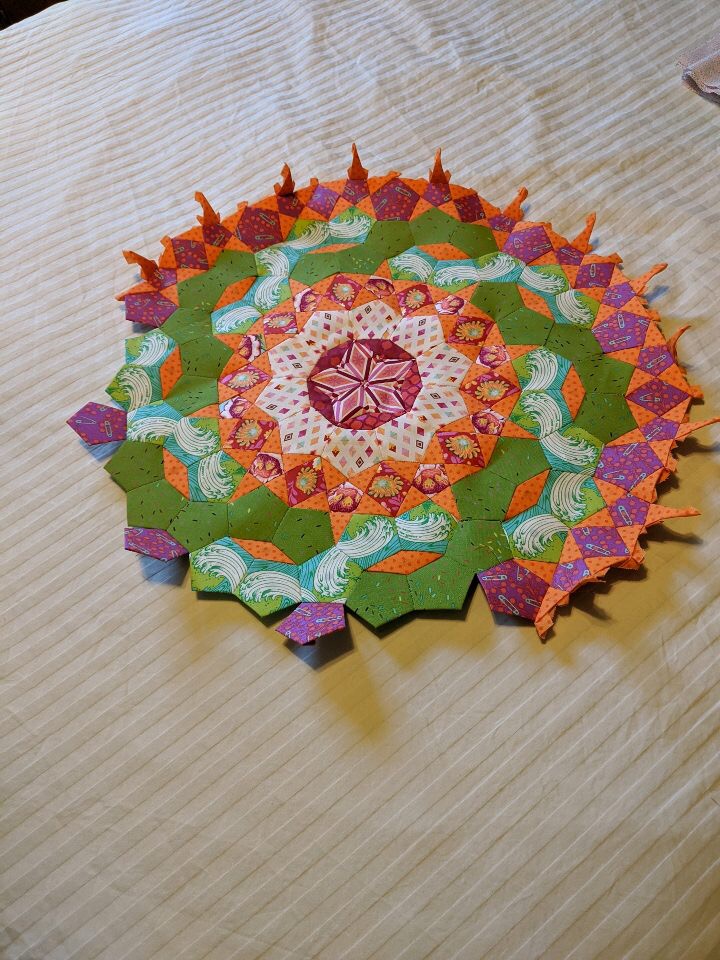
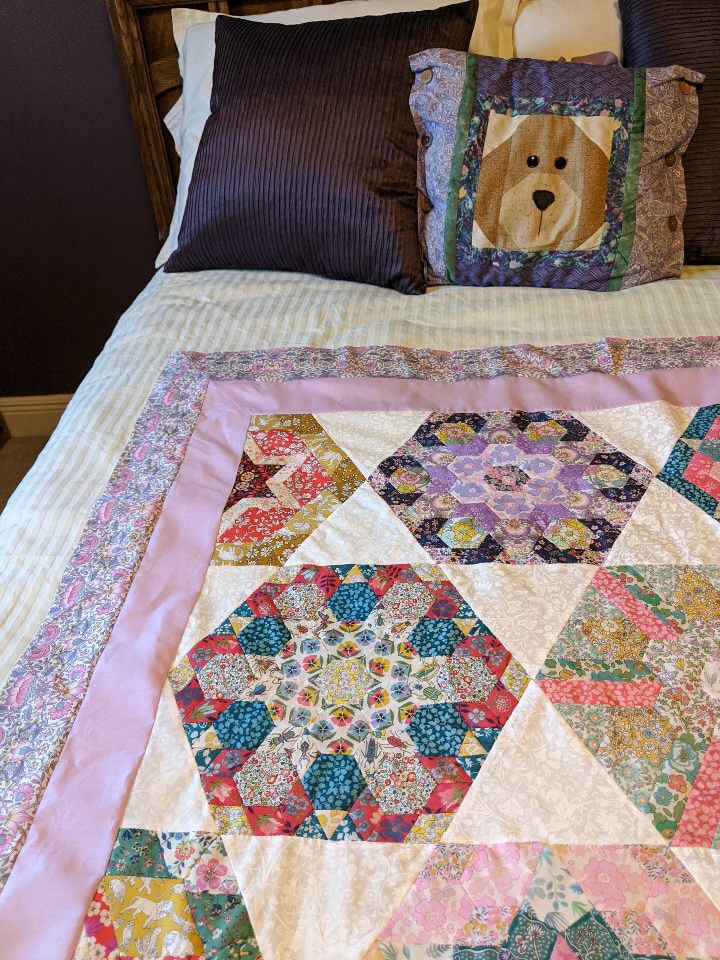
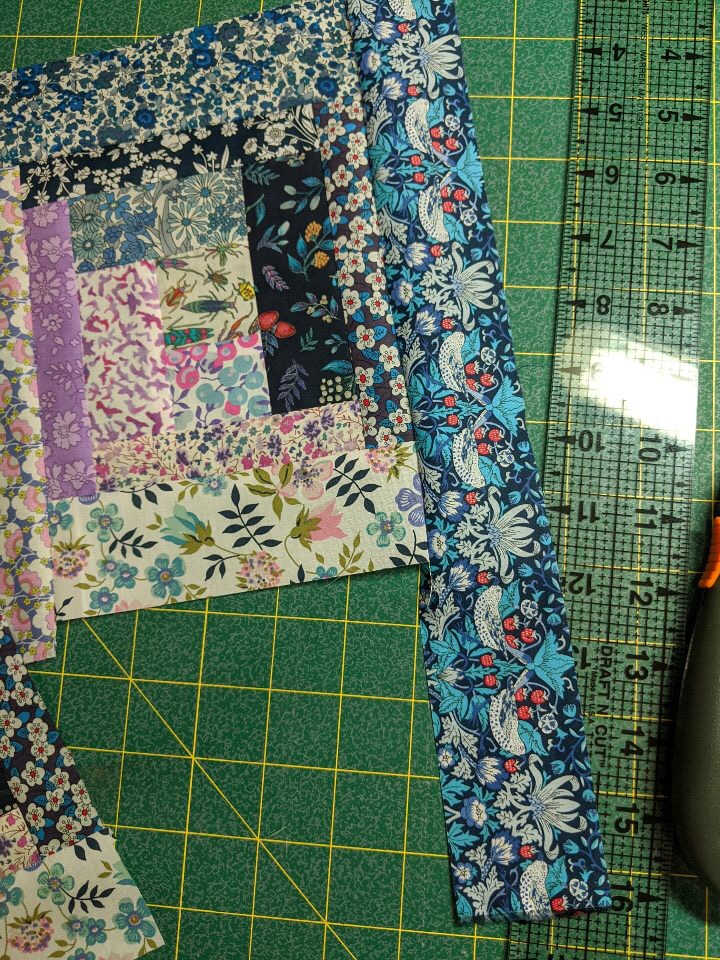
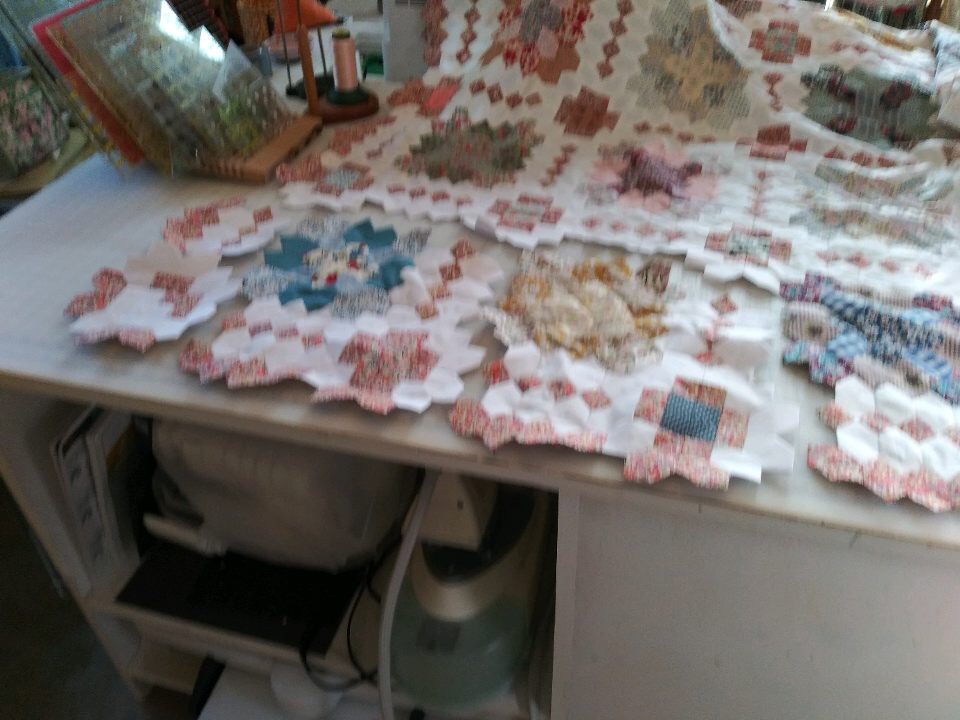
Barky Graziano completed this SAGA program project, which was taught by Margie Fiasconaro.Here is Jane Briscoe’s completed this SAGA program project, which was taught by Margie Fiasconaro.Cindy Gebbia made this cute CC “Nora” with a collar and full skirt from the Sew Along.Cindy Gebbia also made this cute set from CC “Nora” Peplum Top and CC “Parker’s Pants” with ruffle.The matching boy short from CC “Parker’s Pants” by Cindy Gebbia.Suzette Wink crocheted this “Sweetheart Blanket” by Patchwork Heart.Debbi Harris made this precious felt fox, “Charlotte Fox” from a kit by Cynthia Treen of Threadfollower on Etsy.Here is Charlotte Fox wearing cloak from a pattern by Cynthia Treen of Threadfollower on Etsy.Barky Graziano has been keeping busy with paper piecing. This is large rosette 2 of her Millifiori quilt project.Another large rosette minus two additional rows by Barky.Millefiori rosettes by Barky.Millifiori by Barky Graziano.Millifiori by Barky.Barky is putting the binding strips on her Pemberly quilt. Its so pretty!Barky Graziano is also working on this log cabin quilt by machine. Don’t know where she finds the time, and all this is only 6 weeks of work.Well, now I know how Barky gets so much done!Jeanne Buffatt has been diligently working her BOM of Liberty Fabric and is almost finished. A whole group of ladies are also participating in this project.
Hi Folks,
It’s been some time since posting, but have no fear, I am still here.
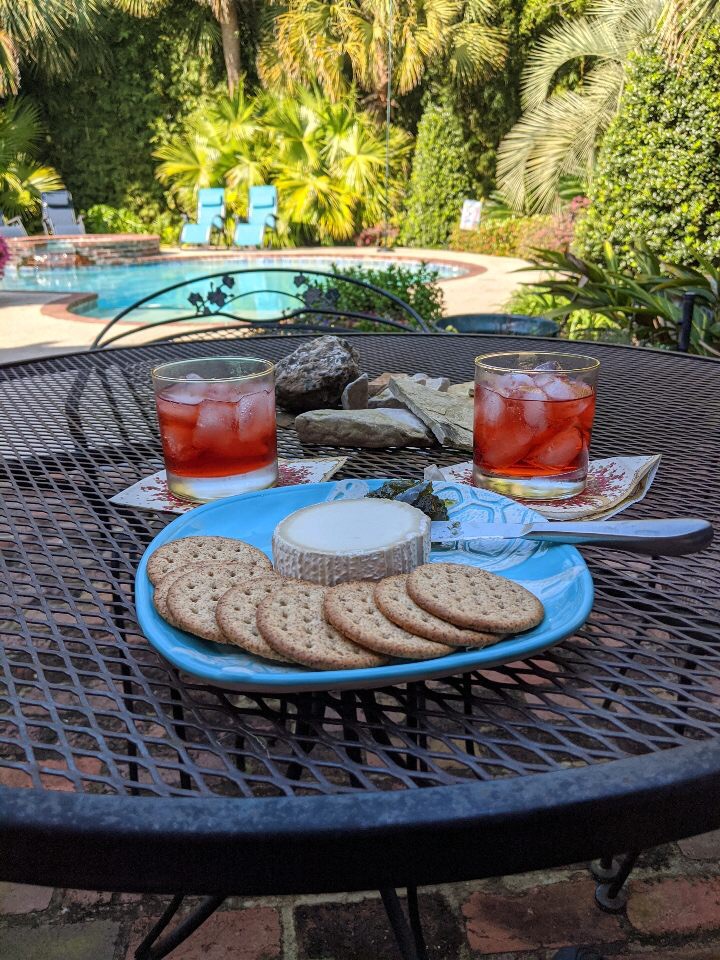
Many of you know that I host “Stitch Therapy Tuesday” every week at my studio where A group of sewing friends come to my studio for a few hours of stitching, conversation and of course, food. Yes, that’s right: we eat lunch together too.
Everyone brings her own projects to work on, which is quite interesting and informative, and we love seeing what each other is doing during the week. We bounce ideas off each other and sometimes we plan a project for a guinea pig class. We support each other in good times and not so good times, and provide “therapy” as needed. We are all members of the GNO SAGA chapter guild and have been friends for over 25 years.
Our group of about 20 participants, communicate via GroupMe app during the week while we sew. We are a driven group whose projects are quite varied. We each bring something different to the table. I would like to share with you just a few of the projects we have been working on since the quarantine. What talent!
Easter Sewing
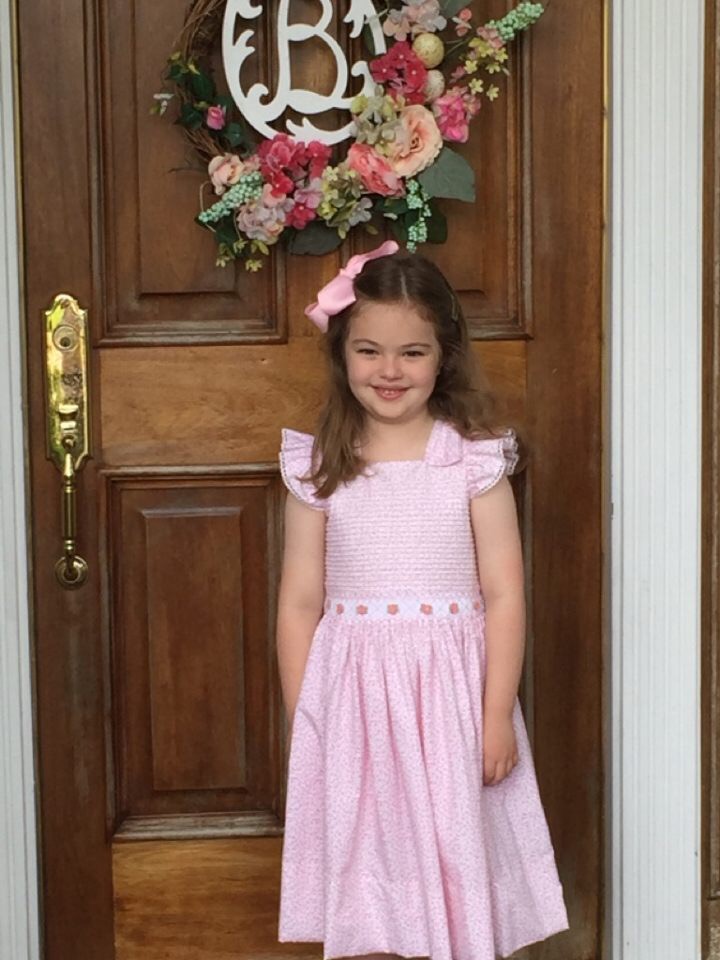
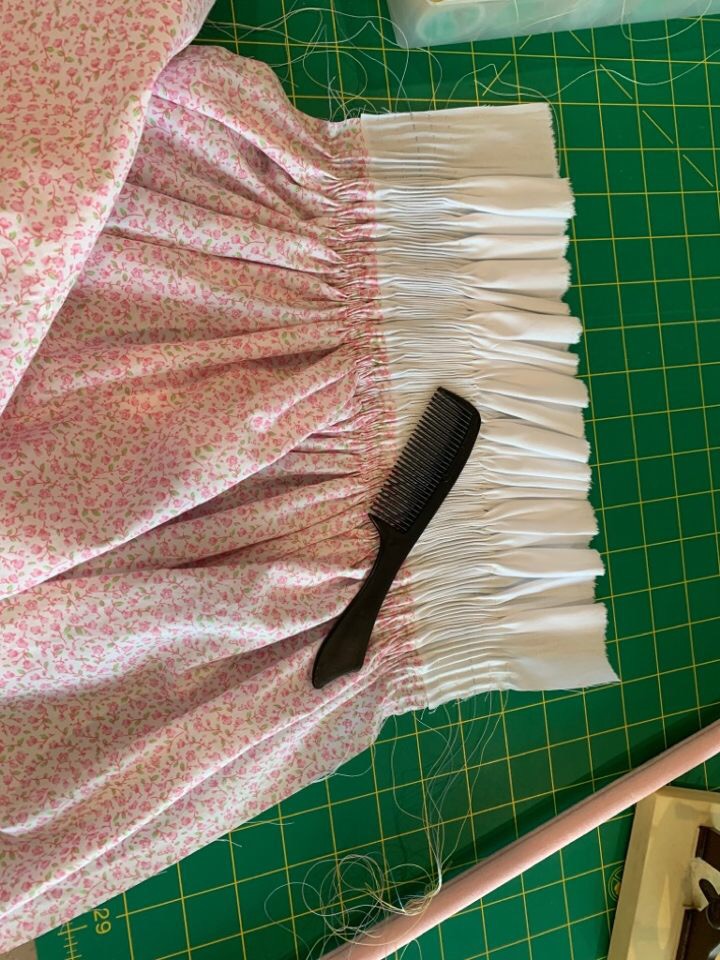
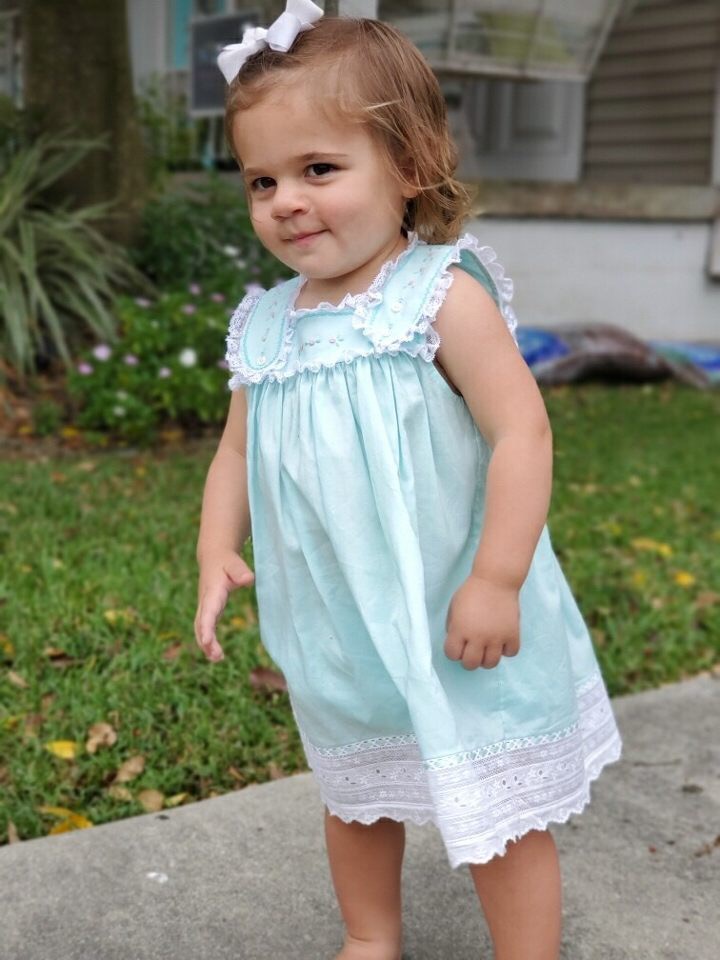
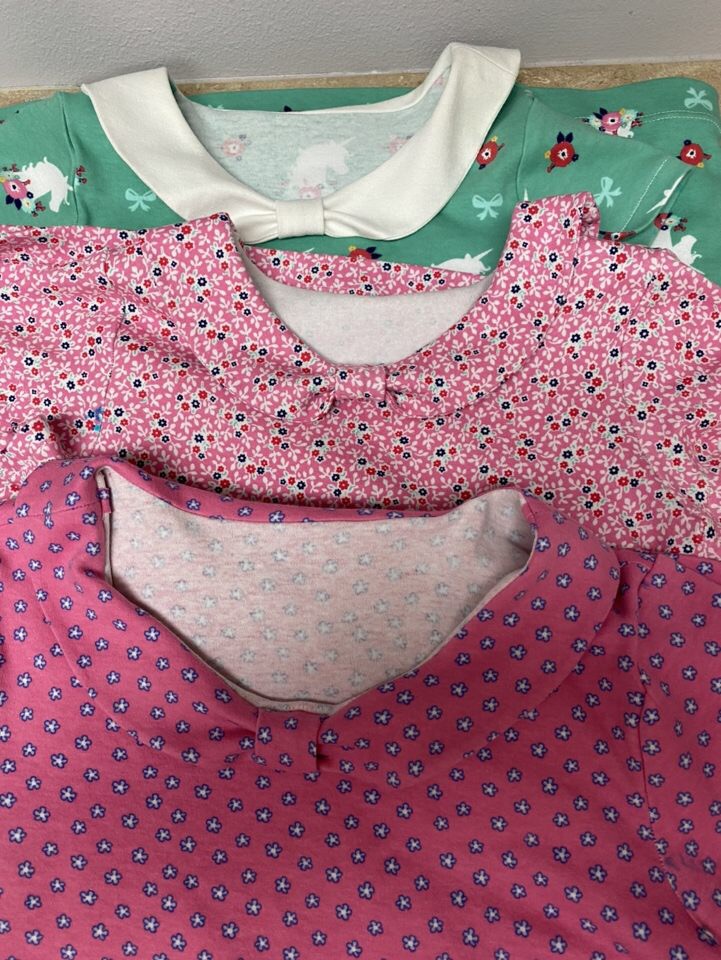
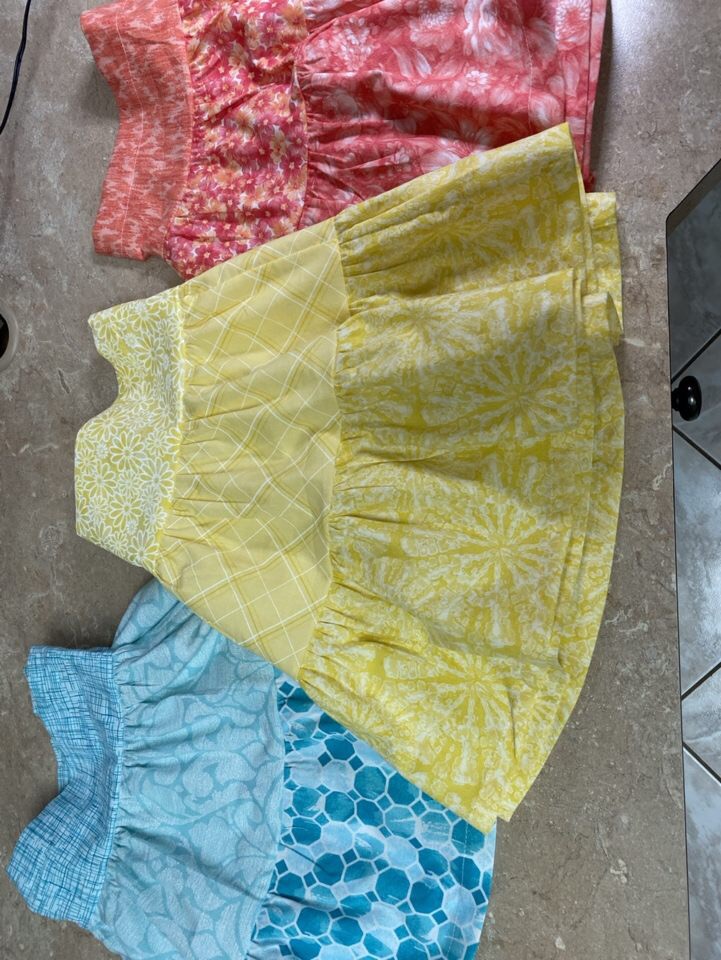
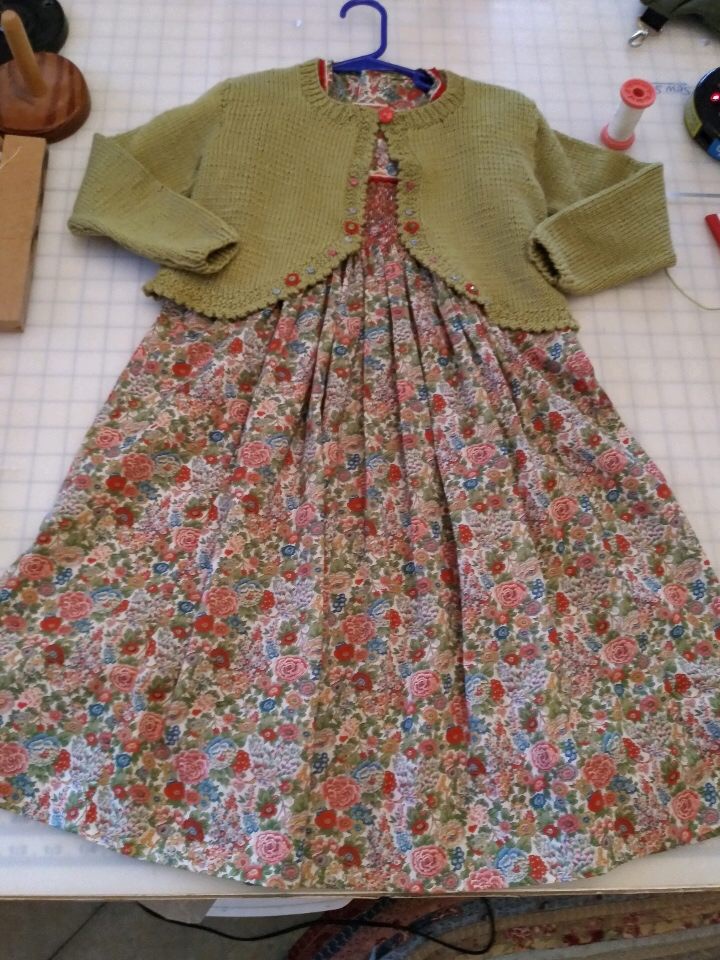
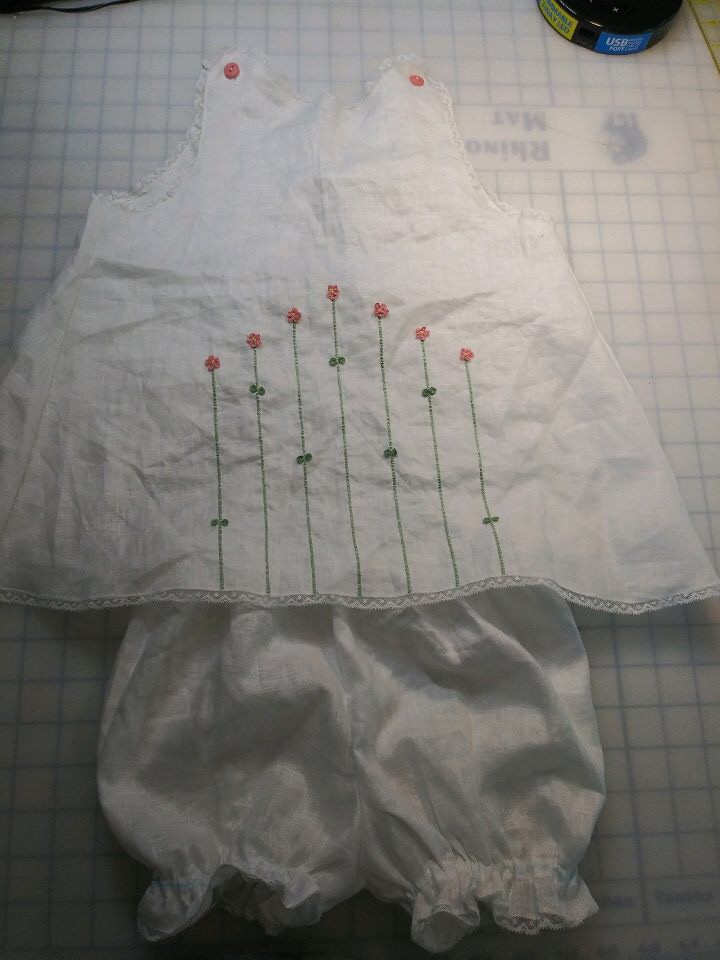
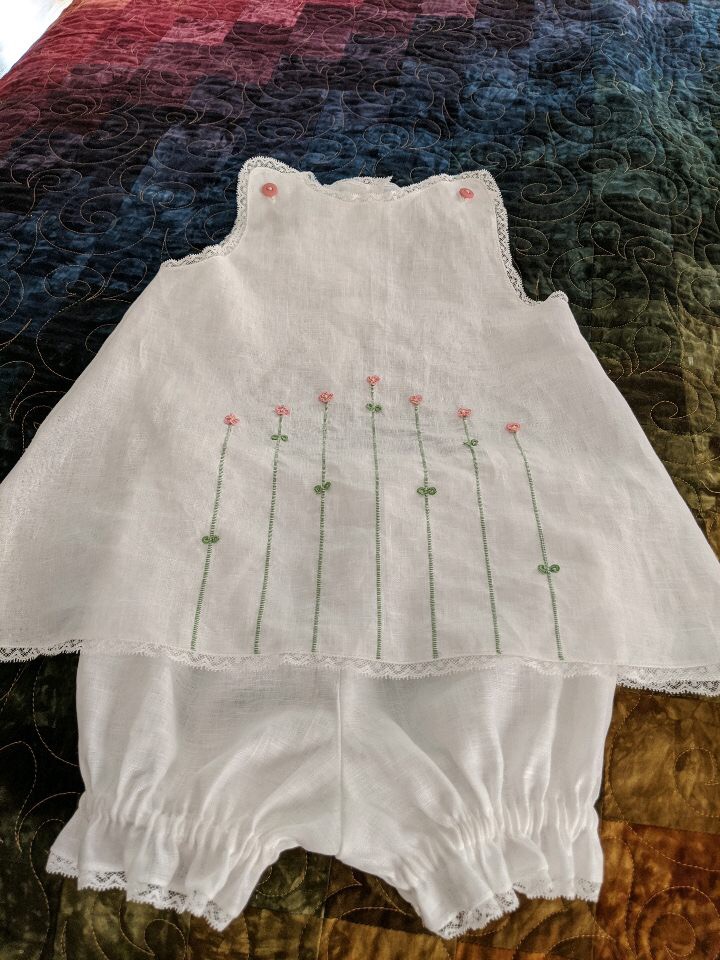
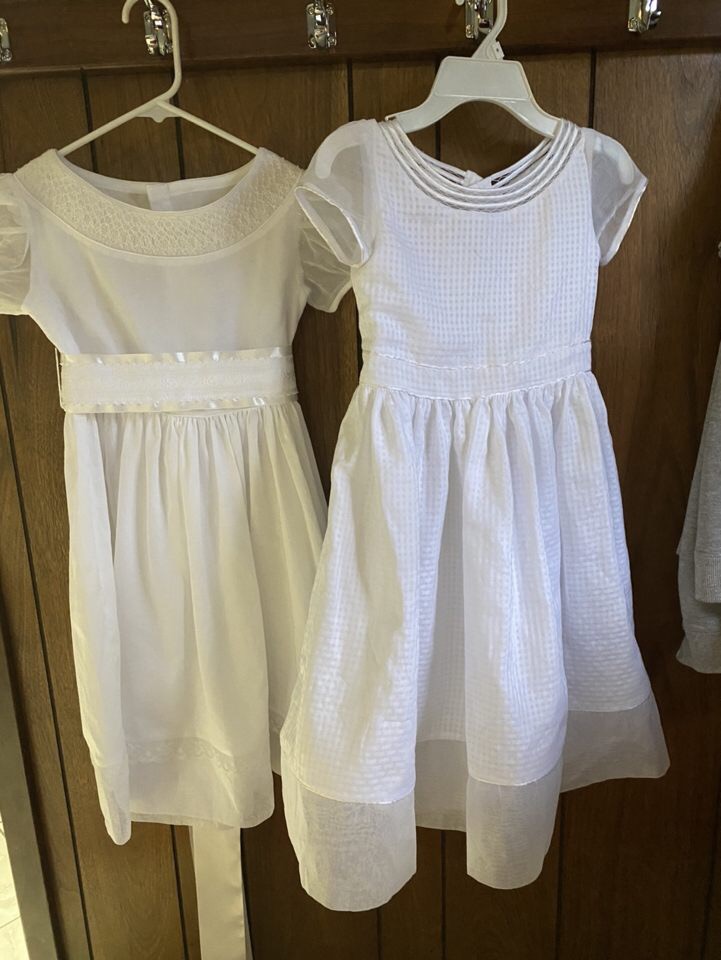
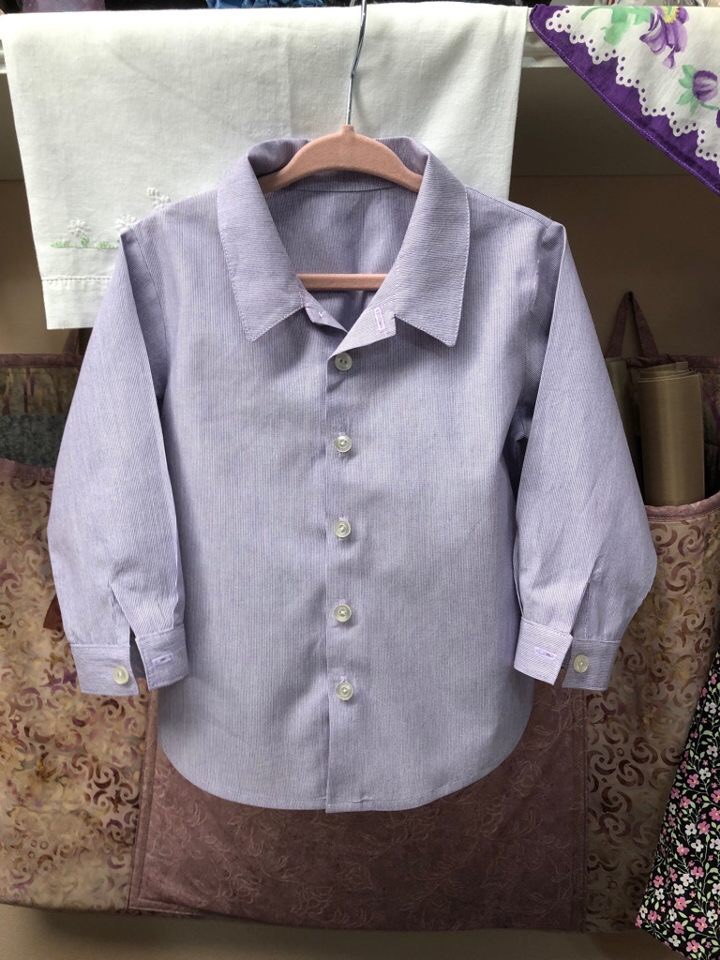
Jane Briscoe made this lovely smocked dress for her granddaughter, Caroline using the Children’s Corner “April” bodice and her rendition of a design developed by Ann Strickler. .Combing the endless pleats.Leslye Usner created this precious sun dress for Jane’s granddaughter, Josephine, using Old Fashioned Baby’s” French Acadian Sundress”.Another view of Caroline’s sweet dress by Jane Briscoe.Leslye Usner also made this beautiful smocked dress using CC “April” bodice and her rendition of a design developed by Ann Strickler.Cute knit dresses are CC “Nora” with an added collar, made by Diane Palmisano.Diane Palmisano made these twirly skirts for her granddaughters without using a pattern with strips of fabric in her stash. Each row was cut longer and wider than the previous row to create fullness.Jeanne Buffat completed this precious smocked dress and matching sweater designed by Gail Doane.Jeanne also made this precious blue neoprene dress from a pattern download.Jeanne Buffat completed the adorable project from Peggy Burley’s class, which we attended in Baton Rouge a few weeks ago.Here is Barky Graziano’s Peggy Burley class project! Very sweet design. A closeup of the project made by Barky Graziano, featuring thread replacement and cast-on flowers.This beautiful first Communion dress was lovingly made by Diane Palmisano for her granddaughter.These two holy communion dresses were made by Diane Palmisano using “Rose” pattern by Sue Stewart Designs. The fagotted insert was adapted to the pattern and worked by hand. Beautiful!Cindy Gebbia made this adorable boy’s shirt for her grandson, who is a twin.Cindy Gebbia made this precious shift dress for her granddaughter, who is a twin.
Keep in mind that this is only the photos they have shared with me, and does not include every project they are working on.
Stay tuned for Part B in a separate post.
Hi Folks,
It’s been way too long since I last posted on my blog. Truthfully, I just haven’t felt up to sharing with you, mostly due to my father’s illness and death. Okay, that’s been 4 years ago, but I swear, it takes a long time to get over some things, and this one threw me for a loop! I can honestly say that this past year has been the happiest and most wonderful ever. Of course there were some setbacks but at least I’m not in that deep hole as I was before. Enough of that! Here’s the great news: I’m Back!
I was so fortunate to be able to teach for SAGA this past September. With shaky feet and a slow start, I managed to have good results and I had a wonderful experience. Seeing everyone again (after 8 years) was terrific! I’m so thankful for being asked and even happier to have done it.
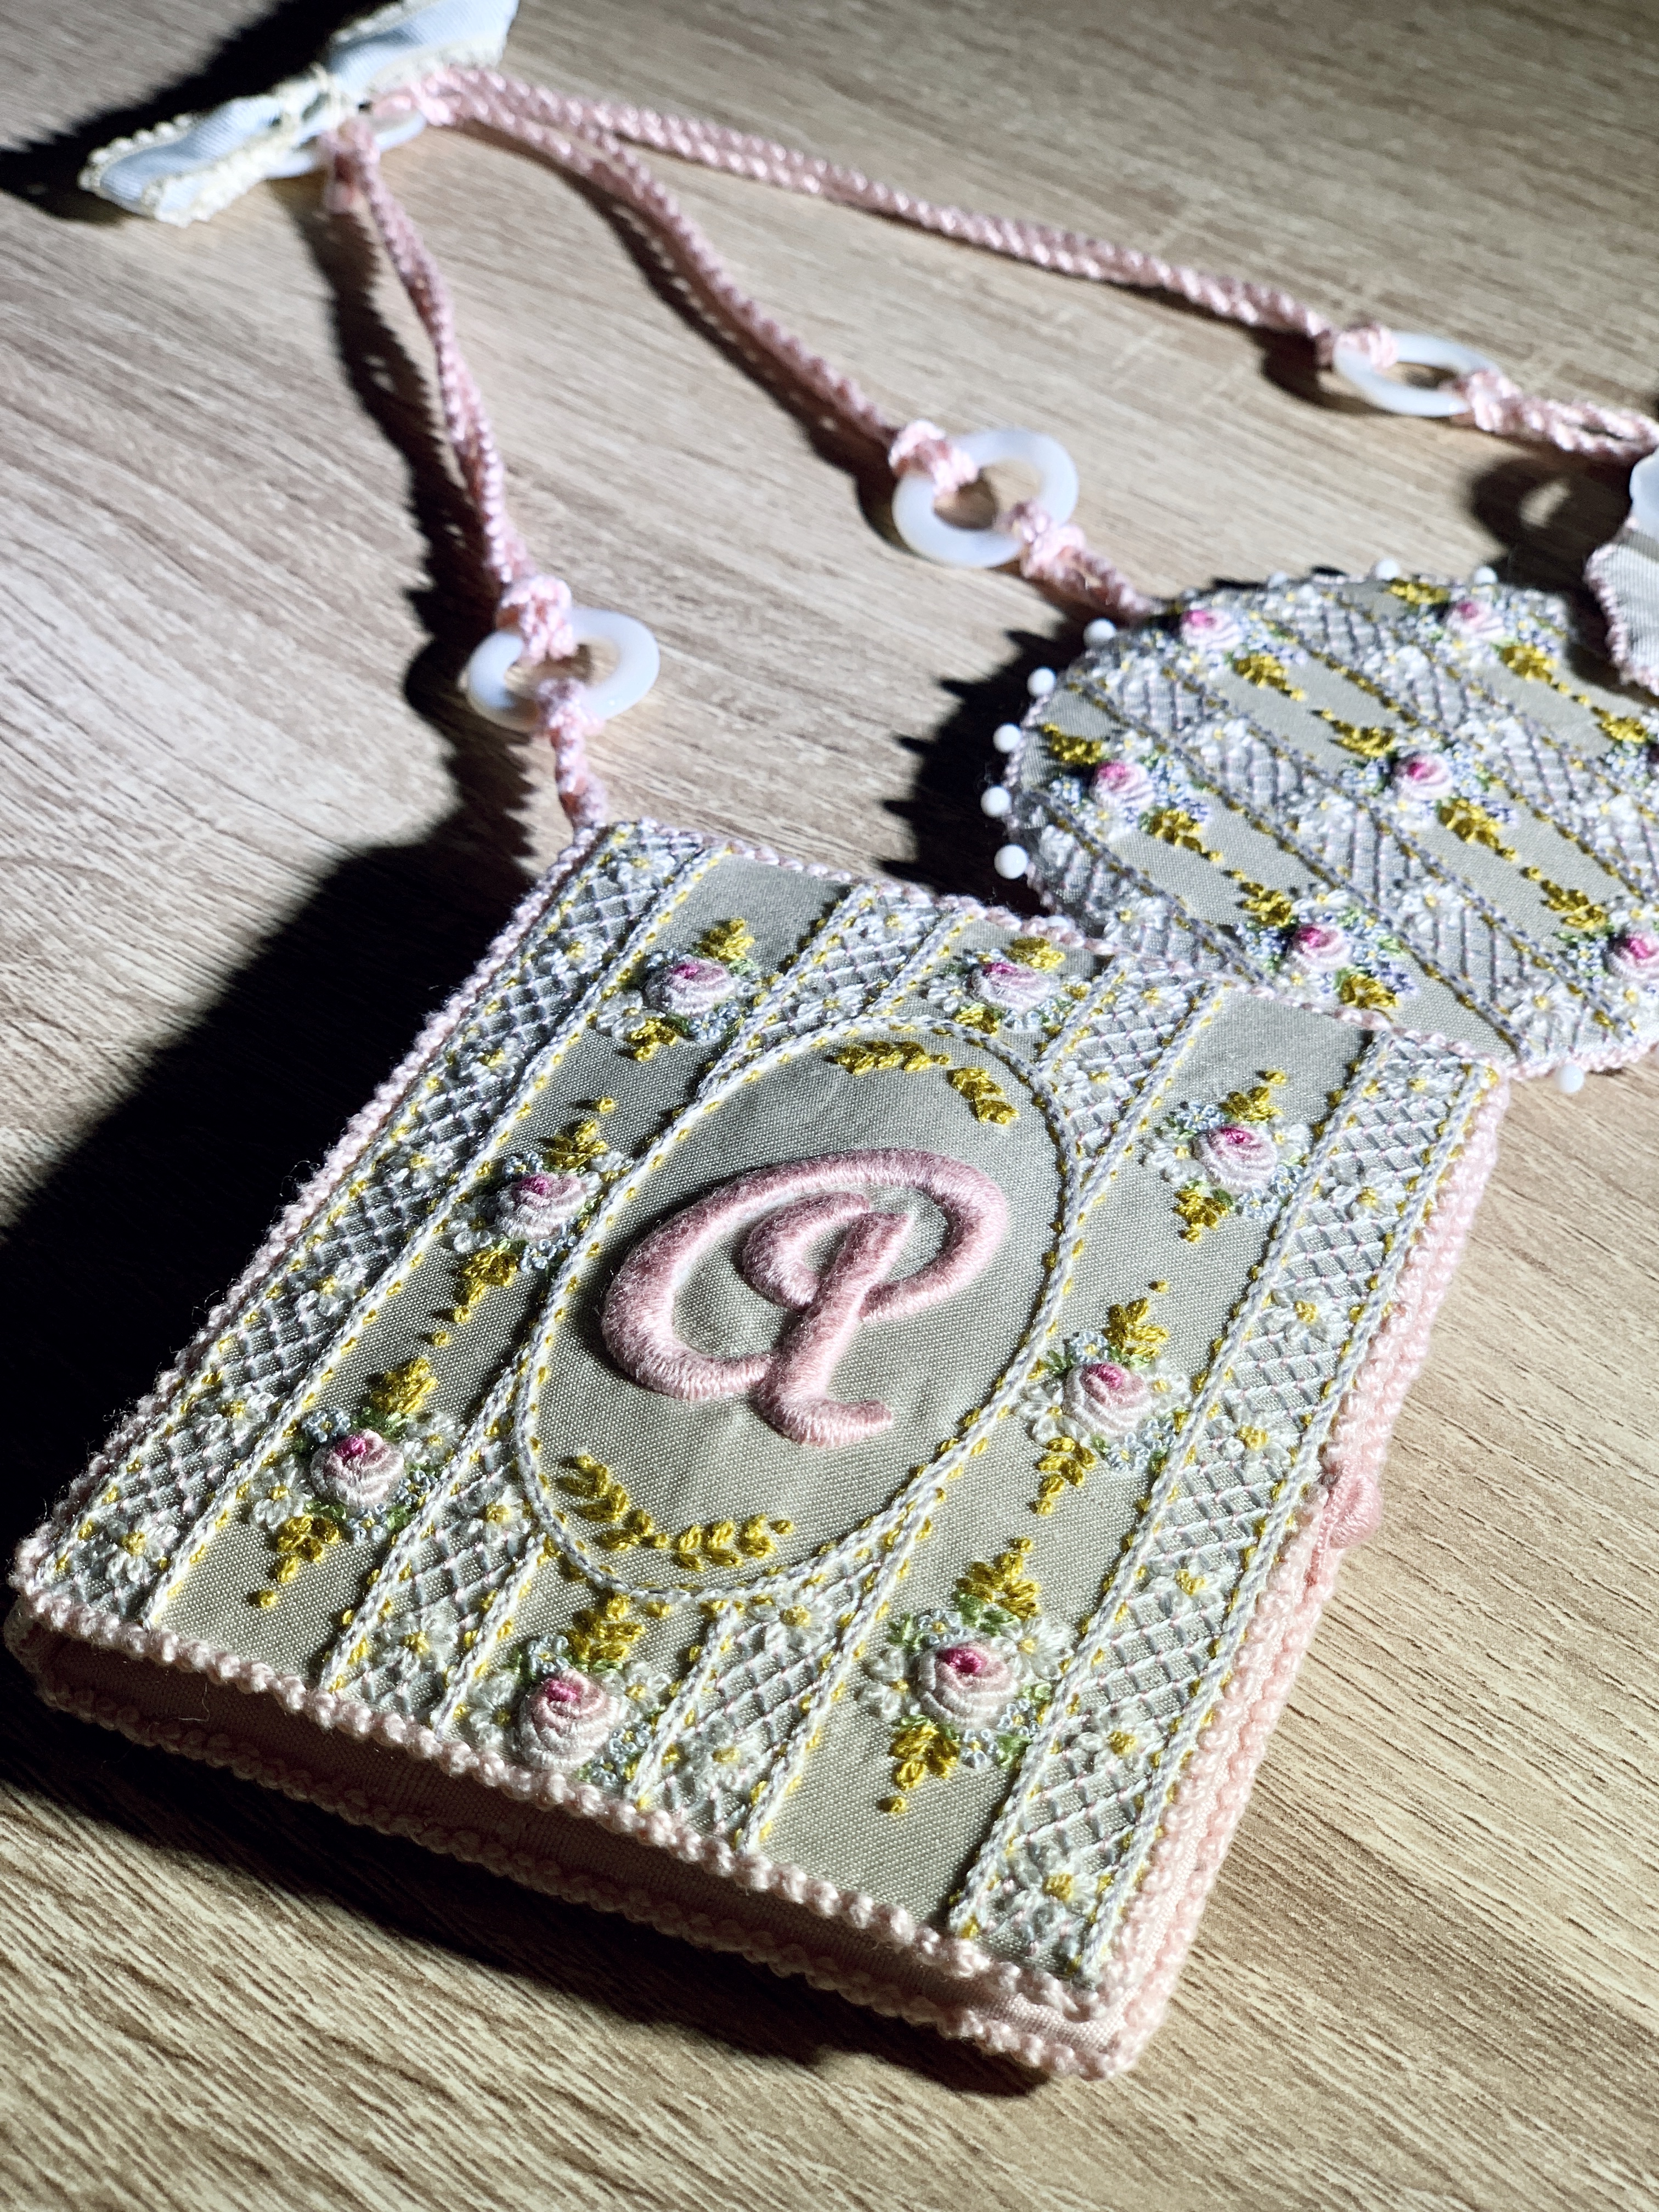
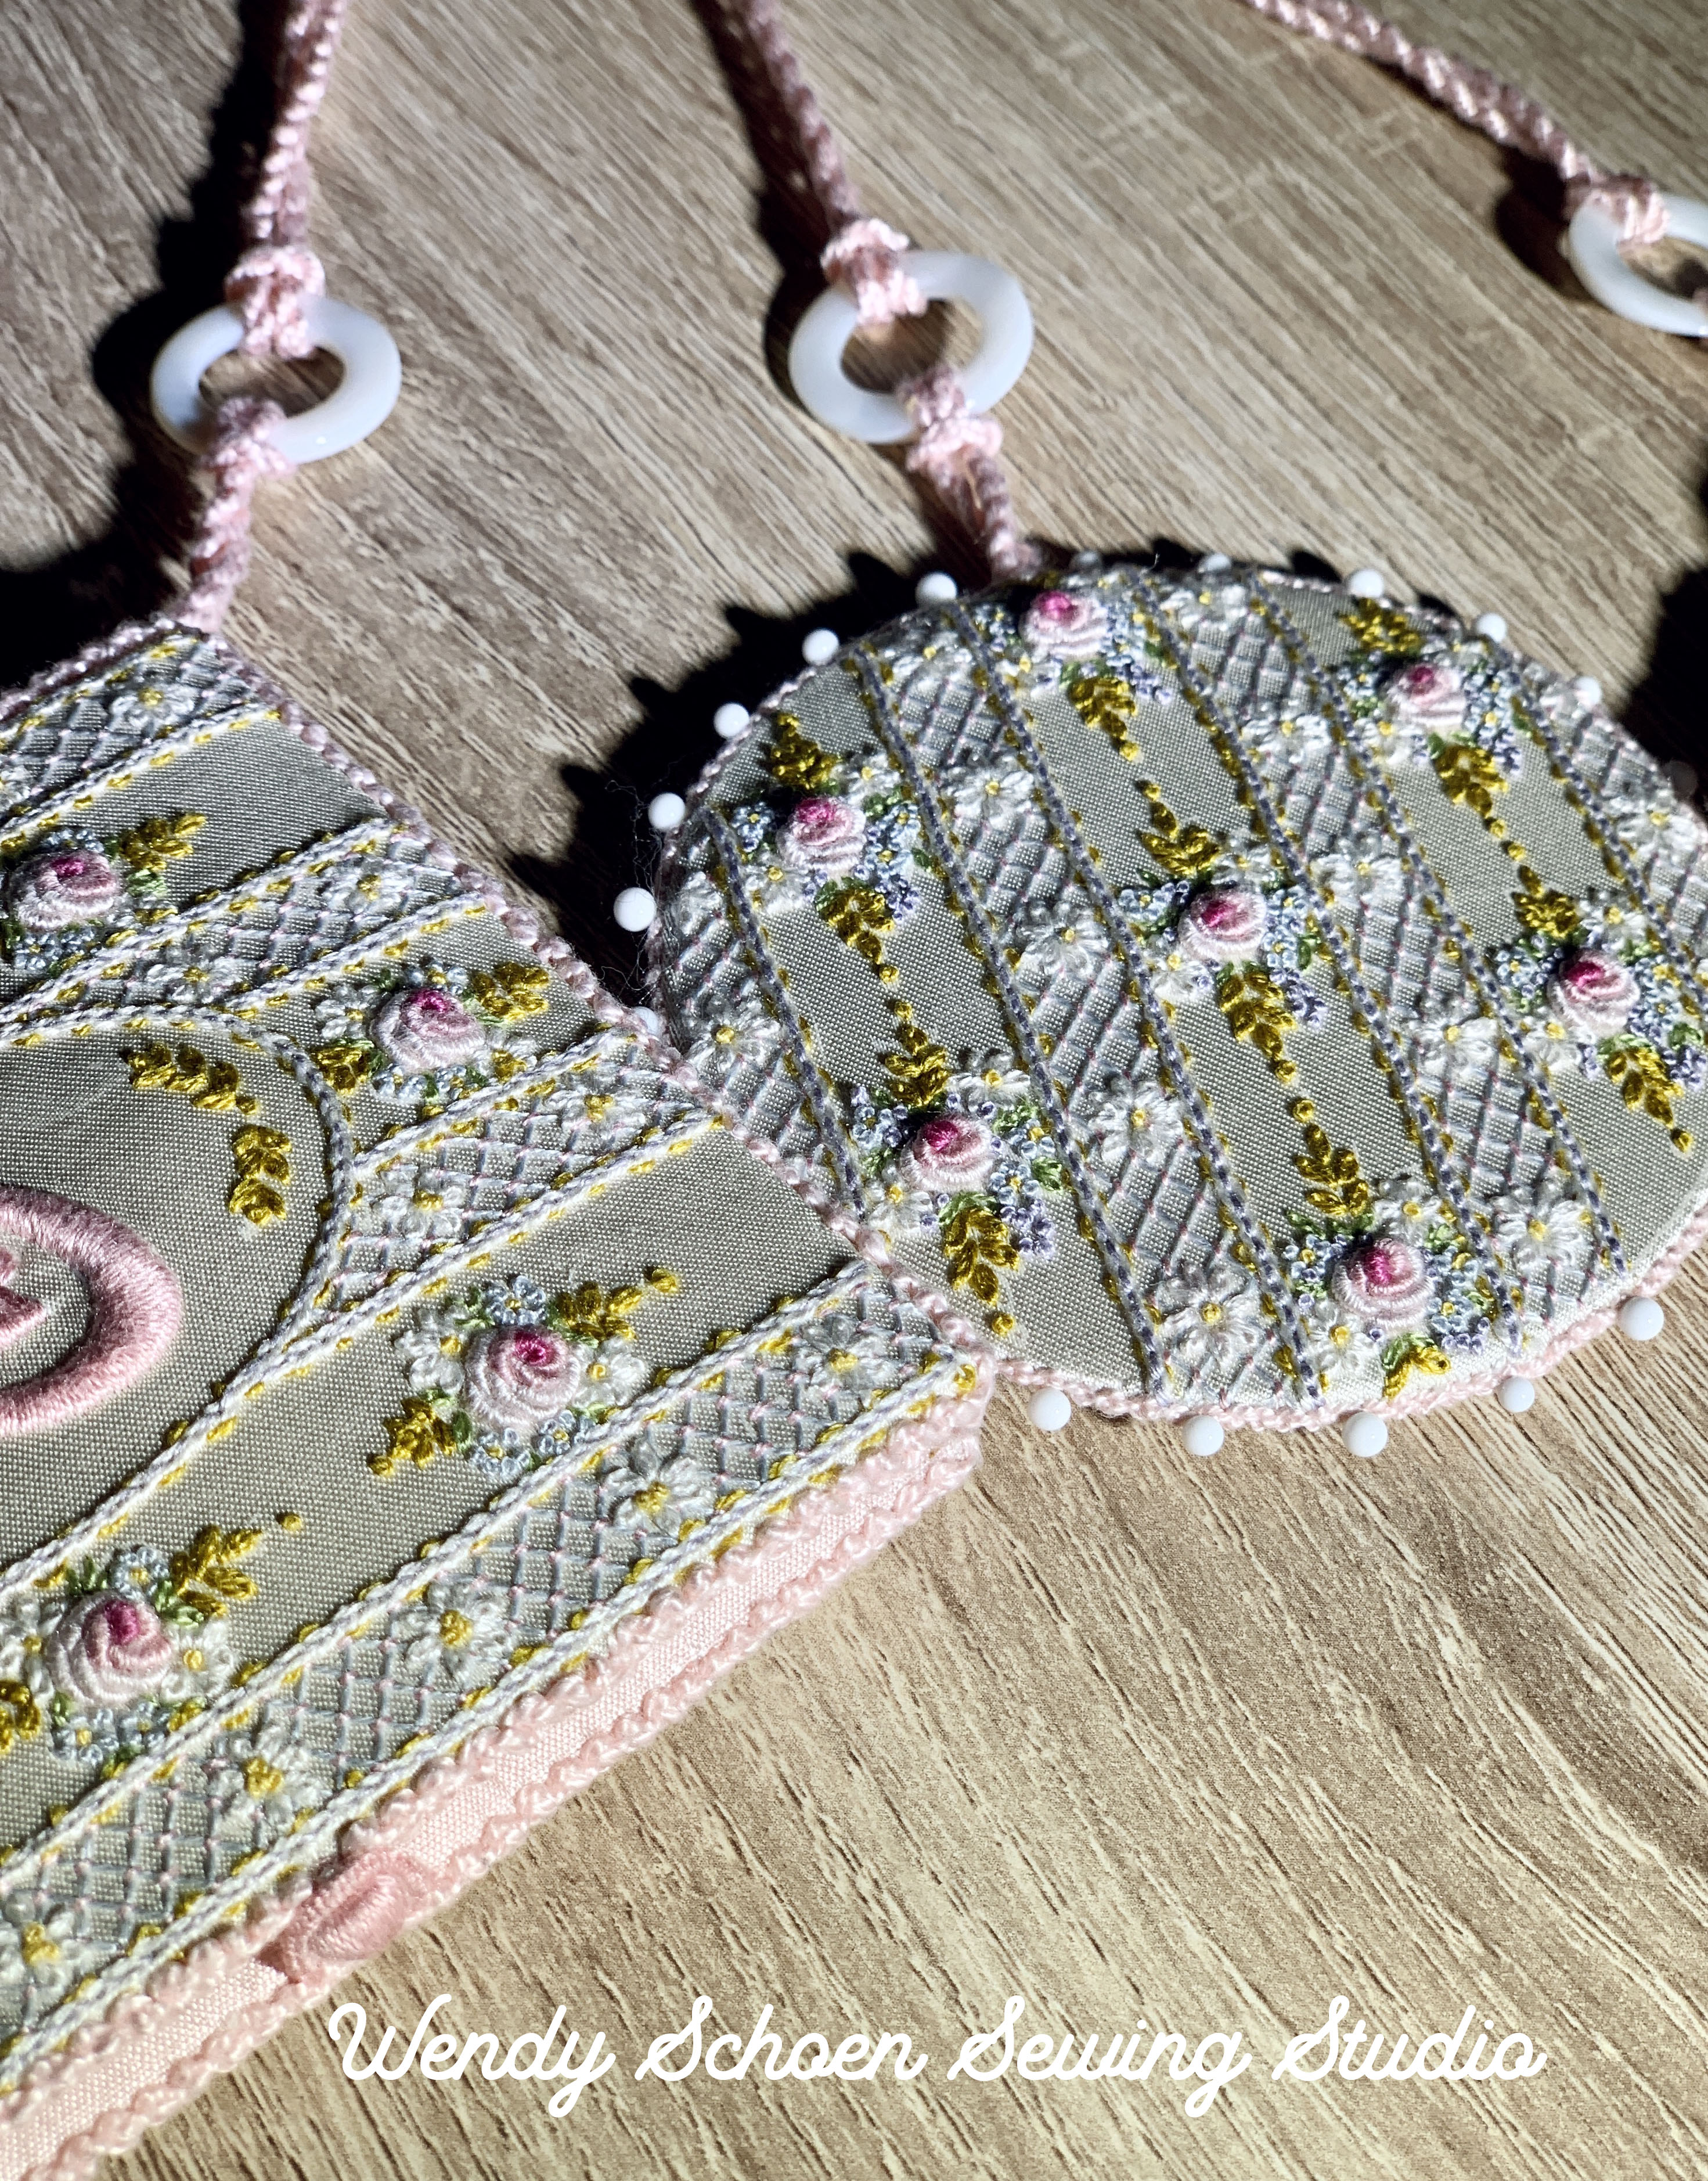
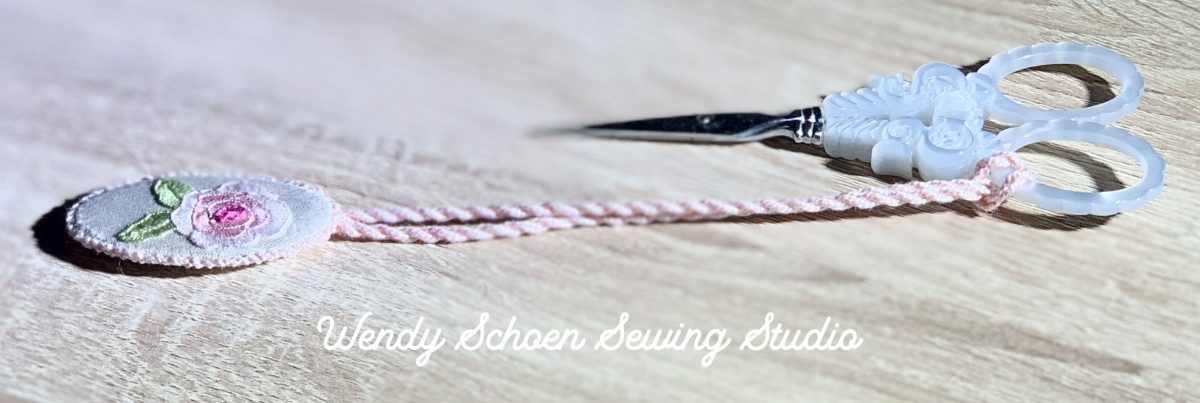
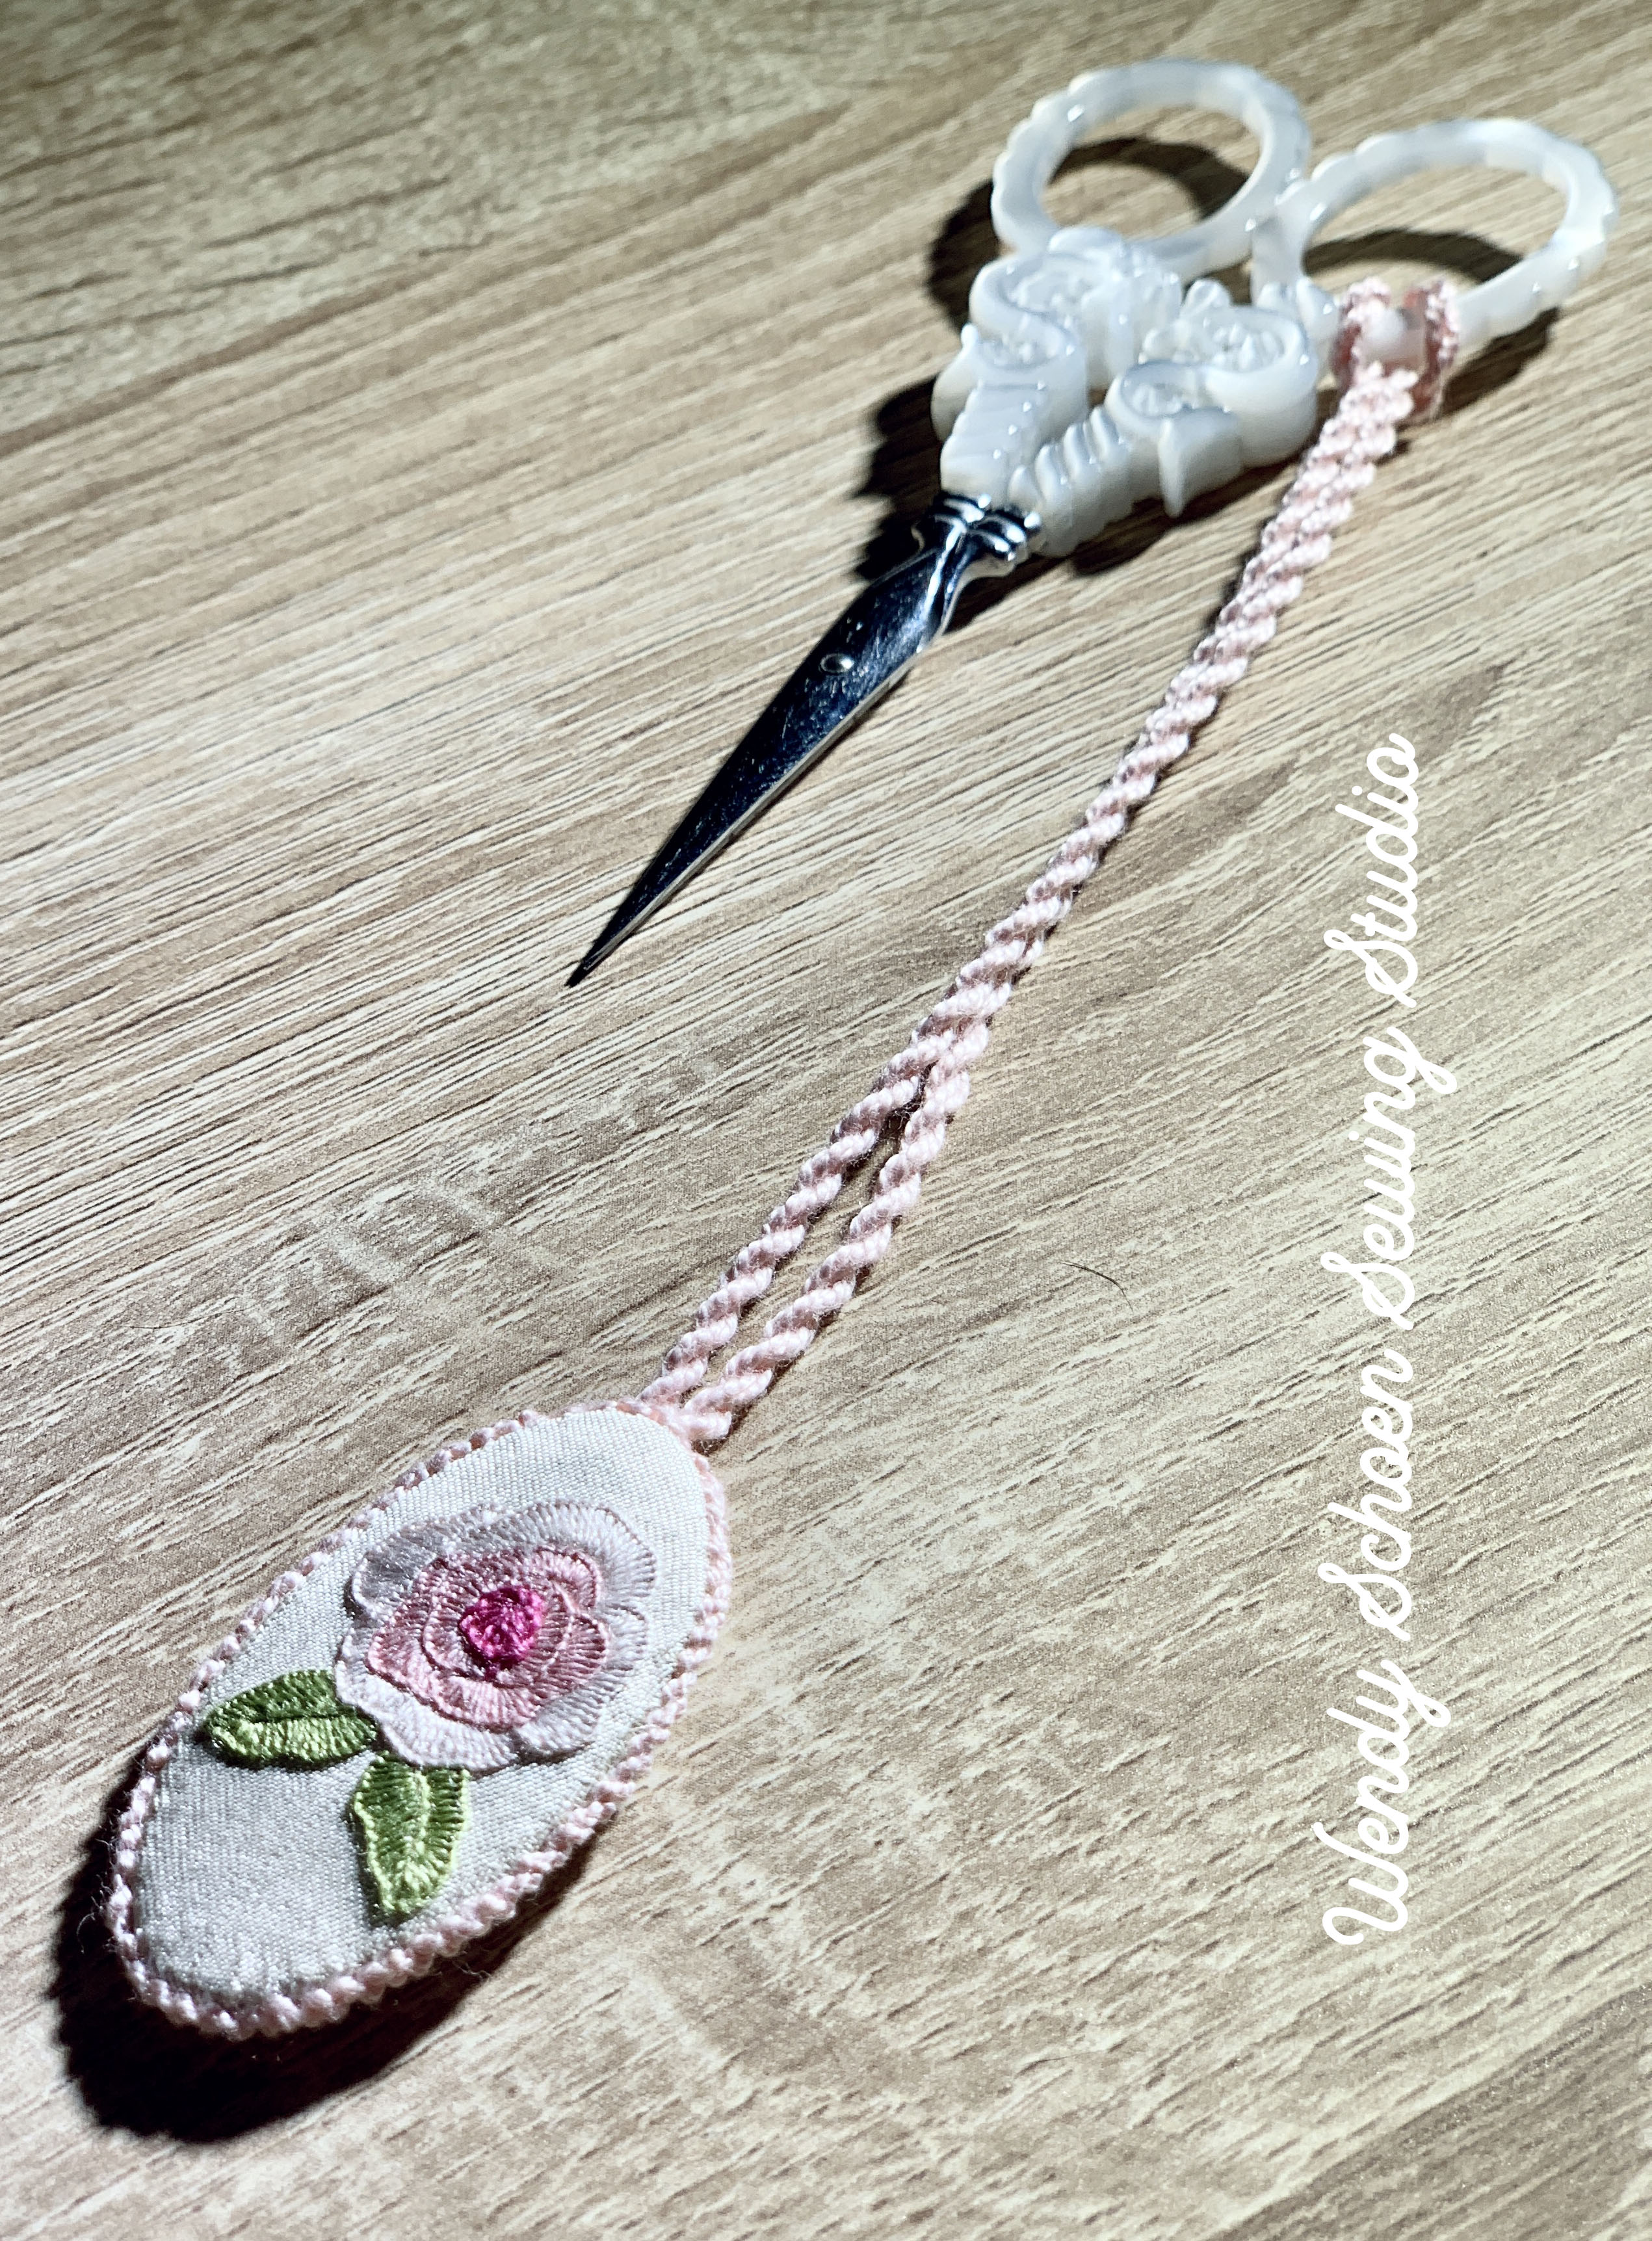
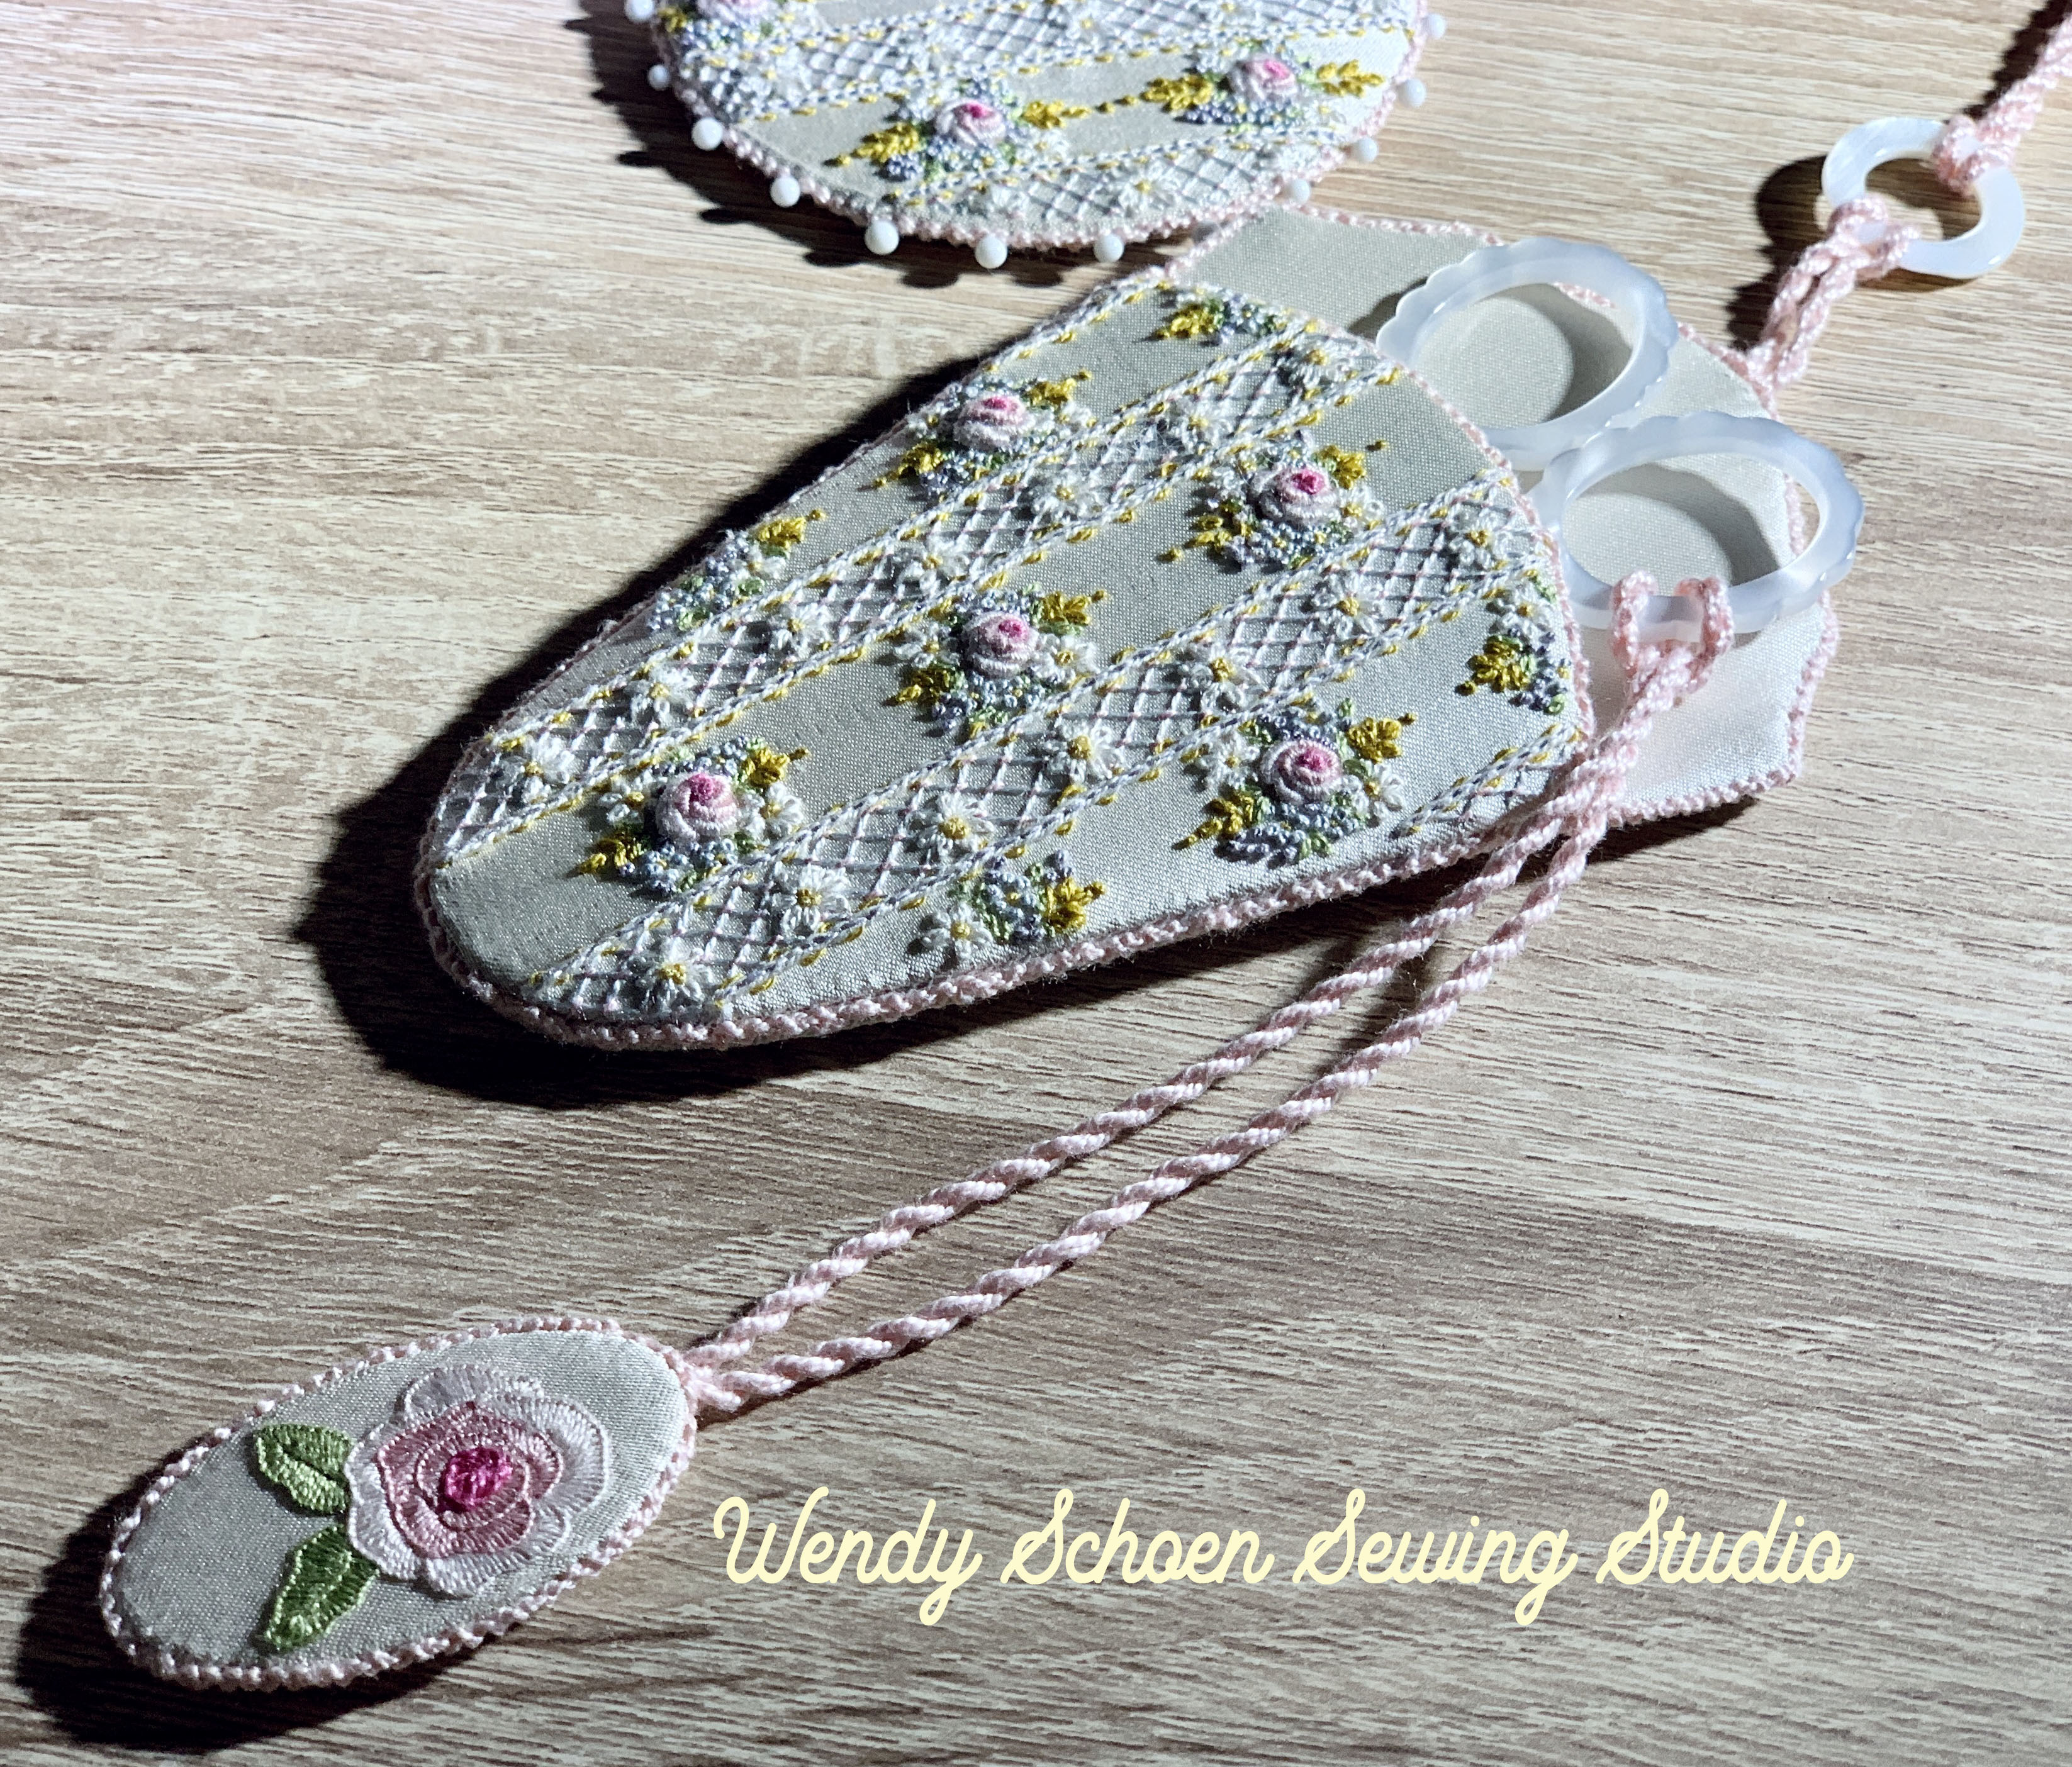
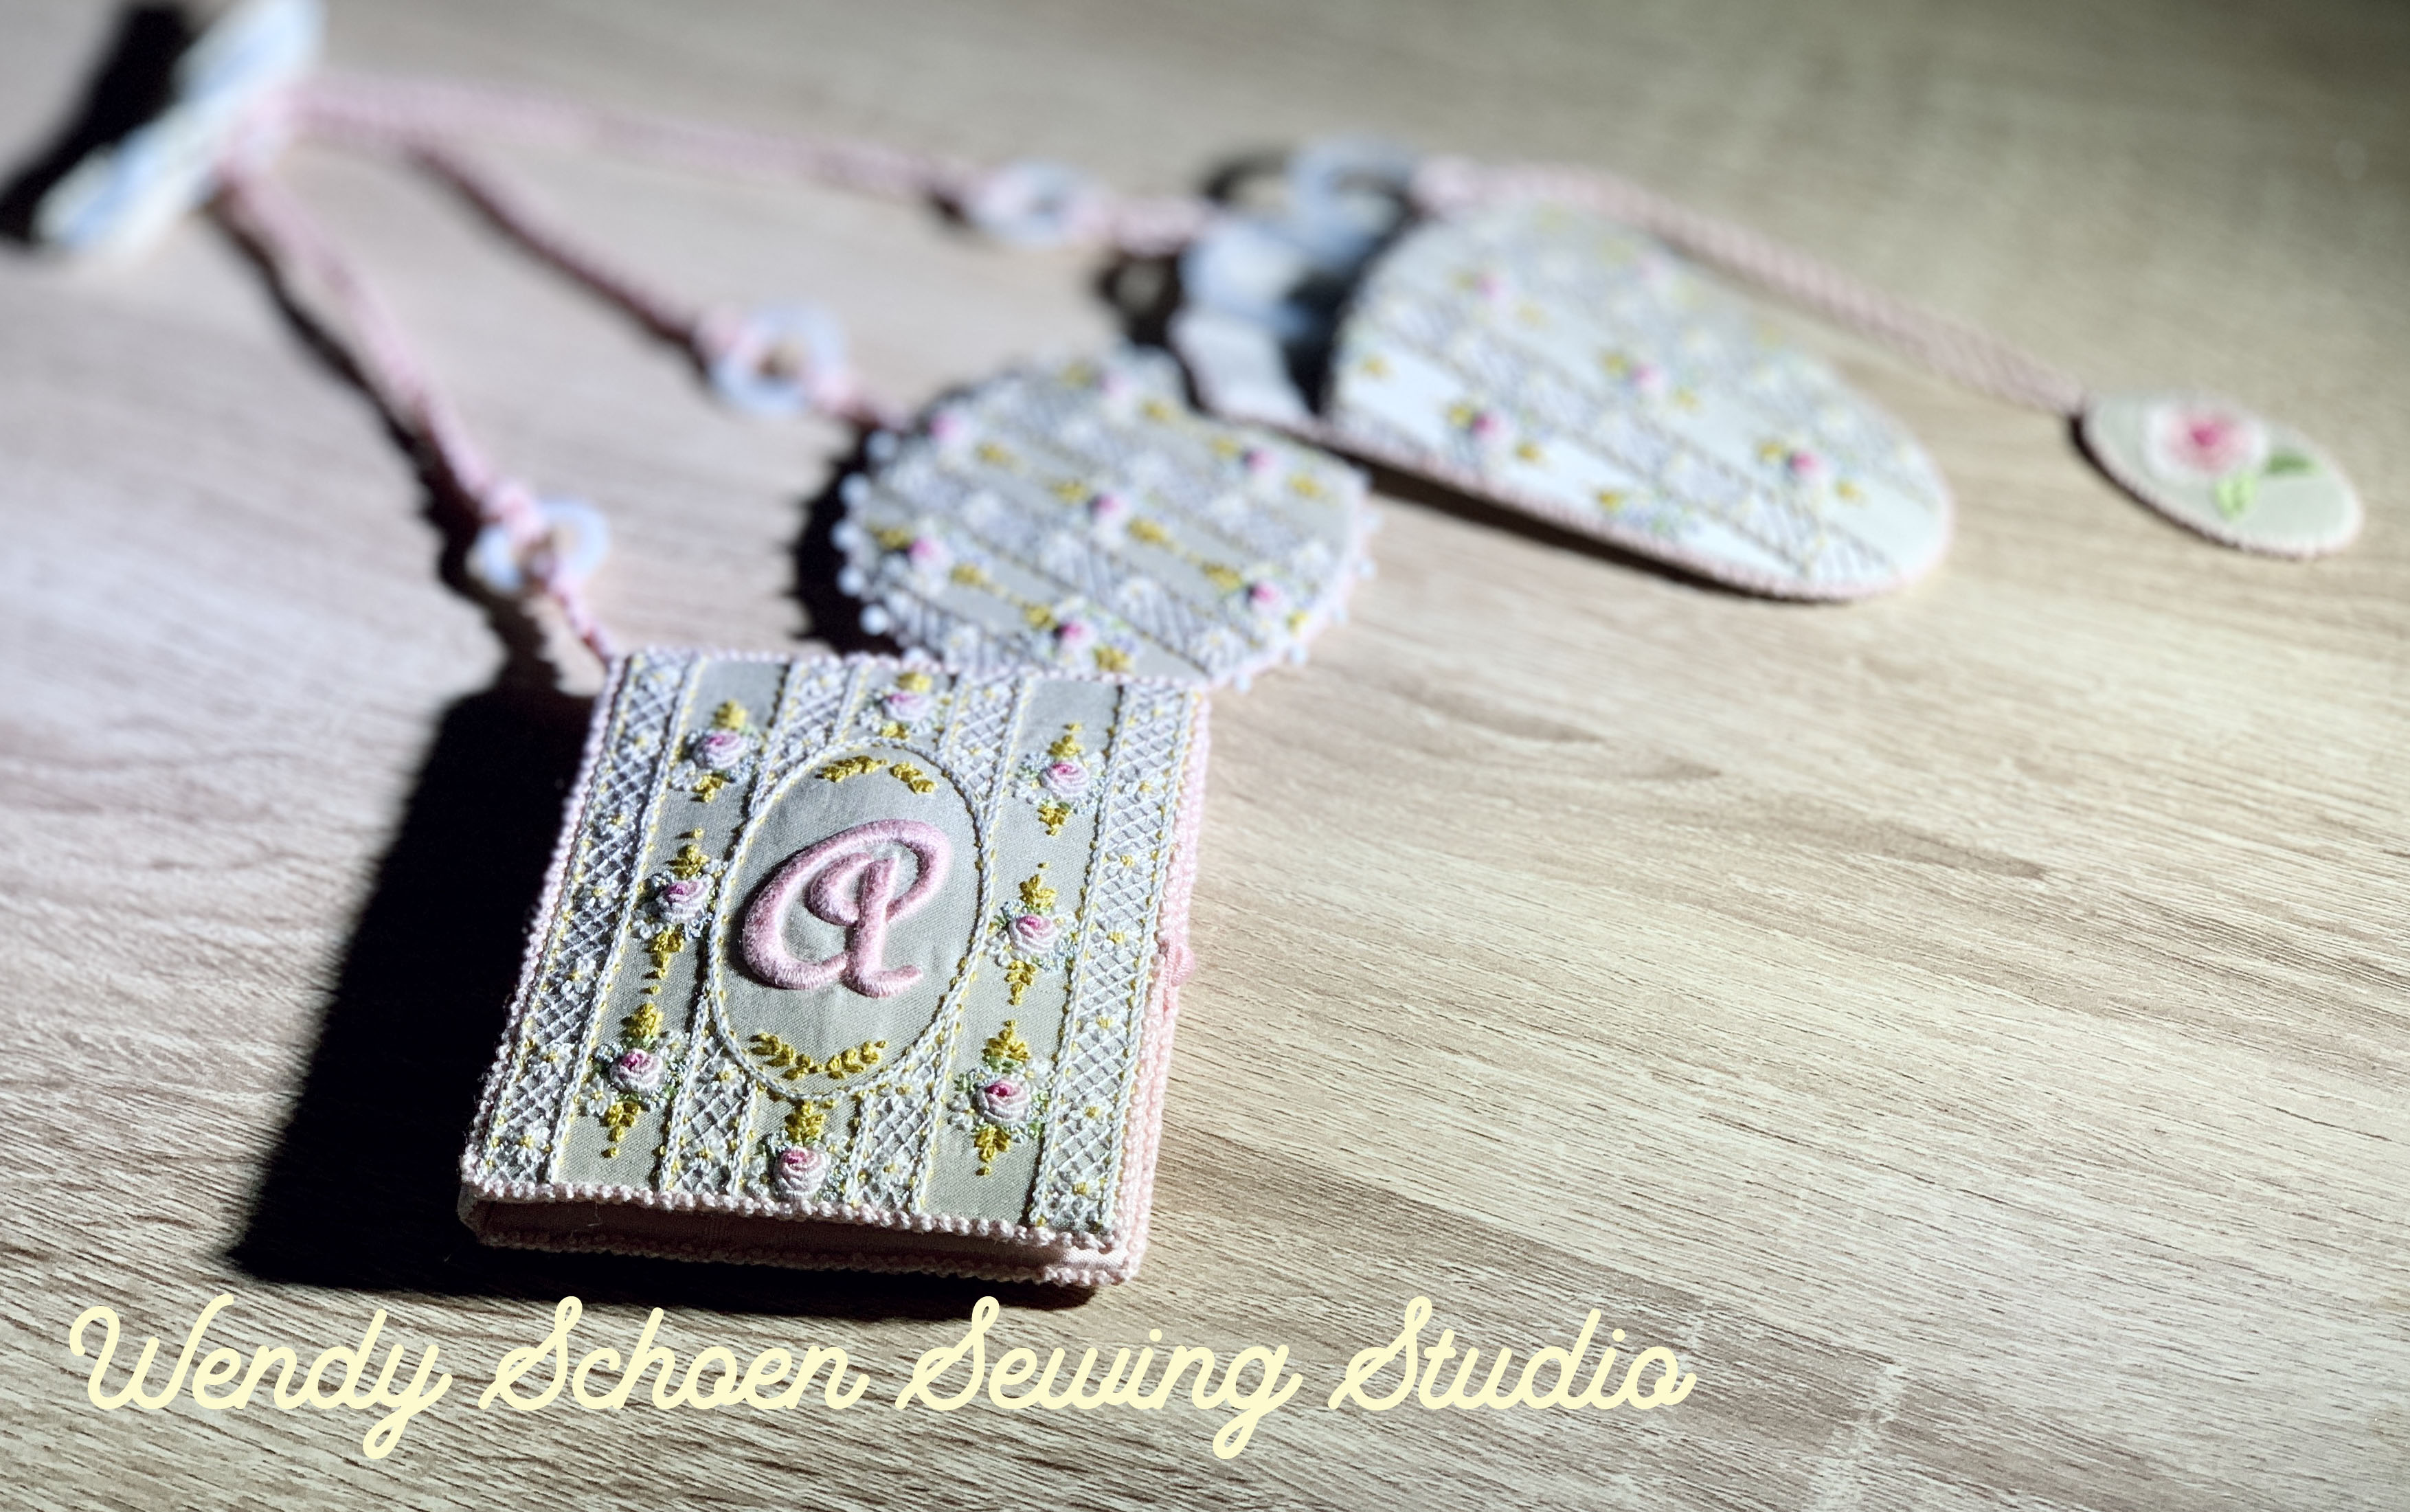
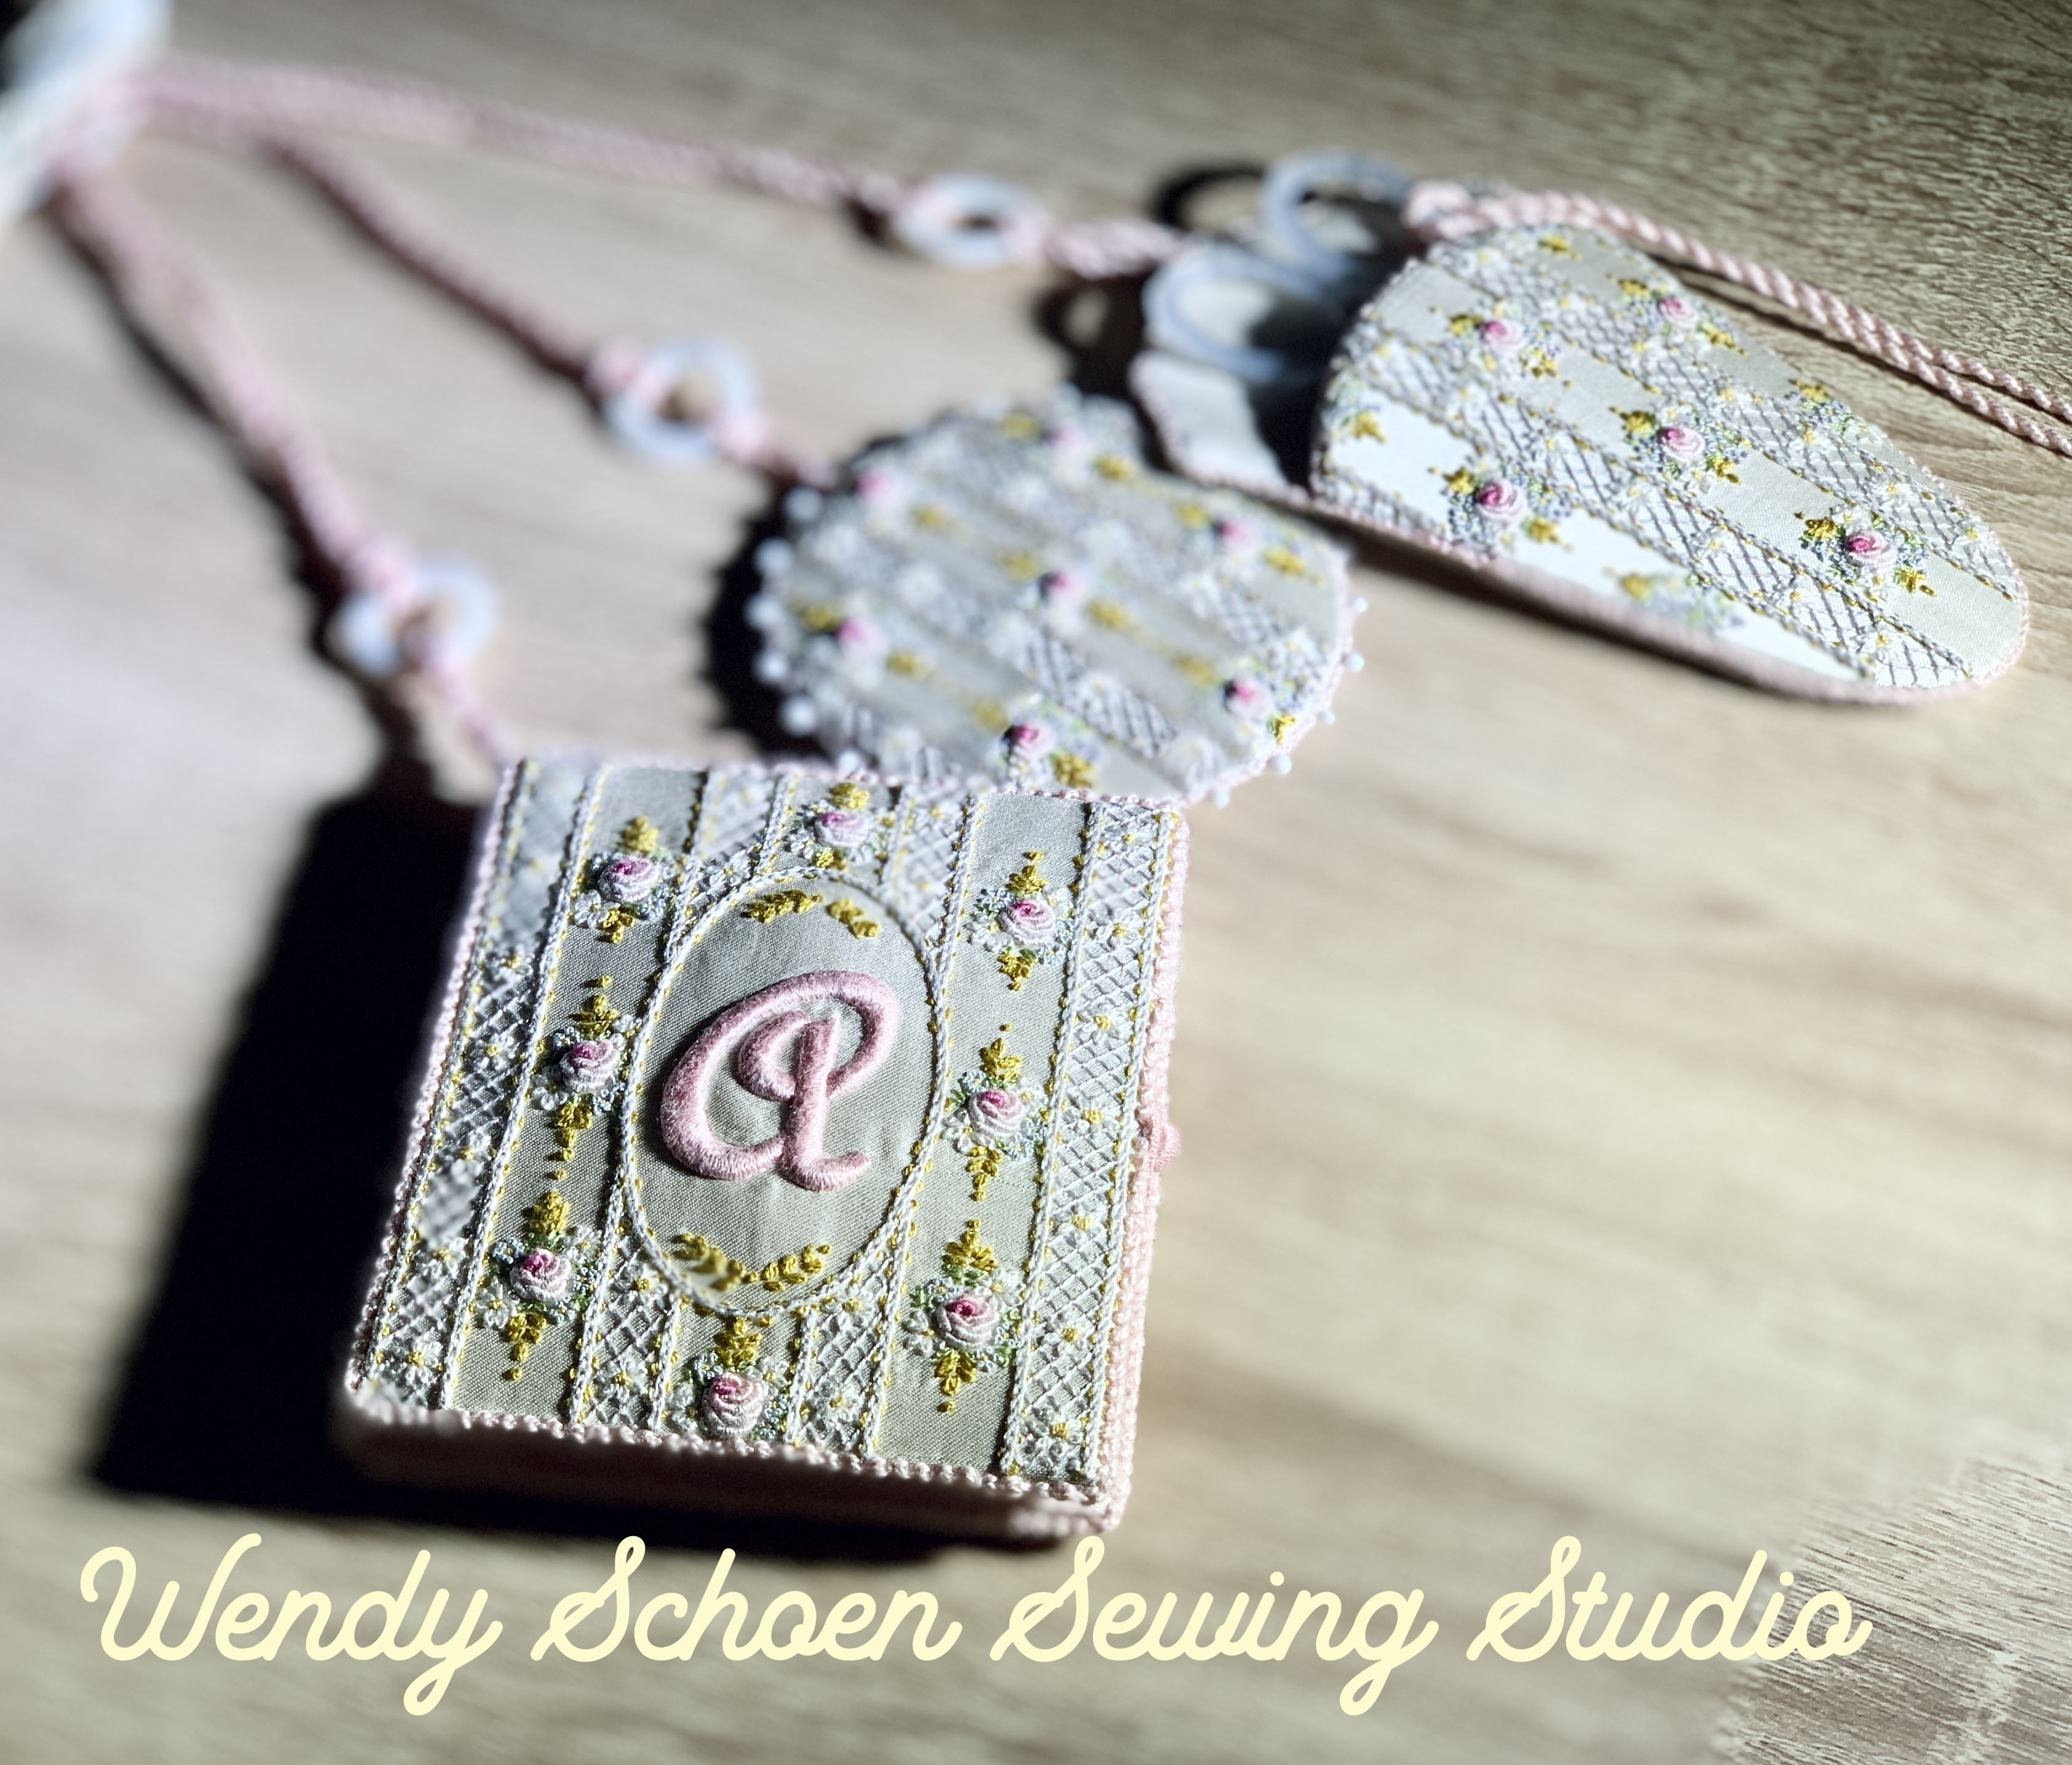
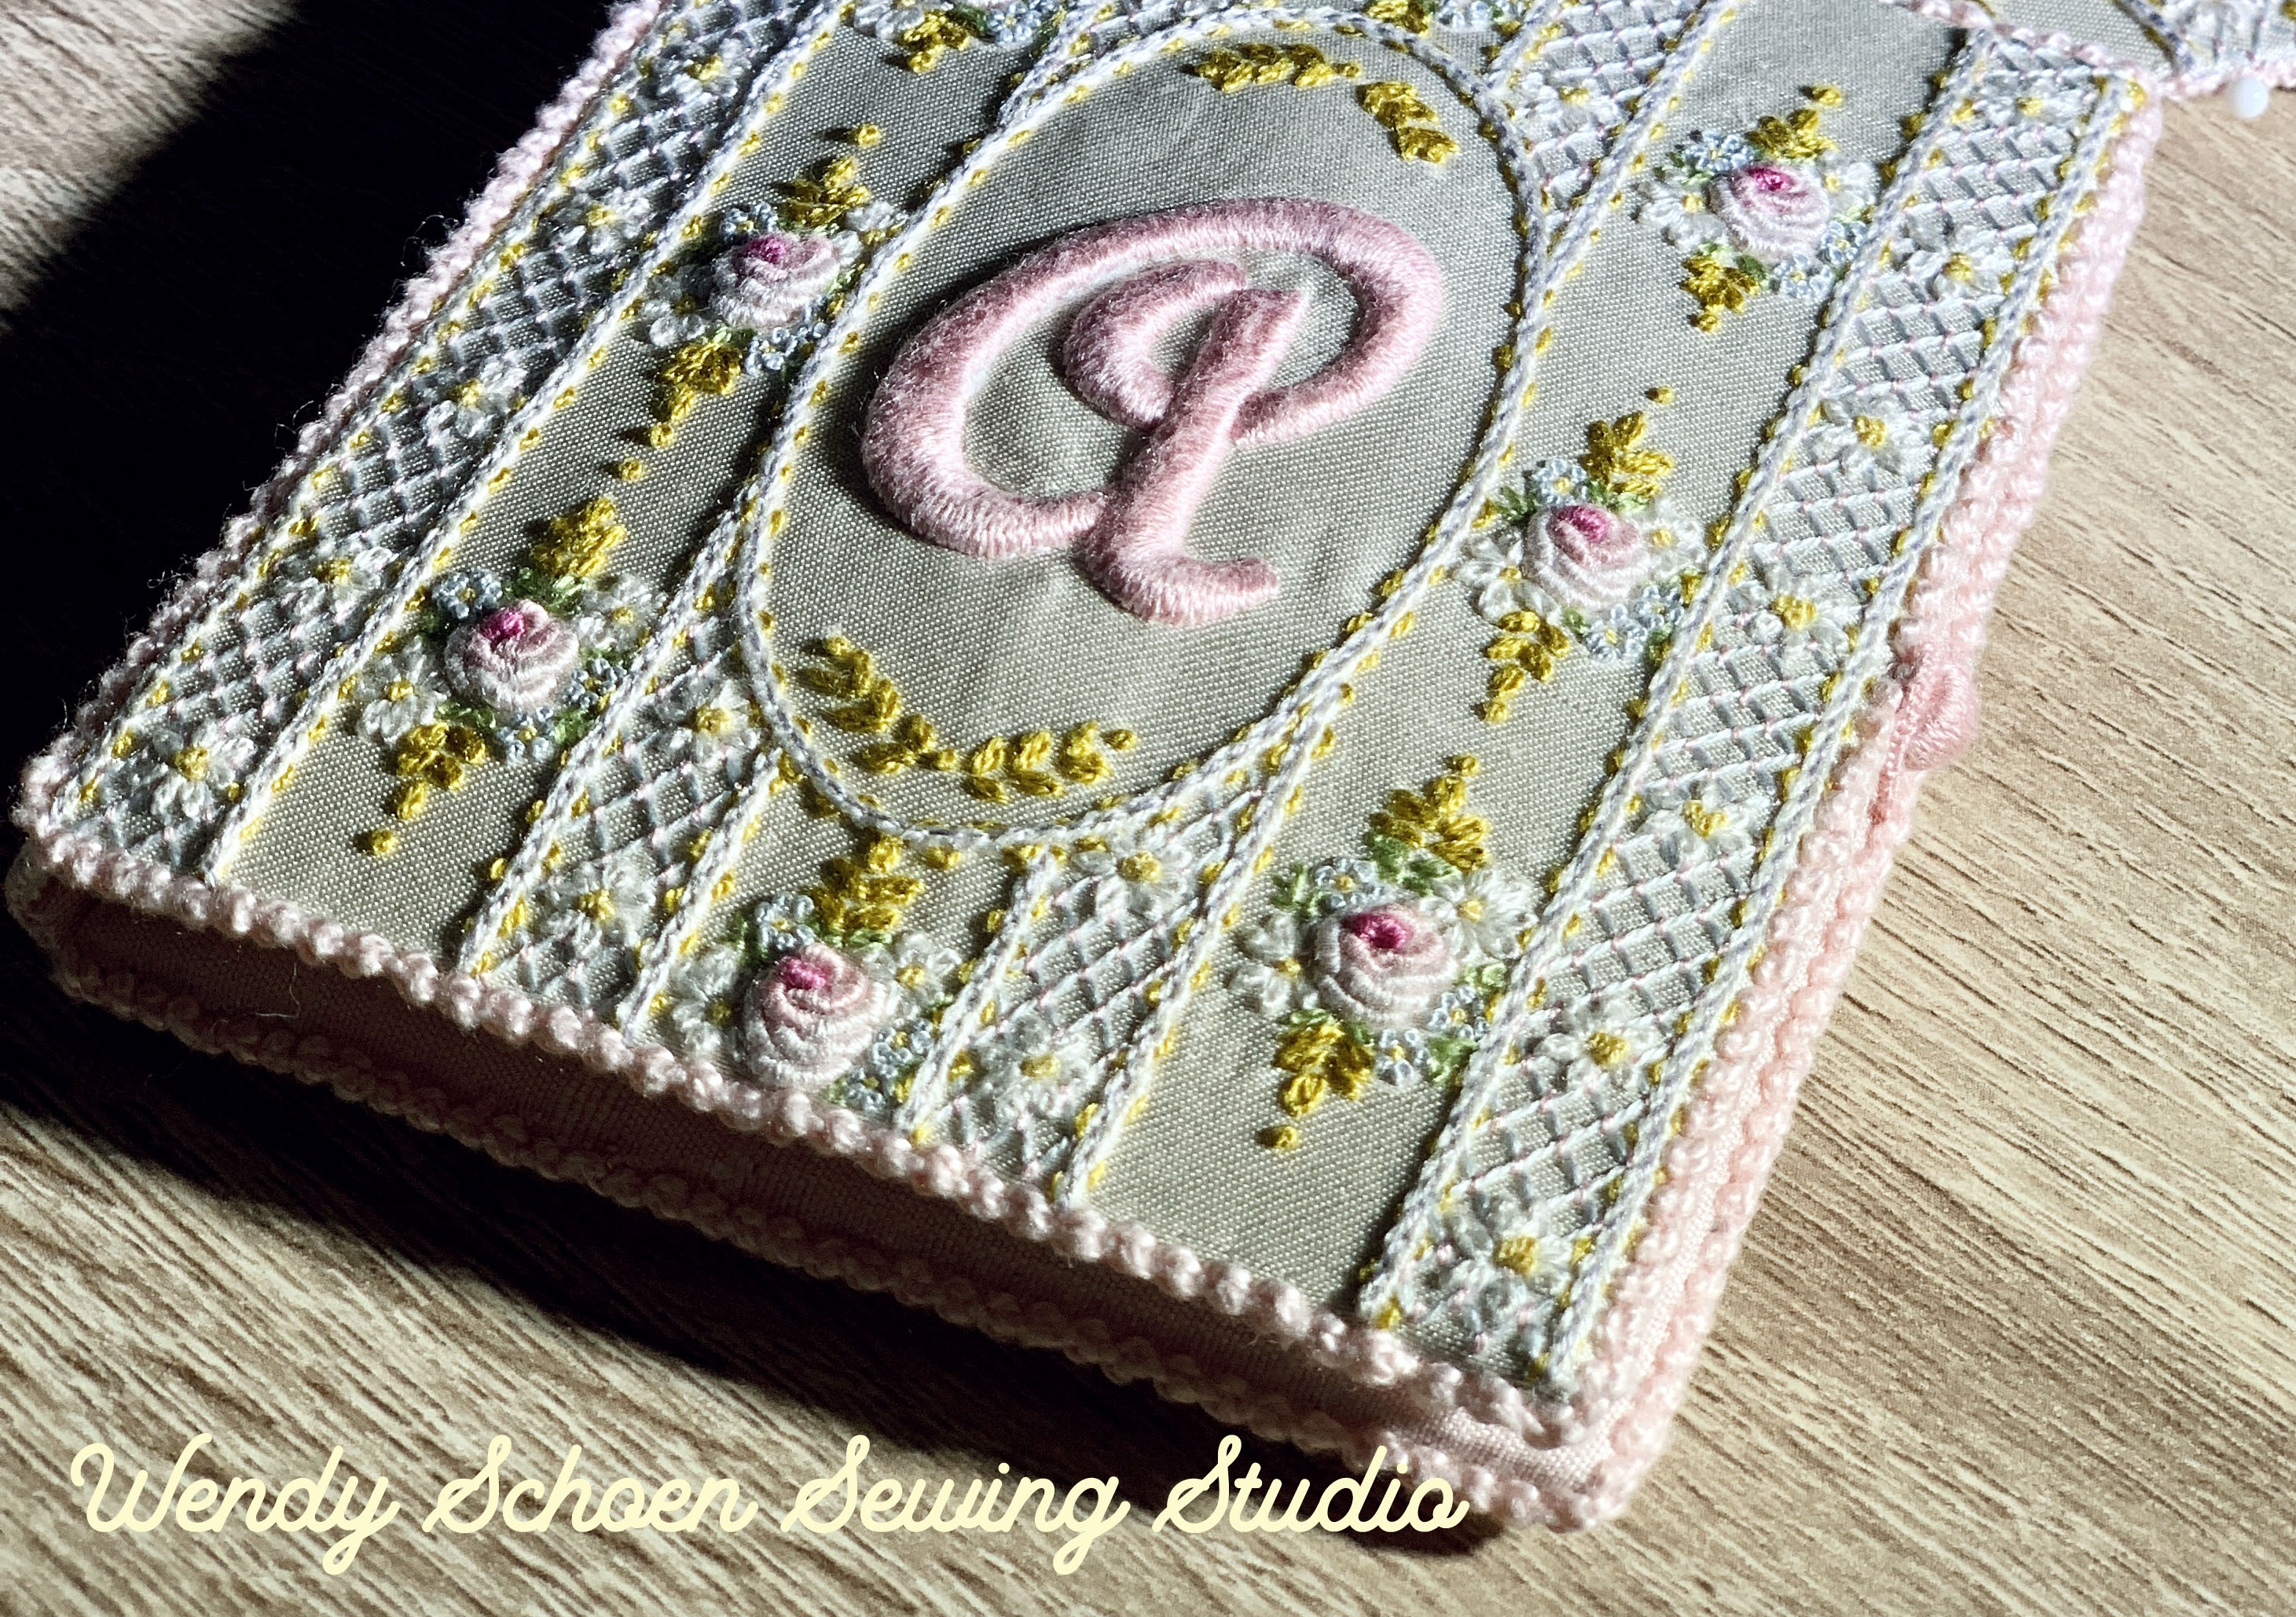
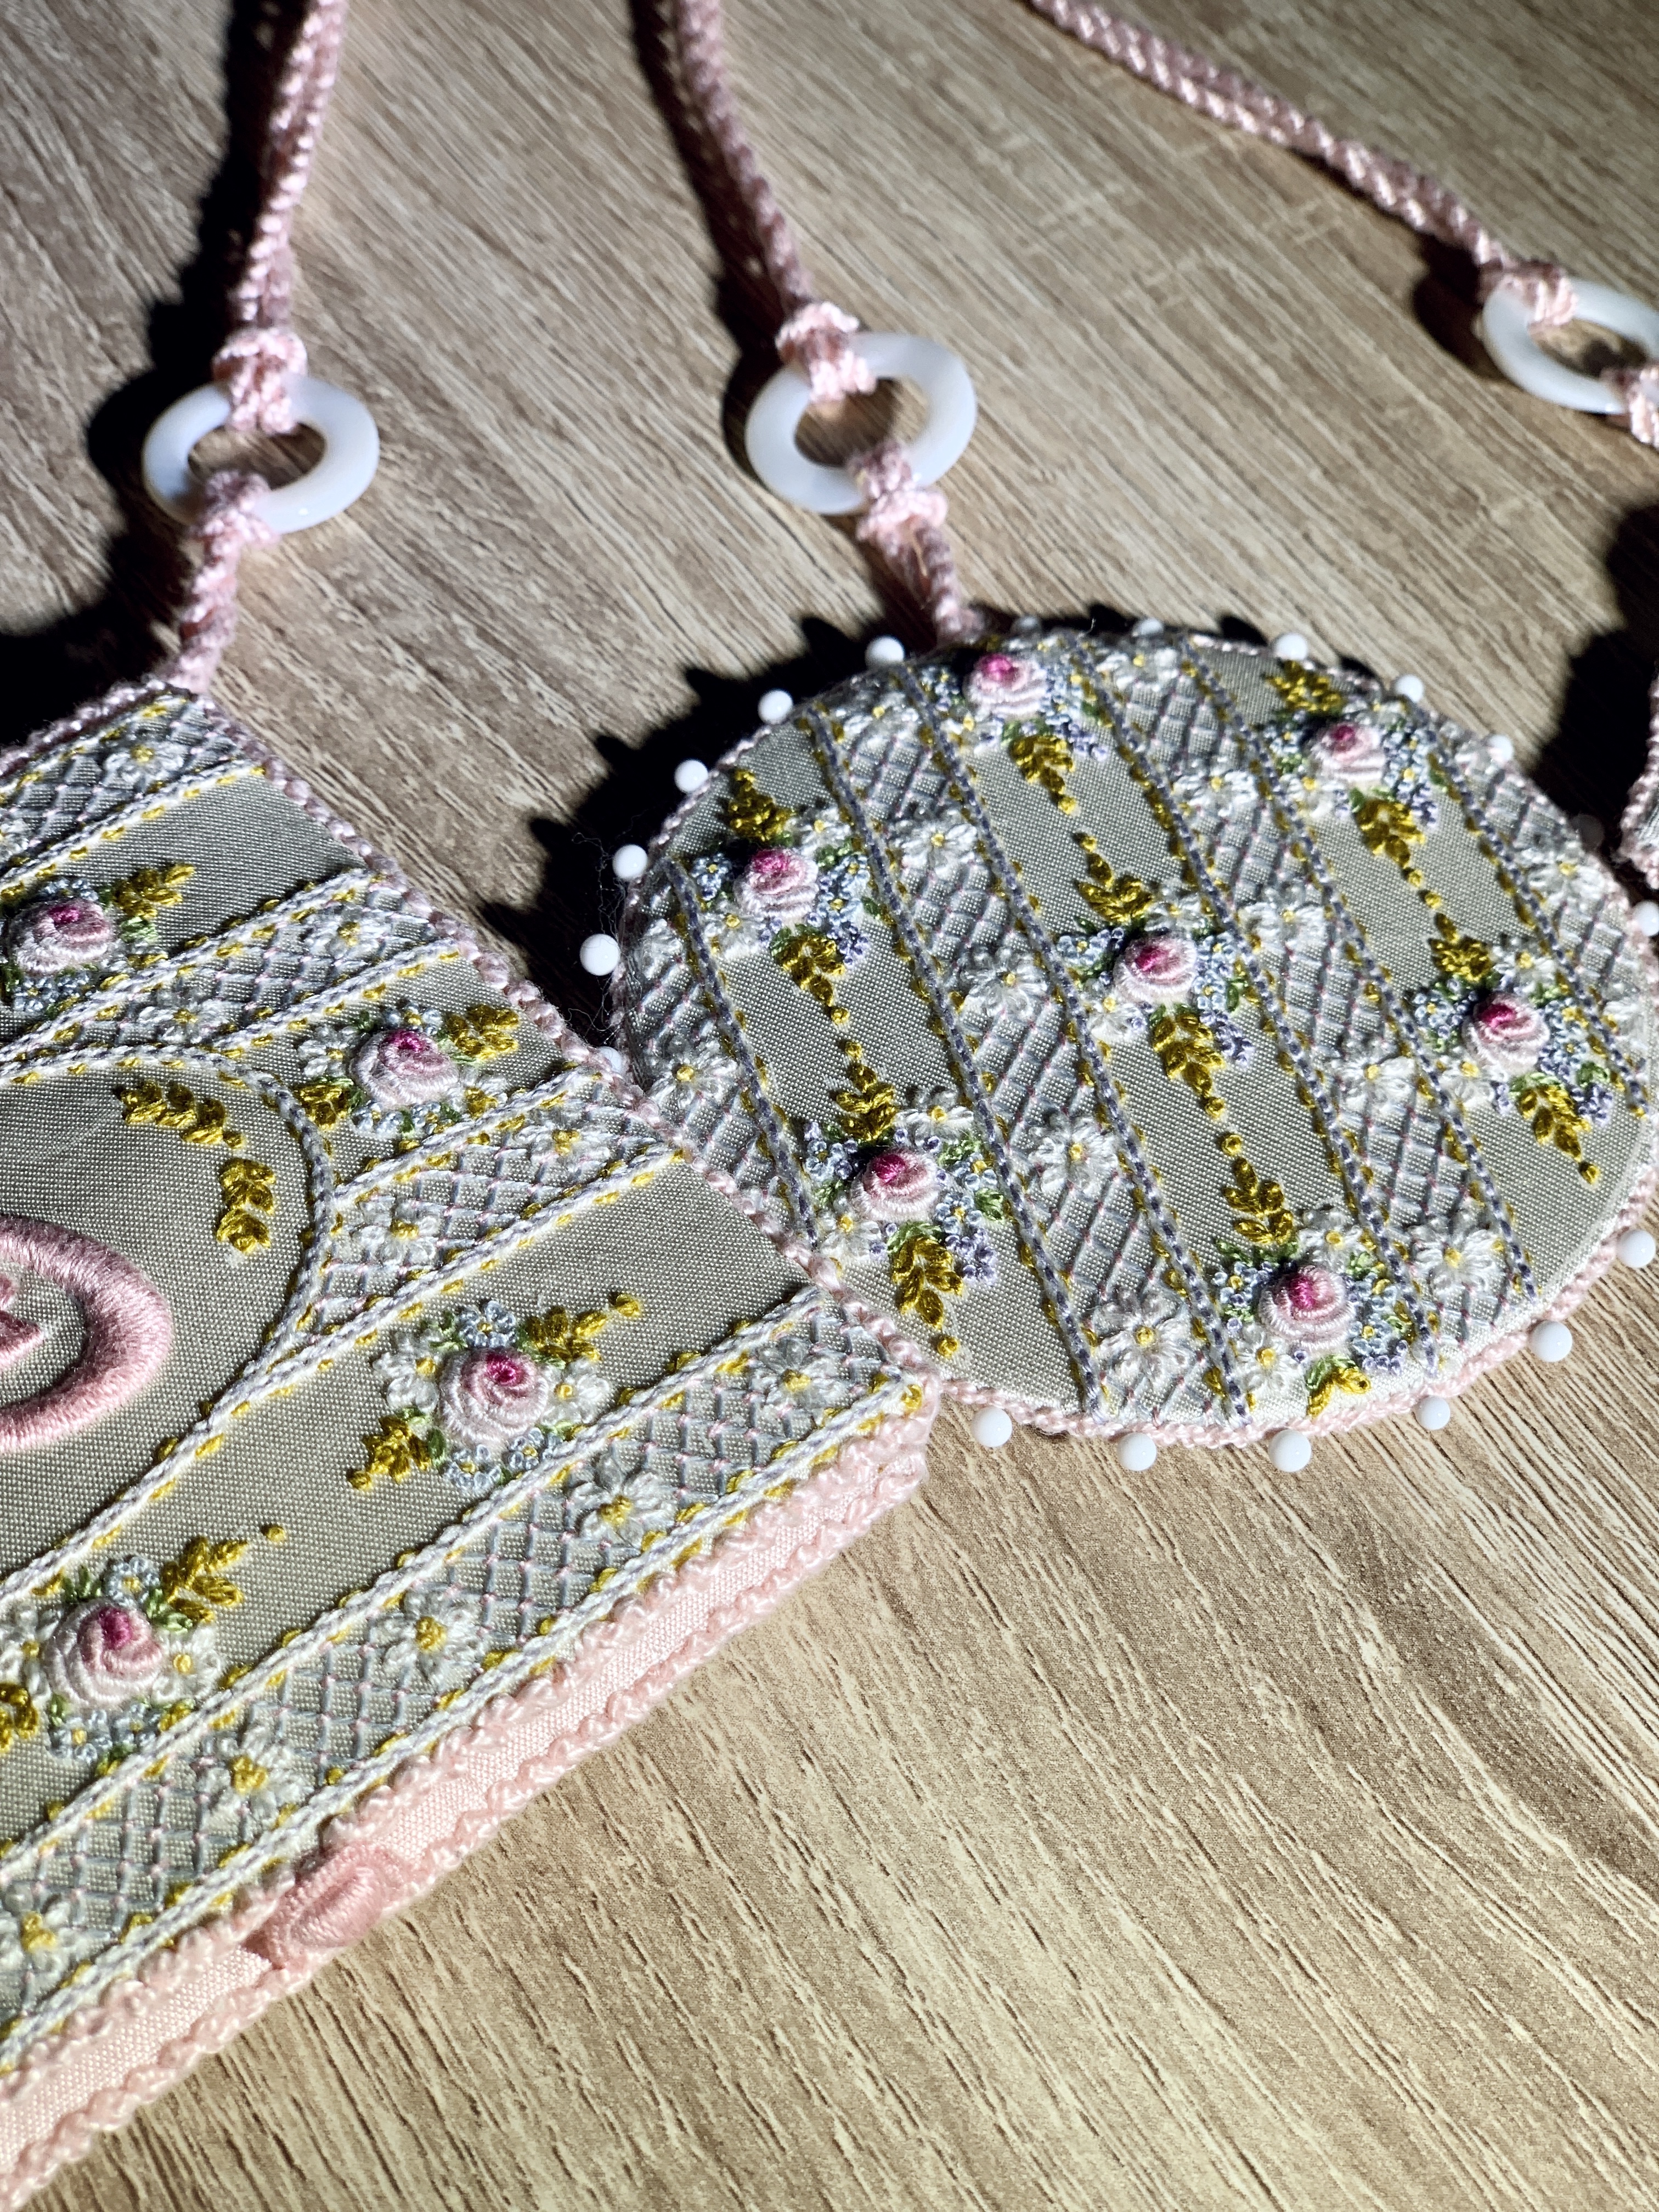
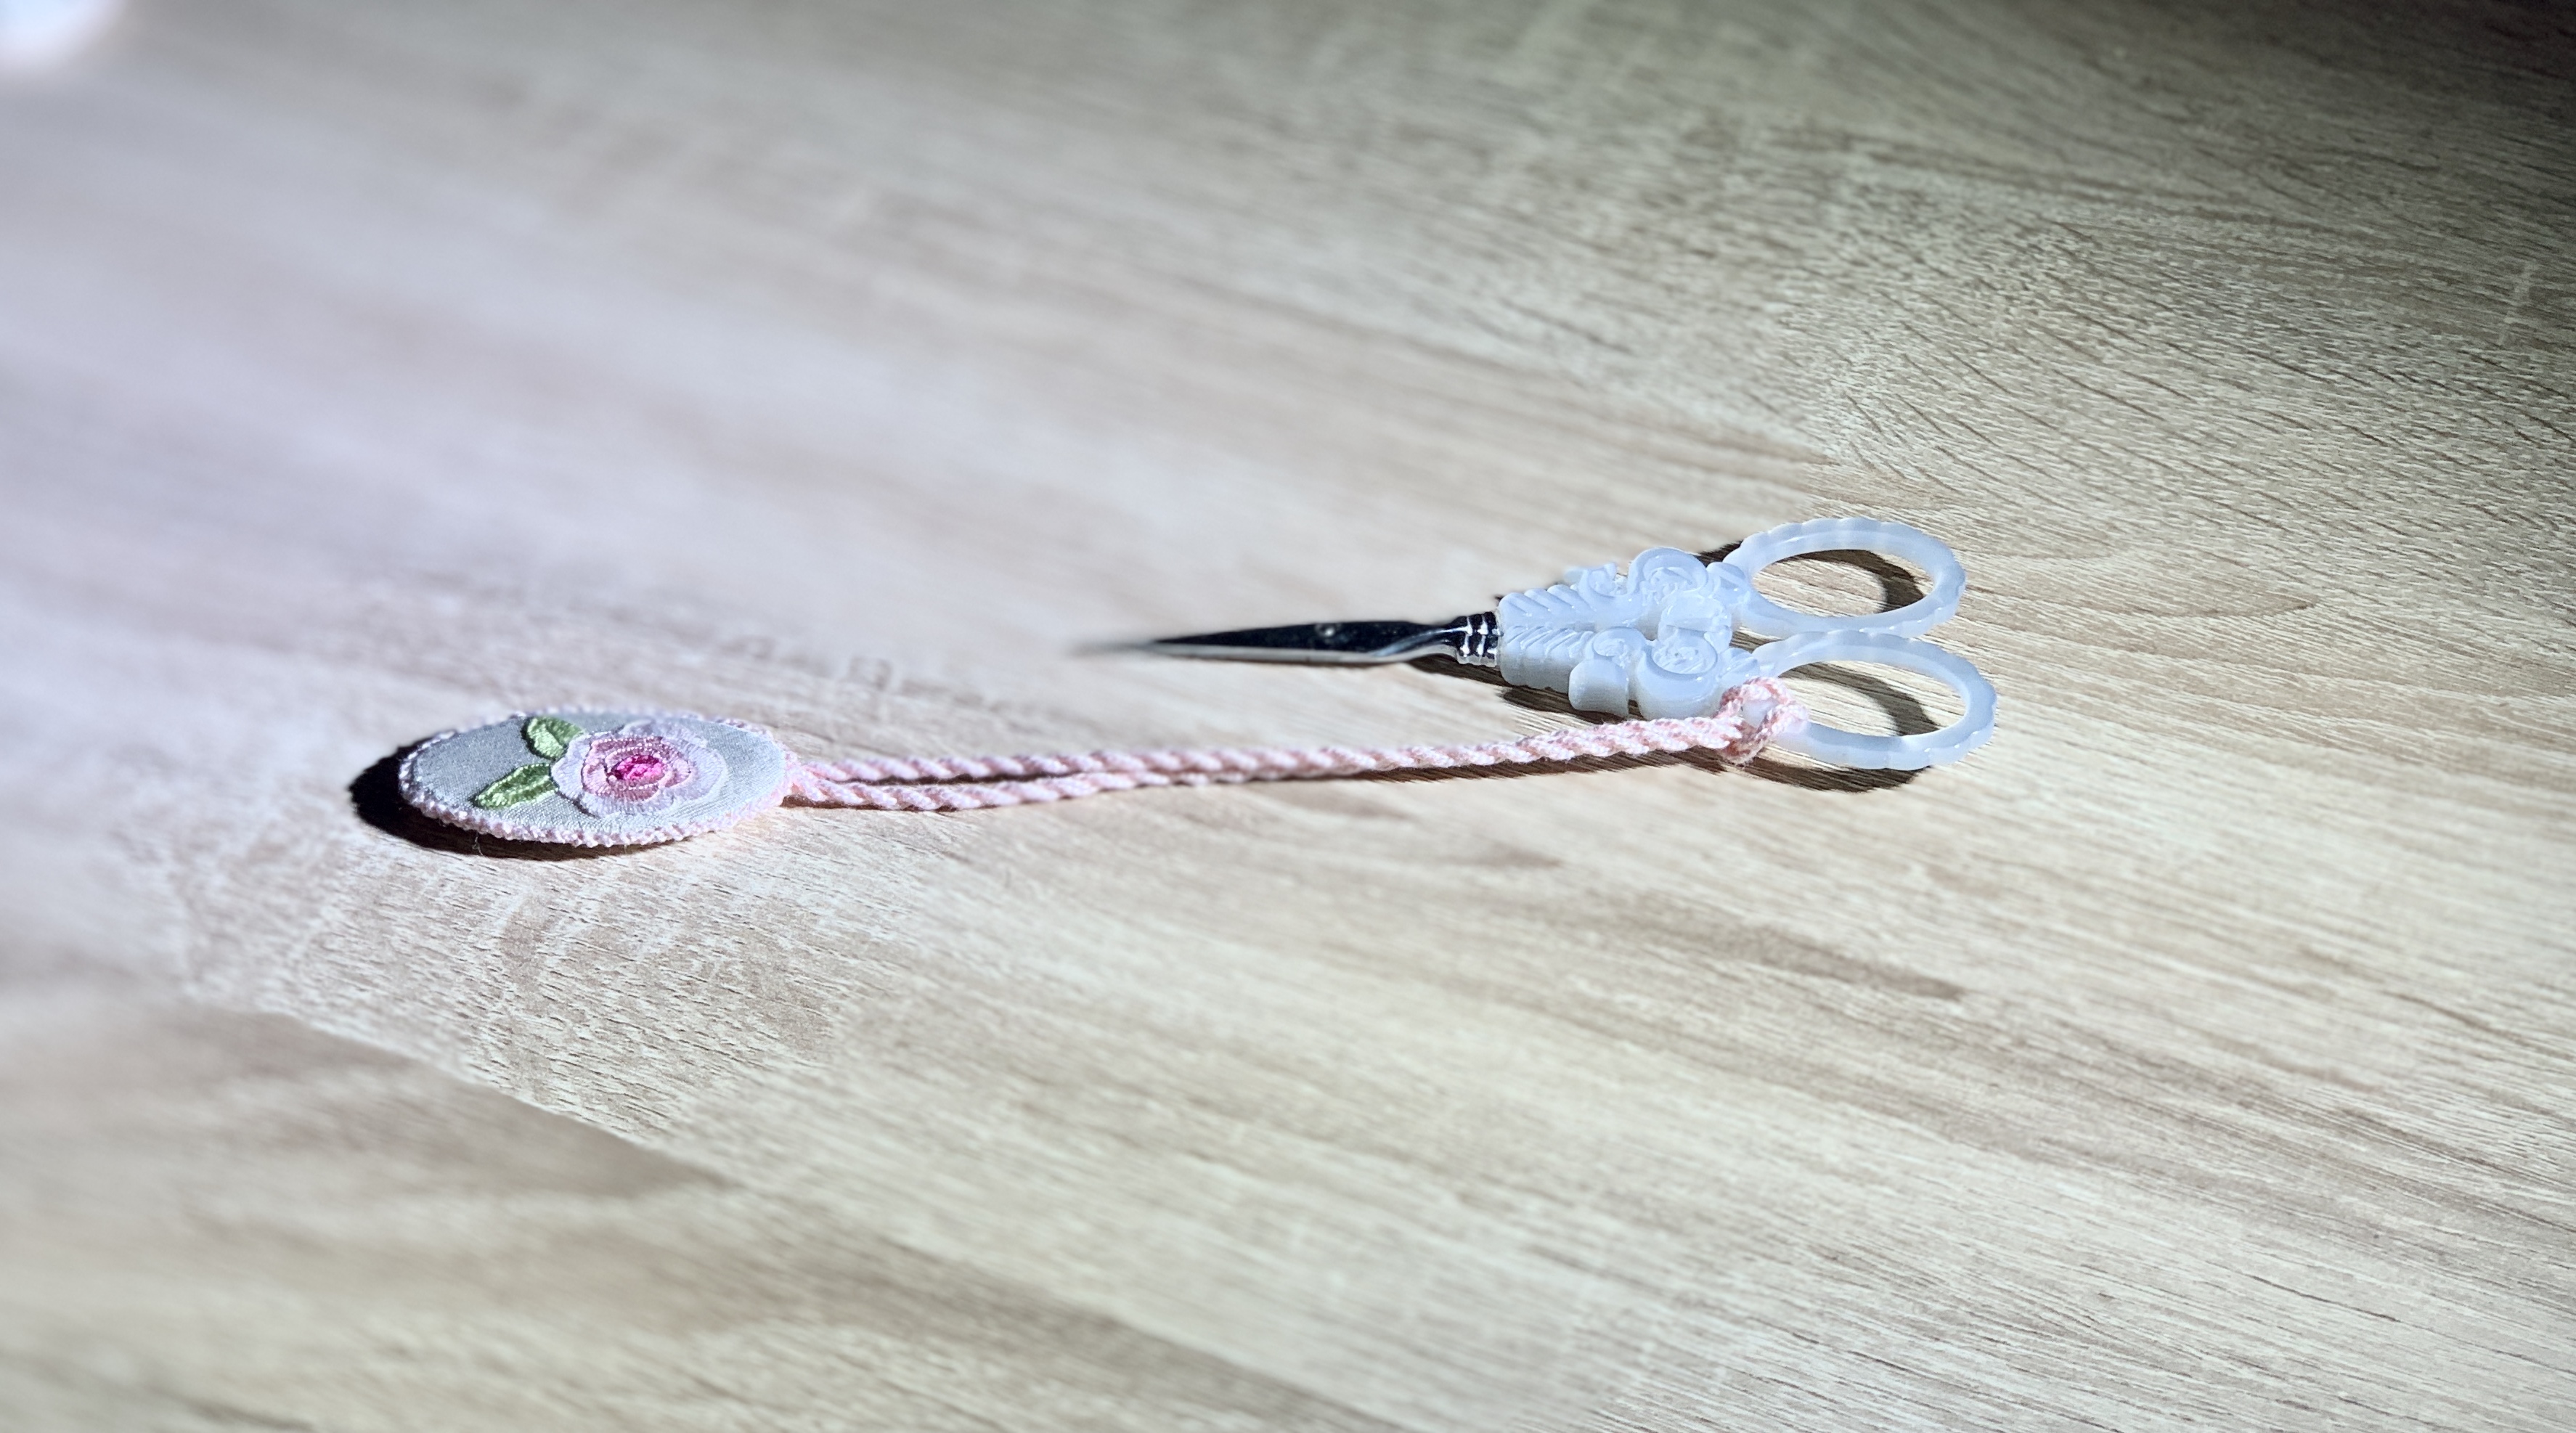
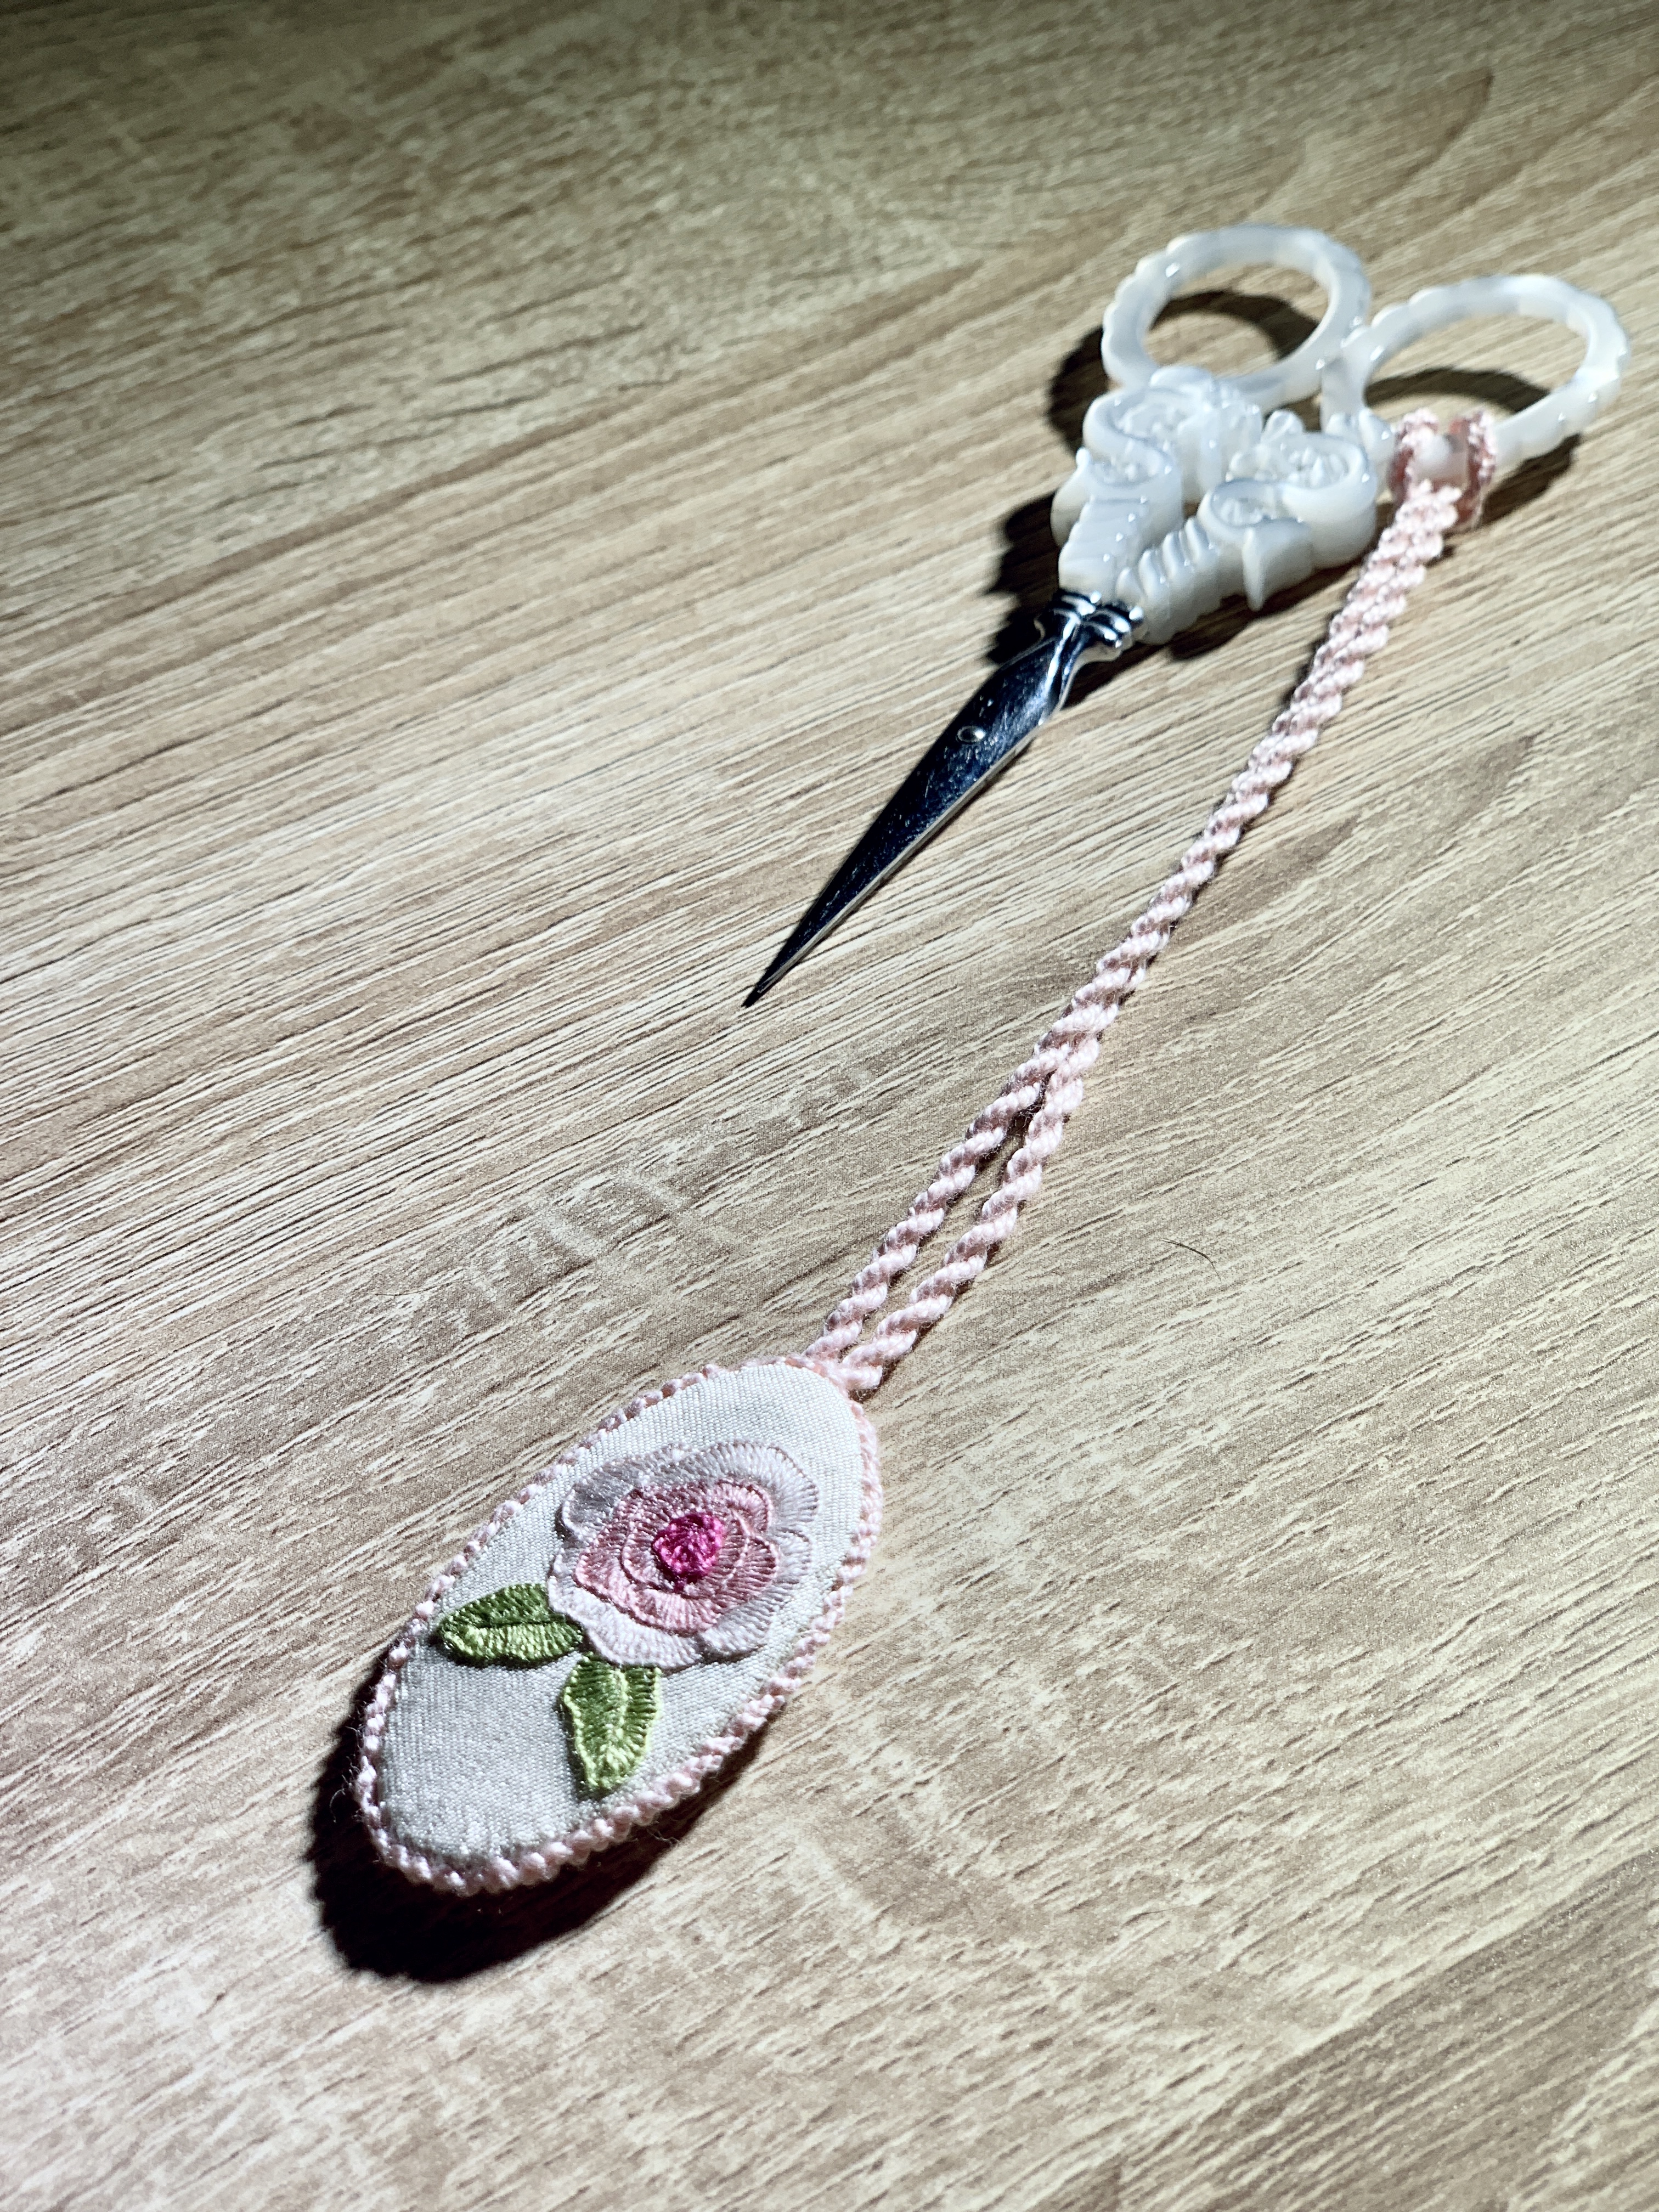
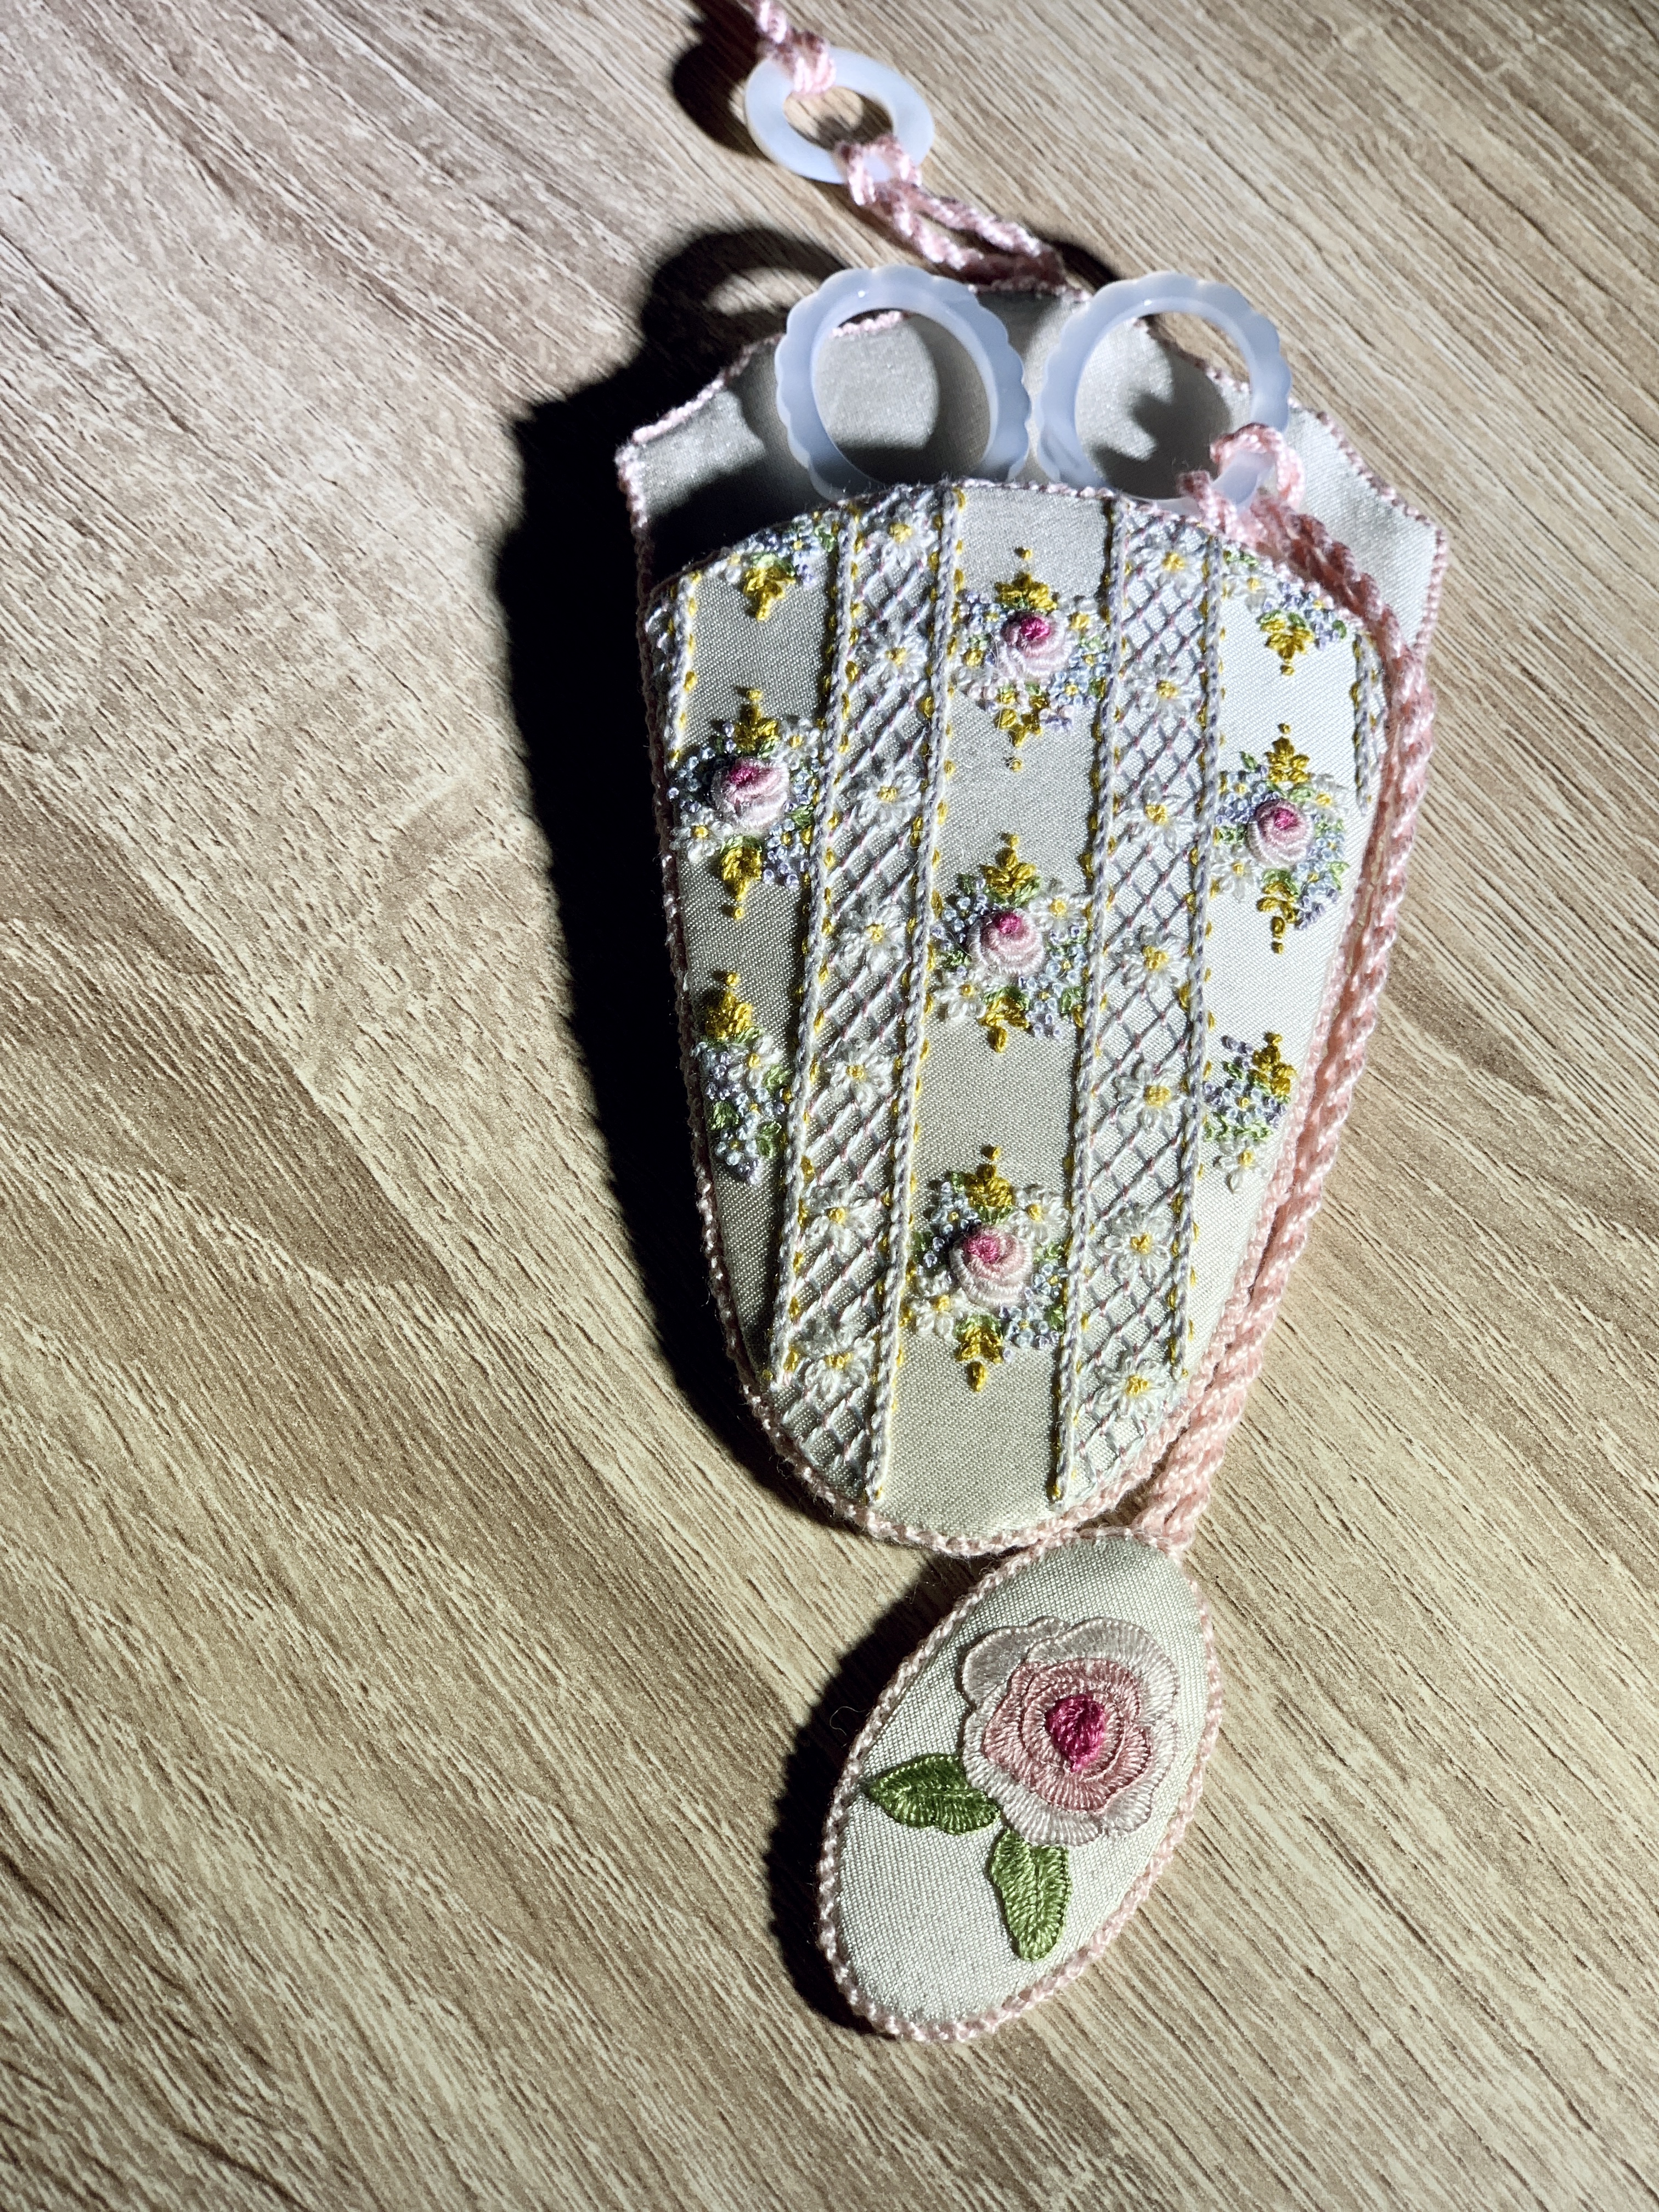
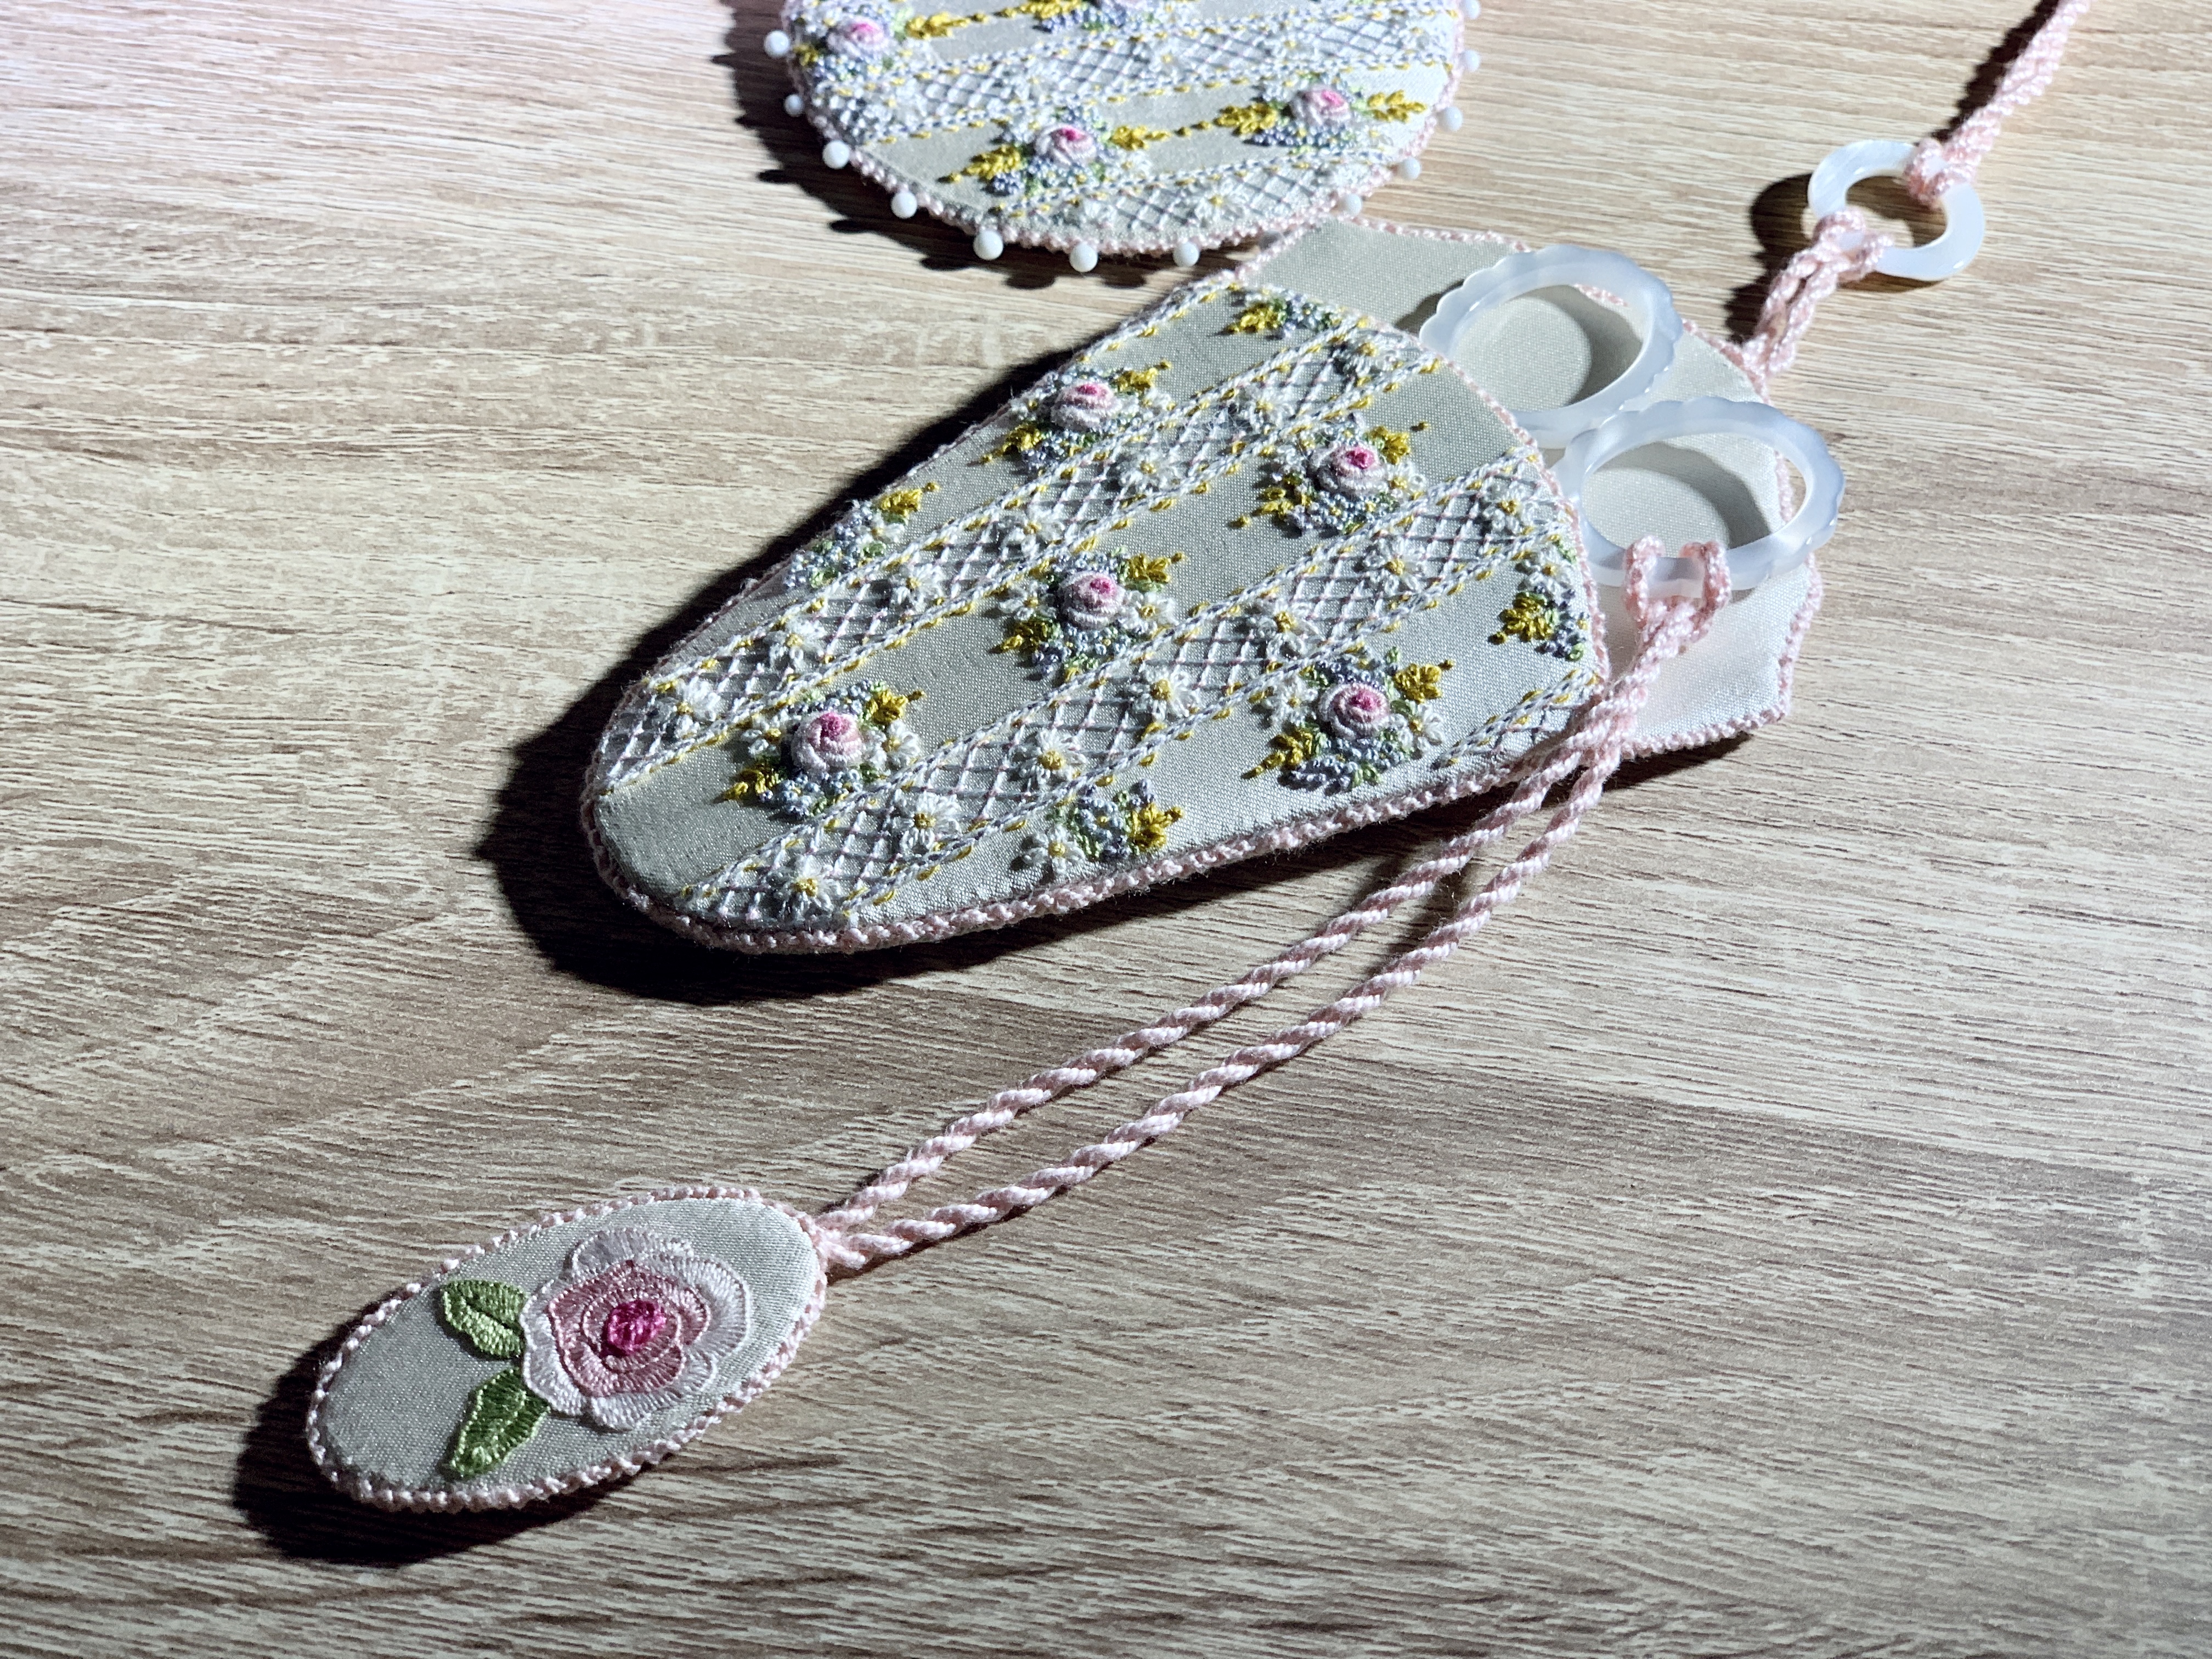
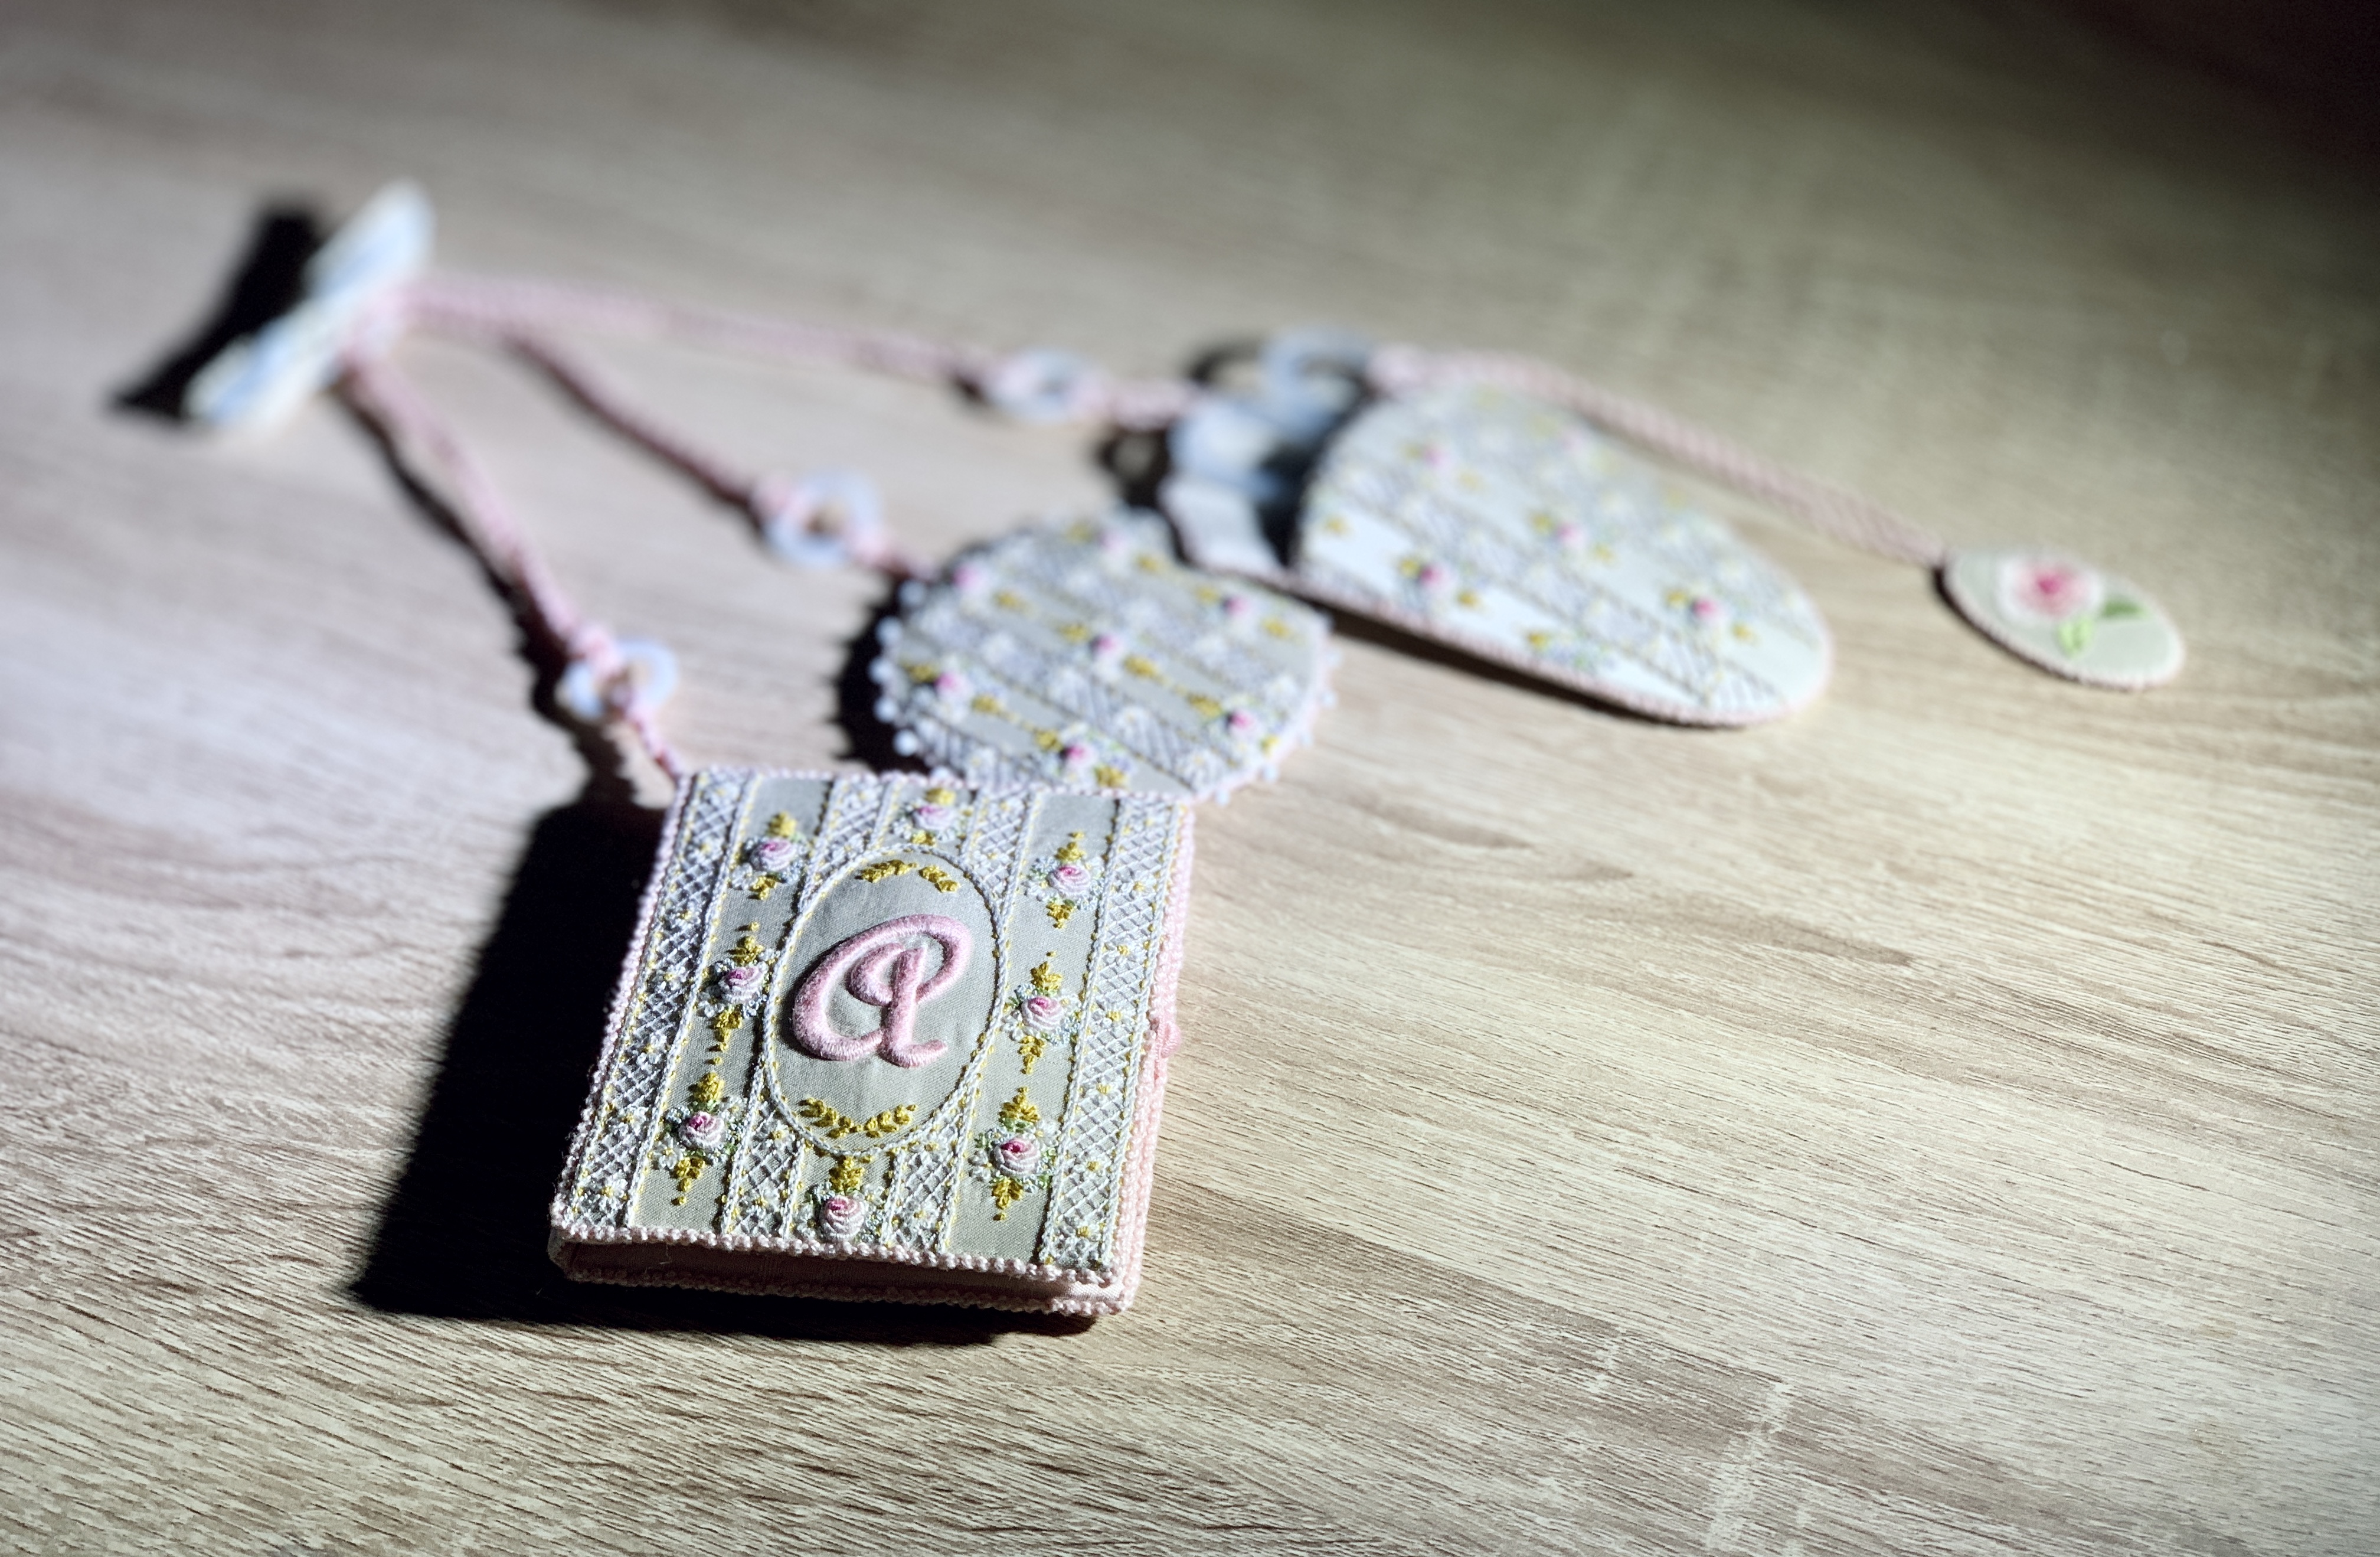
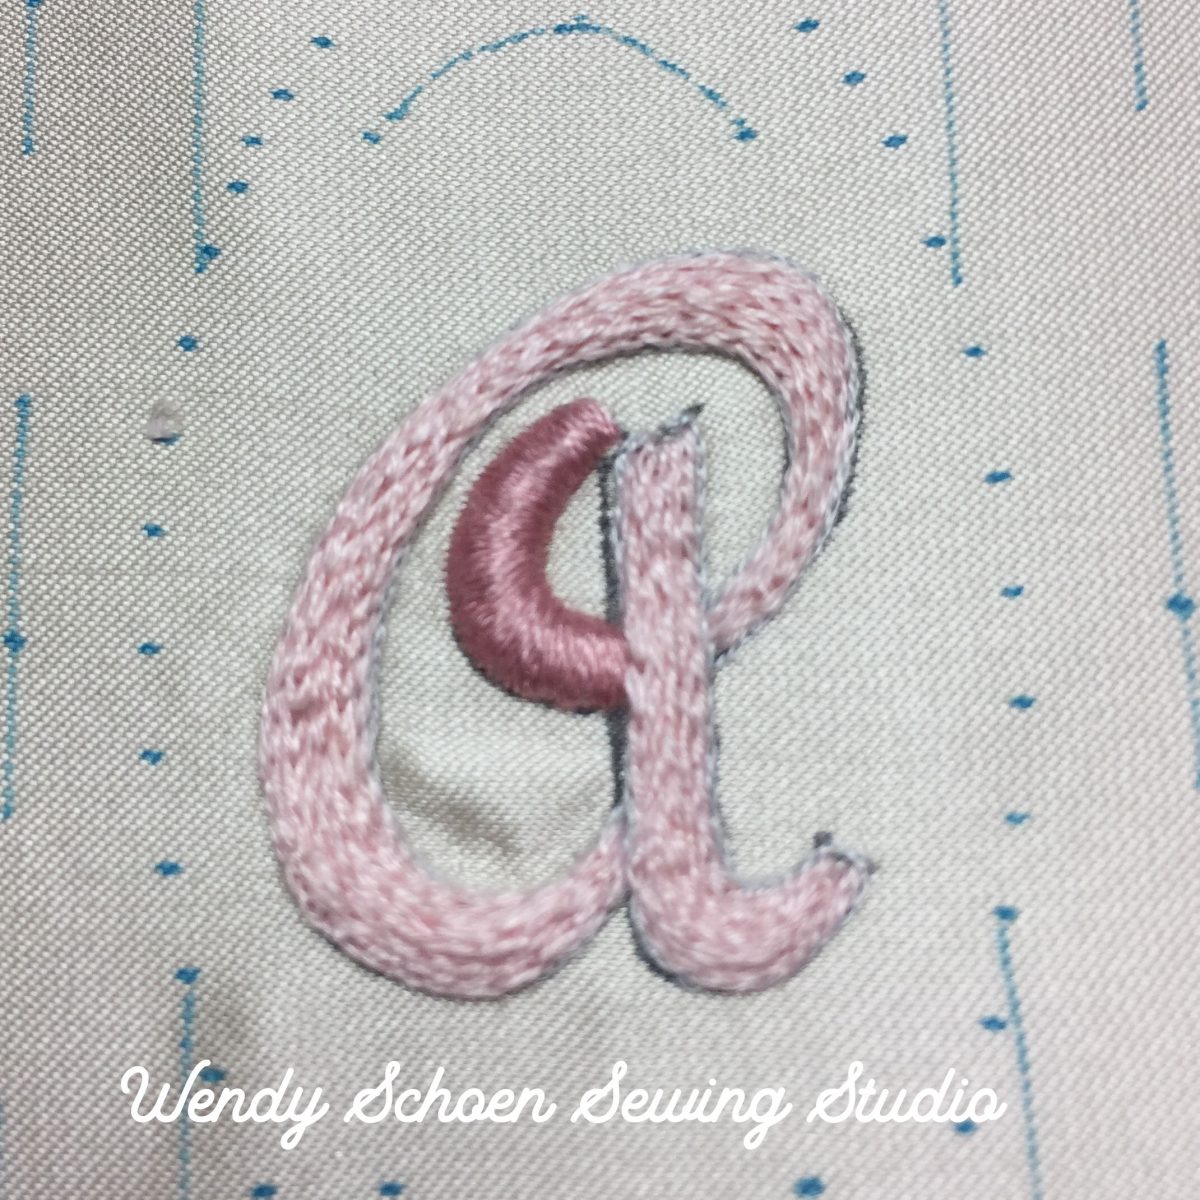
The by-product was the extra 6 days I spent taking classes. It was wonderful!! I opted to take both Susan O’Conner classes the entire week! I kept thinking to myself, please God, if I’m dreaming, please don’t wake me. The Versailles Chatelaine and the Cornflower Scissors Ball. I struggled with the later, but decided to focus on the first class, The Versailles Chatelaine. I made the decision to make it for my dear daughter-in-law, Andrea Schoen, who has been working on her own embroideries. I did change the mostly blue to mostly pink colorway. My girl is a pinky and I knew she would want it that color. Just watching her face when she opened it will stay with me for the rest of my life. Now I want to share it with you. Happy New Year and Enjoy!
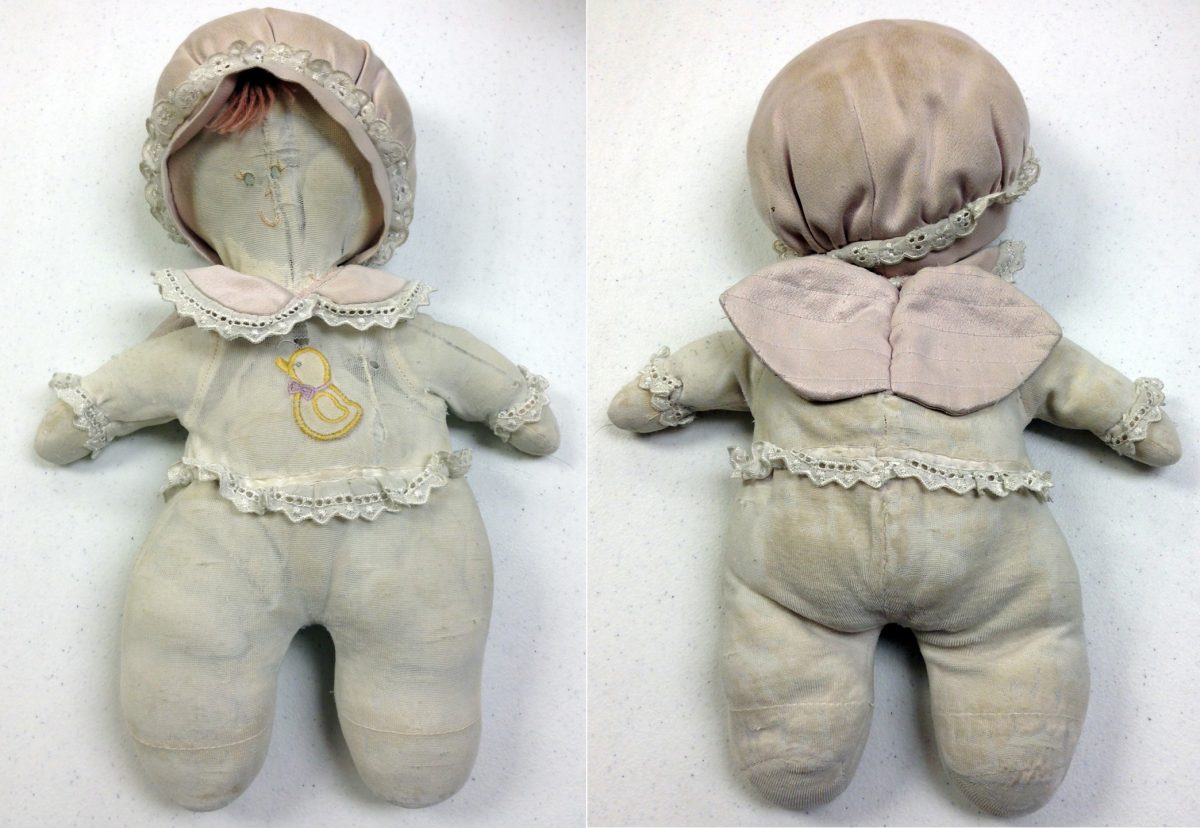
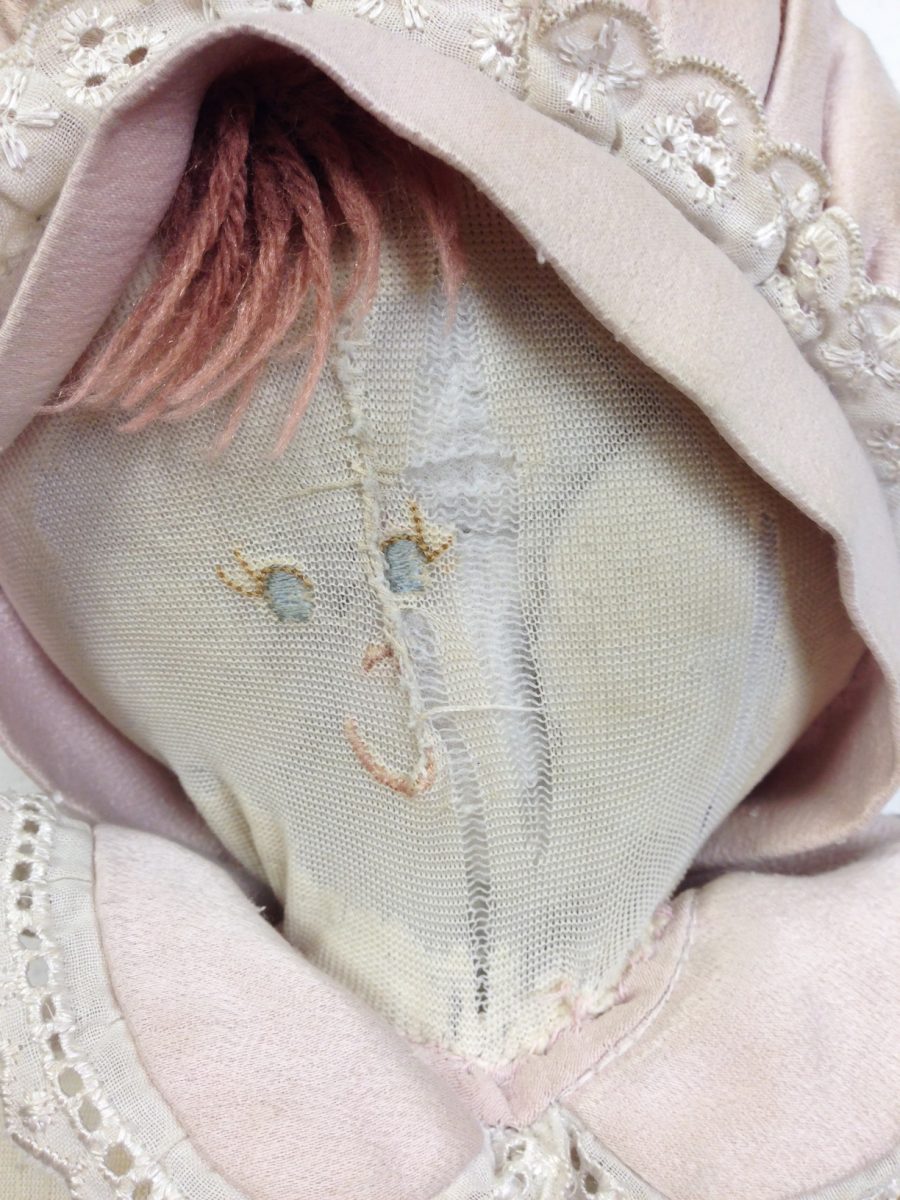
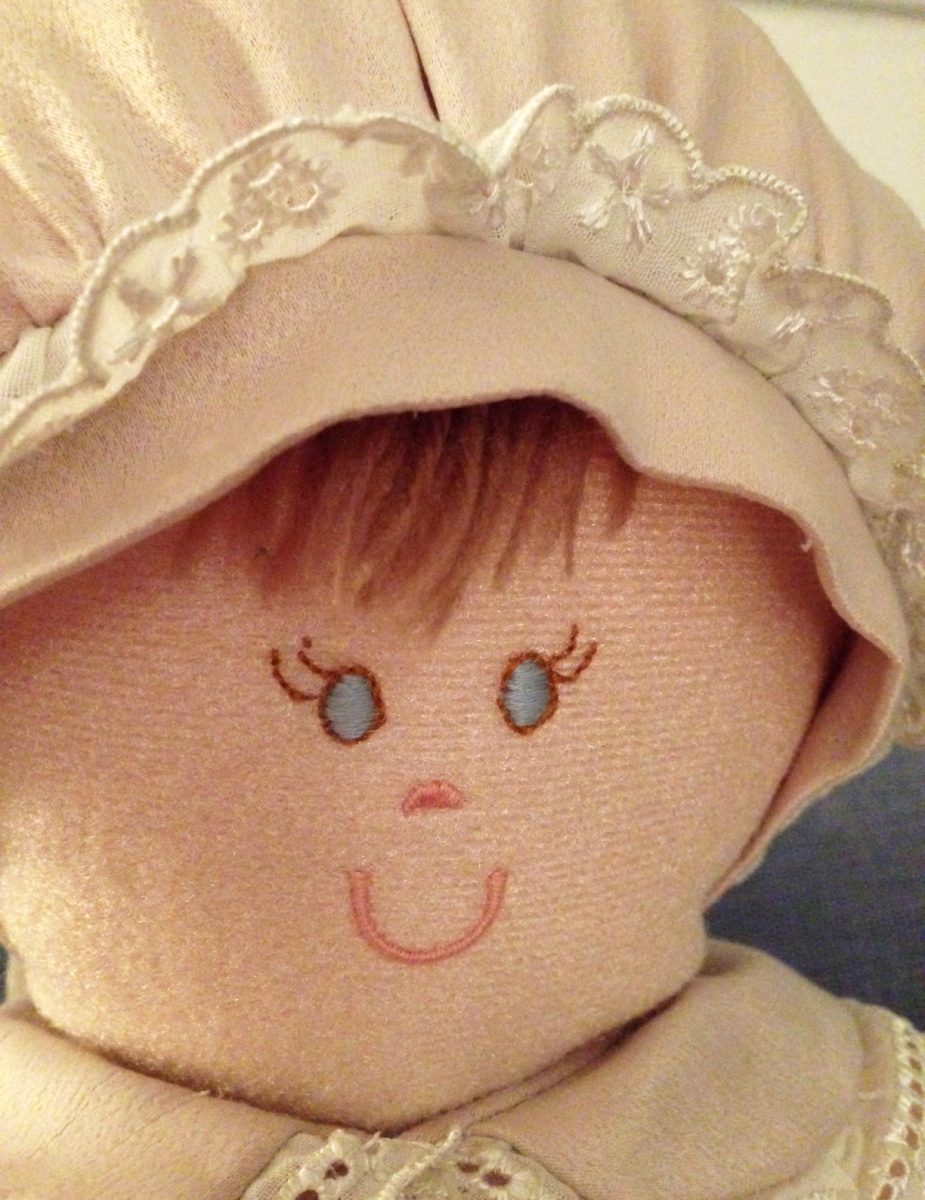
You can see by this photo that Allegra was well loved. Her velour body had been completely worn out. Her sweet little wings and lace edged collar were in decent shape but the bonnet was so dirty, I couldn’t believe my eyes.This close-up shows how her face had been repaired and half of her mouth and nose were missing.
This sweet doll was originally made of the finest stretch velour and soft crepe-back satin and equipped with all the right components that any baby girl would love. Her soft velvety-smooth skin was carefully embroidered with a tiny duck appliqué and her facial features were sweet and gentle. Her little woolen bangs were covered by a sweet moppet style bonnet, edged in lace and her little sleeves were adorned with similar lace edging. Inside her was the subtle sound of a baby rattle and I thought my heart would melt when I discovered she had been altered many times as to last the lifetime of expectations from a baby girl into teenage dome. My mission was to restore her to her former beauty while keeping as much of the integrity of the original doll as possible. As I accepted the challenge, I asked God to give me the ability to meet the high standard of the challenge, a prayer I make before all commissions.
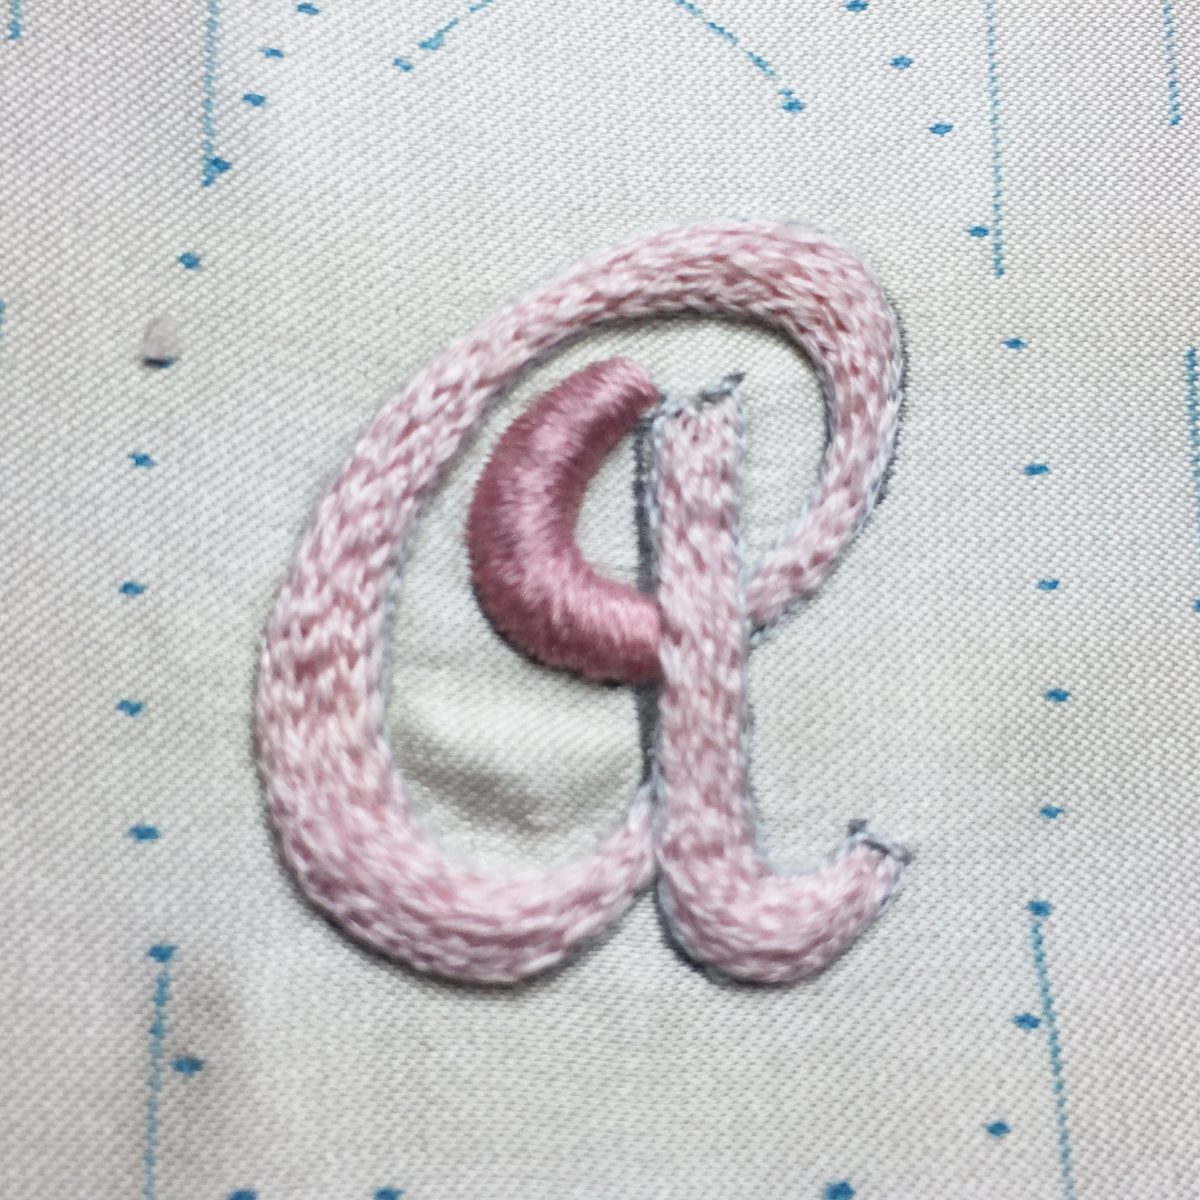
The sweet little duck applique was originally done by machine but I wanted to do the new one by hand. Luckily I had a scrap of soft yellow wool fabric in my stash that would work perfectly for the new applique.
Allegra is the prize possession of Luana, one of my summer camp students. Luana is very grown up young girl now but still cherishes her favorite baby toy. Although Allegra is still very cherished, Luana decided it was time to restore her to original glory so I was called in to do the job. This task turned out to be my most daunting challenge of all time. As I examined the well-worn doll in disbelief, I listened intently as Luana carefully explained in detail how she wanted me to change out the stuffing so her head didn’t bobble but to preserve the rattle inside her body, fix her face so the rip didn’t show, re-sew or replace her lace edging, and clean her collar and bonnet so it looked like new again. Then Luana asked me to replace the fuzzy texture of her skin so her soft skin would feel smooth again. My son had a blanket that was his lovey and as it was loved to death, he often told me not to wash it because it wouldn’t feel or smell right, so I knew texture was just as important as visual image.
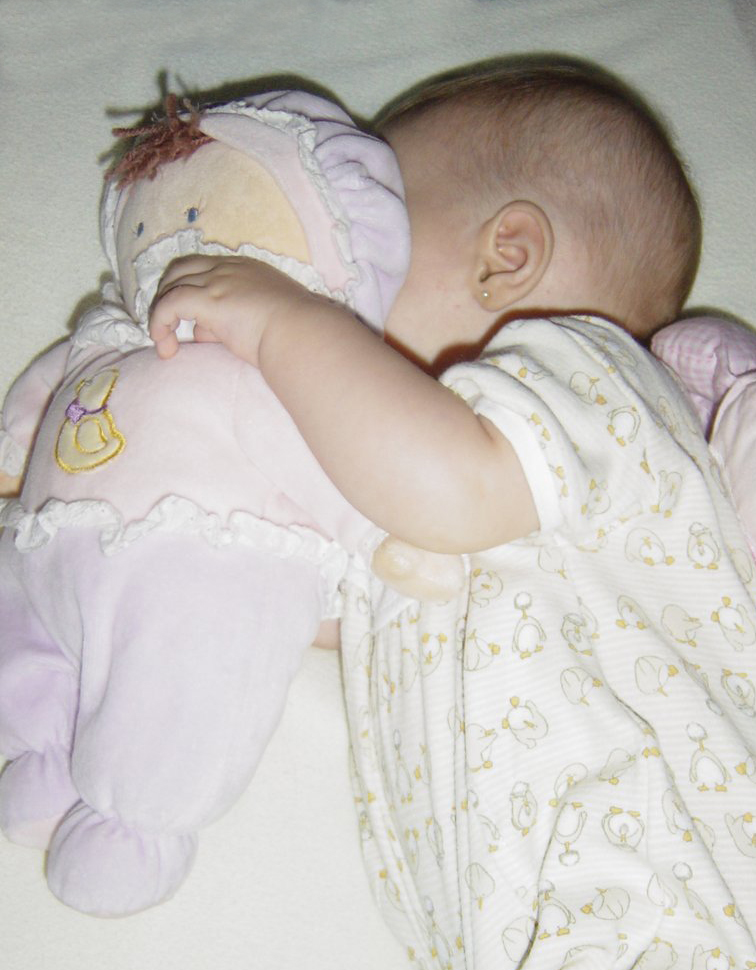
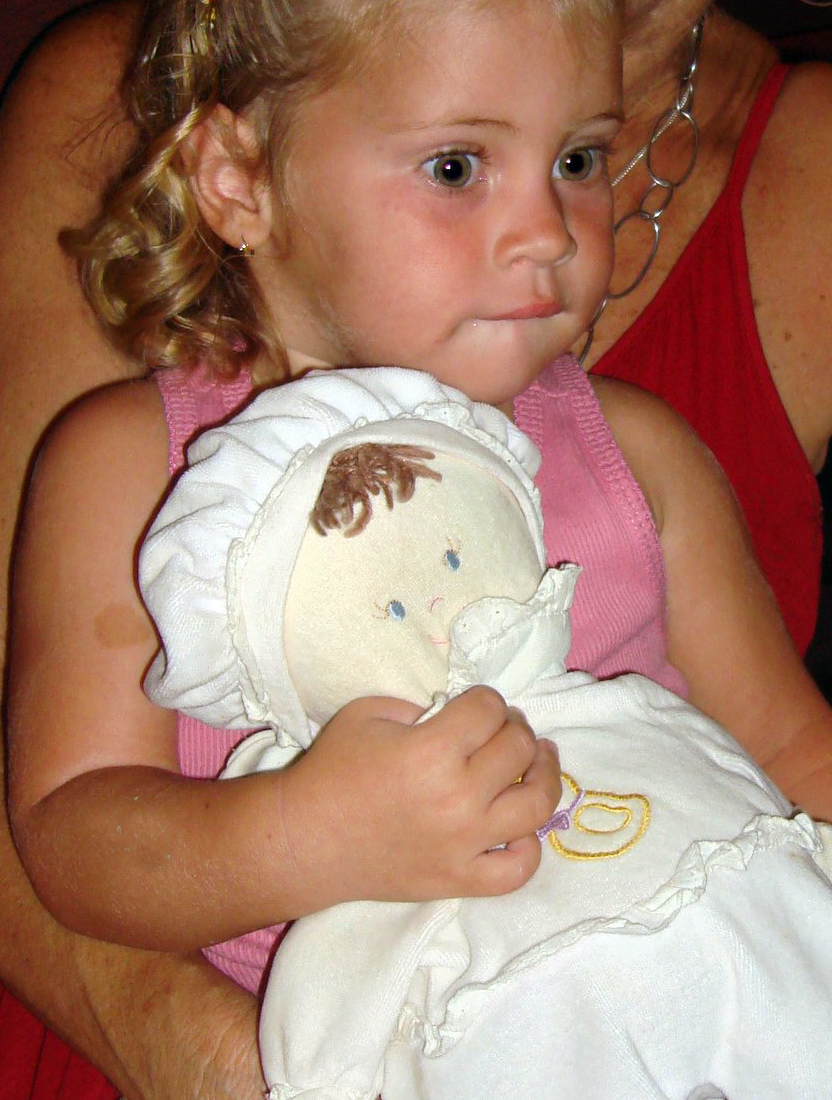
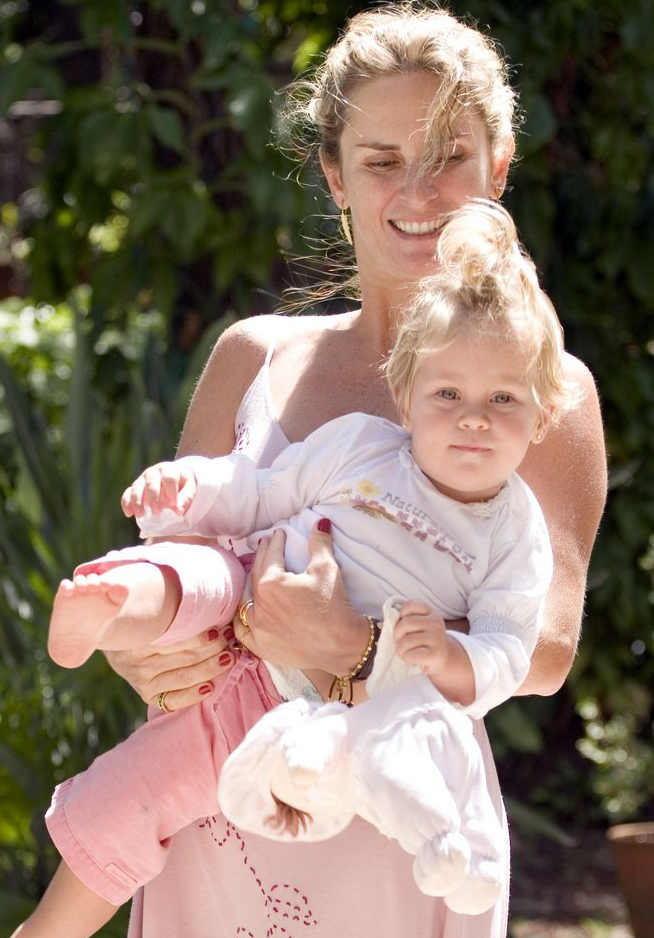
Baby Luana cuddles her adorable Allegra doll. Notice how soft and cuddly her skin is and must have been such a comfort to Luana.Here is Luana as a toddler holding her beloved doll. Notice how she is gripping the fabric. That fabric is the soothing aspect of the cuddle.
The most challenging aspect of any restoration is finding the proper materials. I scanned myriad websites to find a pale pink velour stretch fabric and the best I could find was something called “doll skin”. I set out to find the best color and type and held my breath until the packages arrived.
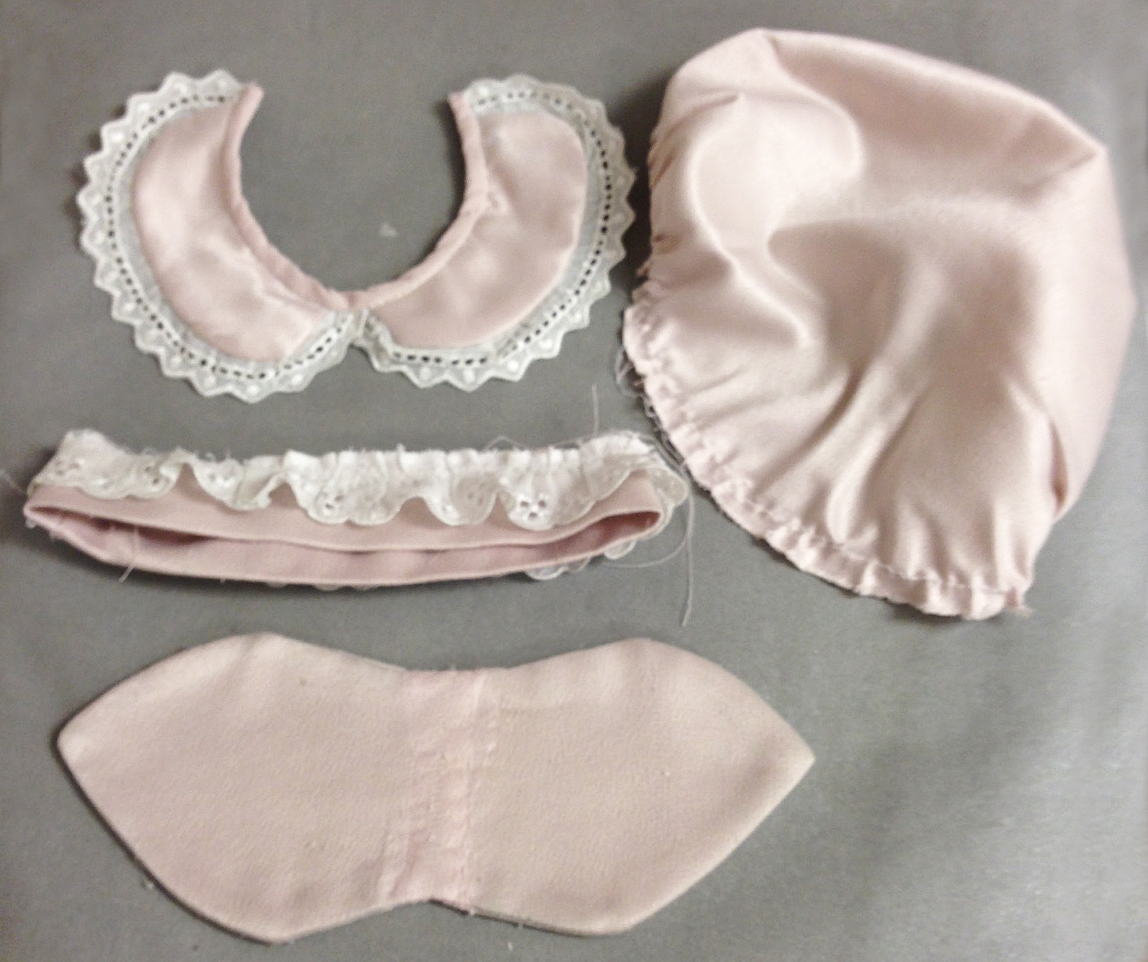
Next, I decided it was pointless to try and rescue the original doll to a reasonable fact simile, so I started out dissecting the specimen. Very carefully I cut away the old stitches and separated the satin elements such as the collar, hat and laces aside to be soaked until the years of dust and smudges disappeared. As usual, I used my favorite cold water soak, Delicare by Arm and Hammer*. It took almost three days to wash away the years of handling, leaving only a glimmer of loving. Then, I let the pieces dry completely and they were ironed smoothly.
After trying to iron the pieces flat to no avail, I used water soluble tacky stabilizer to hold the body parts flat.
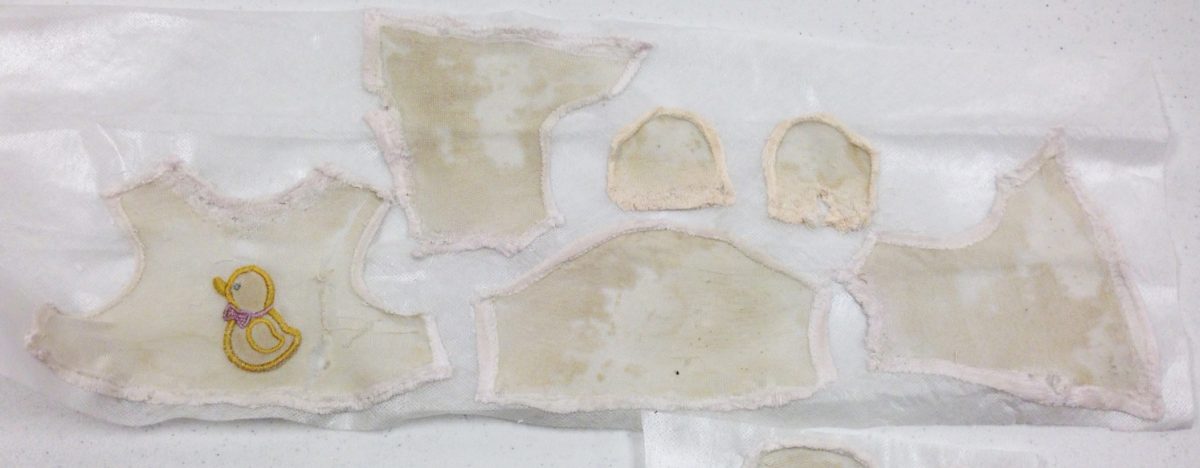
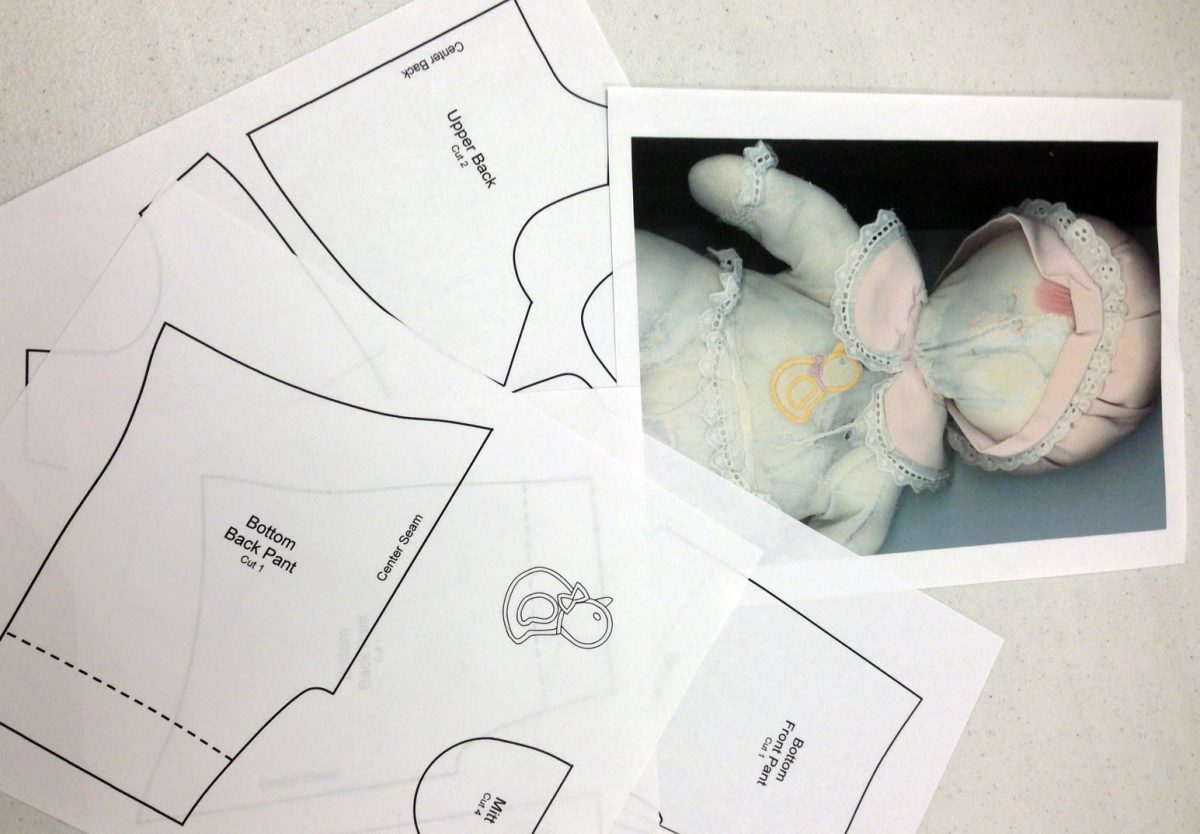
The body sections were in terrible shape so I decided to reproduce them entirely. I carefully labeled and laid each section out on sticky stabilizer so I could get an accurate measurement for pattern reconstruction. Once all the pieced were separated and carefully placed, I scanned the images into my computer so I could create a master pattern of the doll’s body. I pulled the scans into my drawing program and re-traced the outlines of the original body parts. I also made an exact template of the facial features and ducky applique.
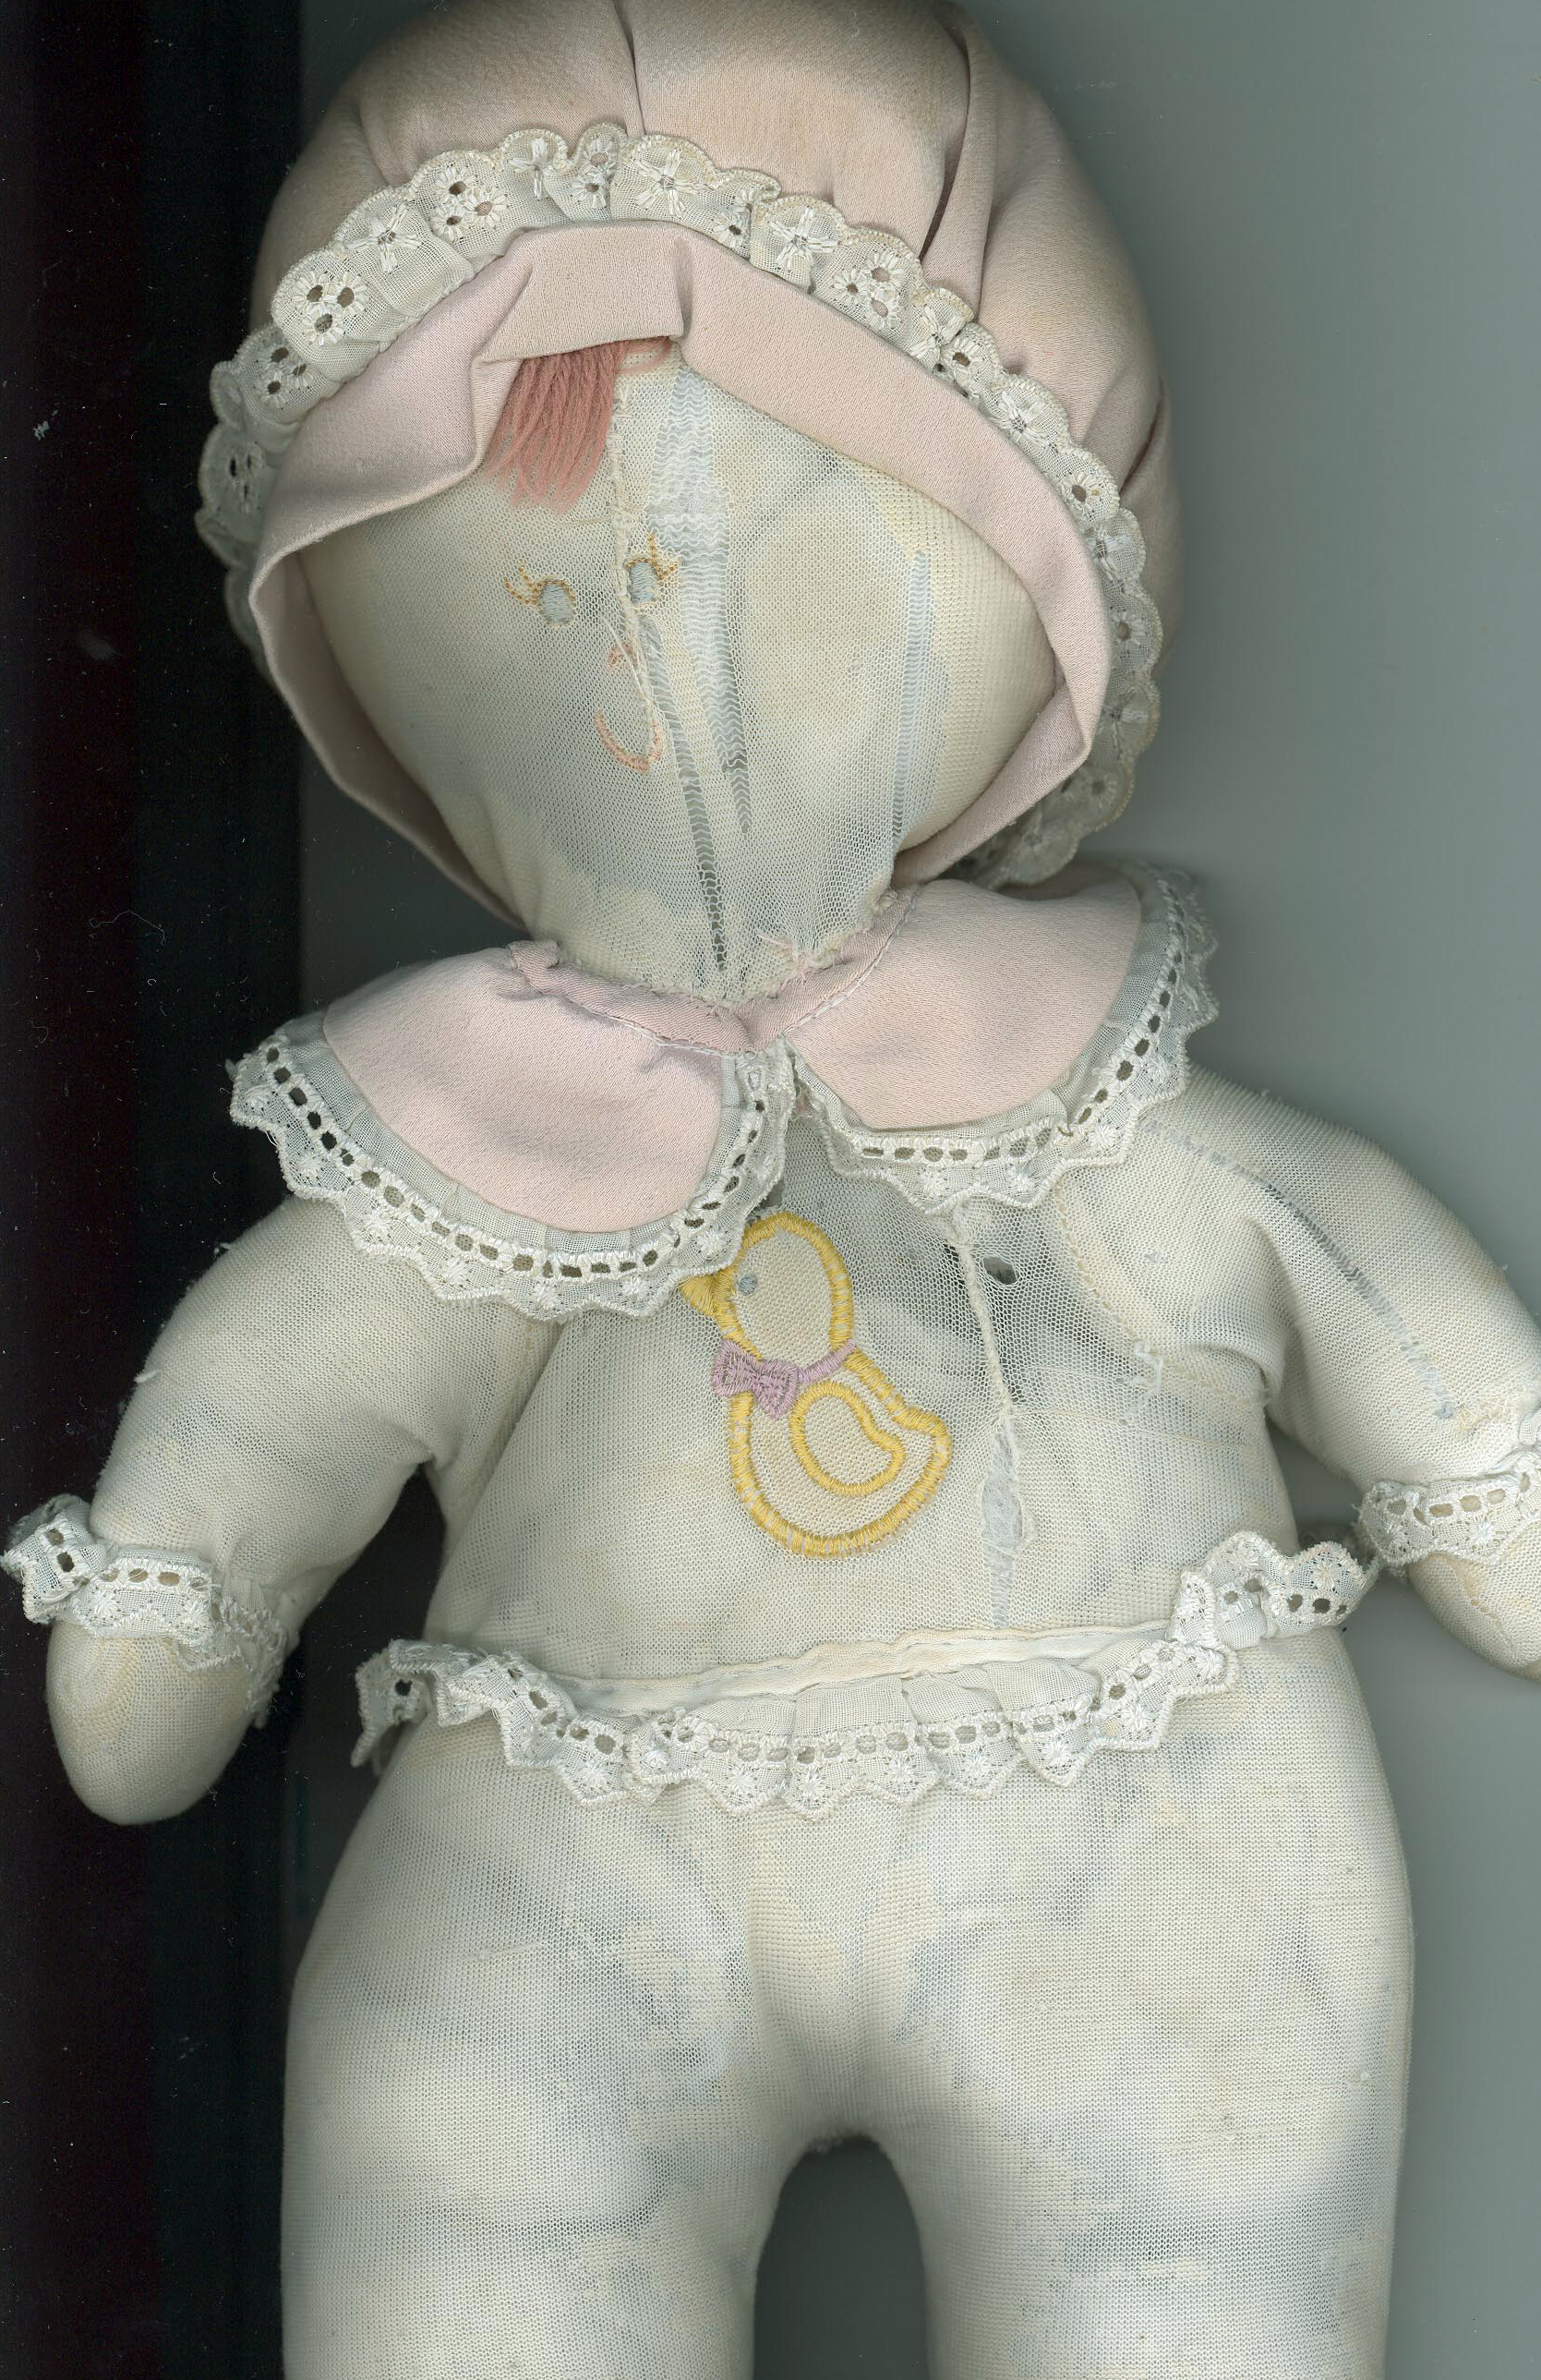
The velour had been completely rubbed away and the fabric had become thread-bare. She still looks so sweet and happy even at this stage.
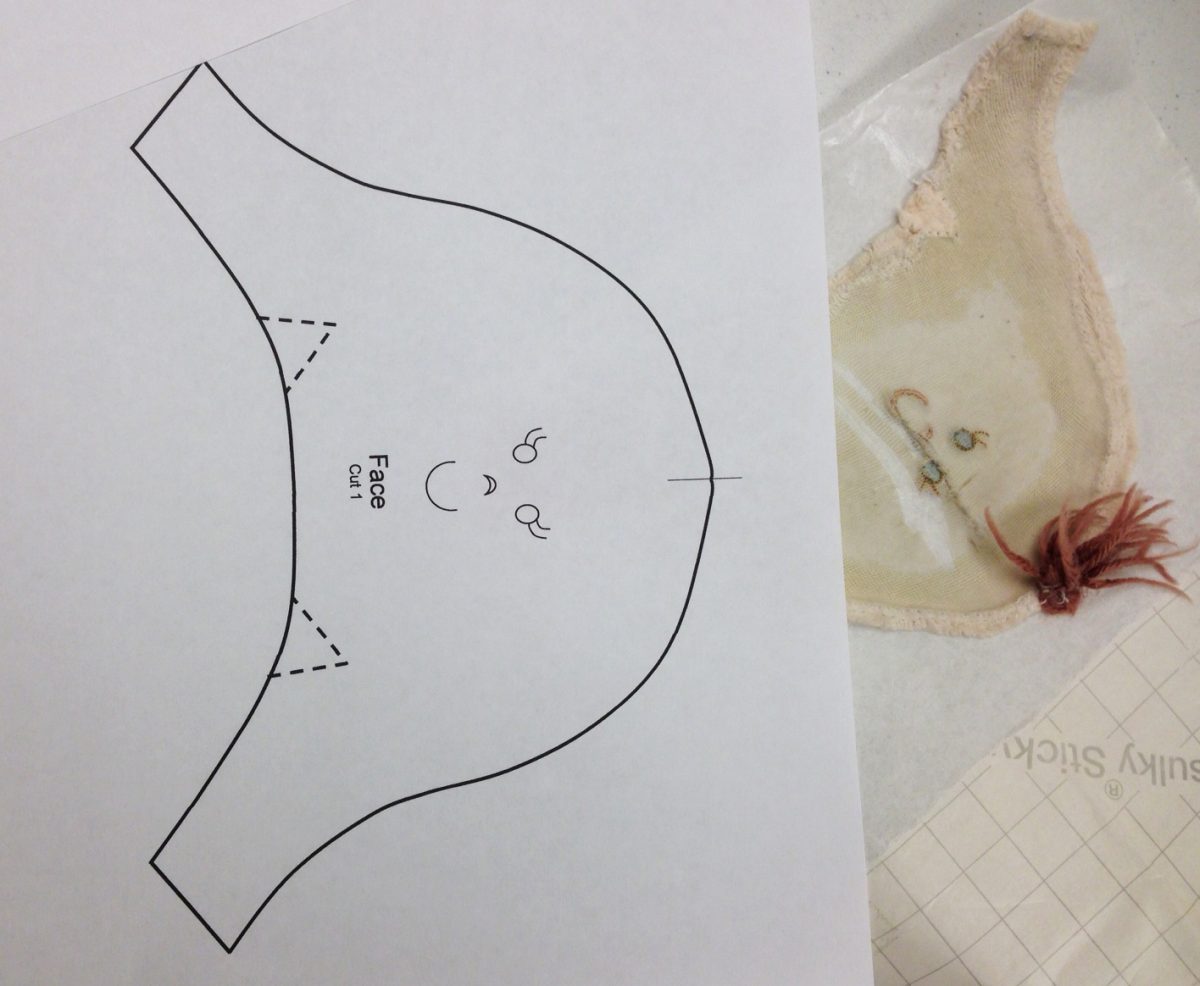
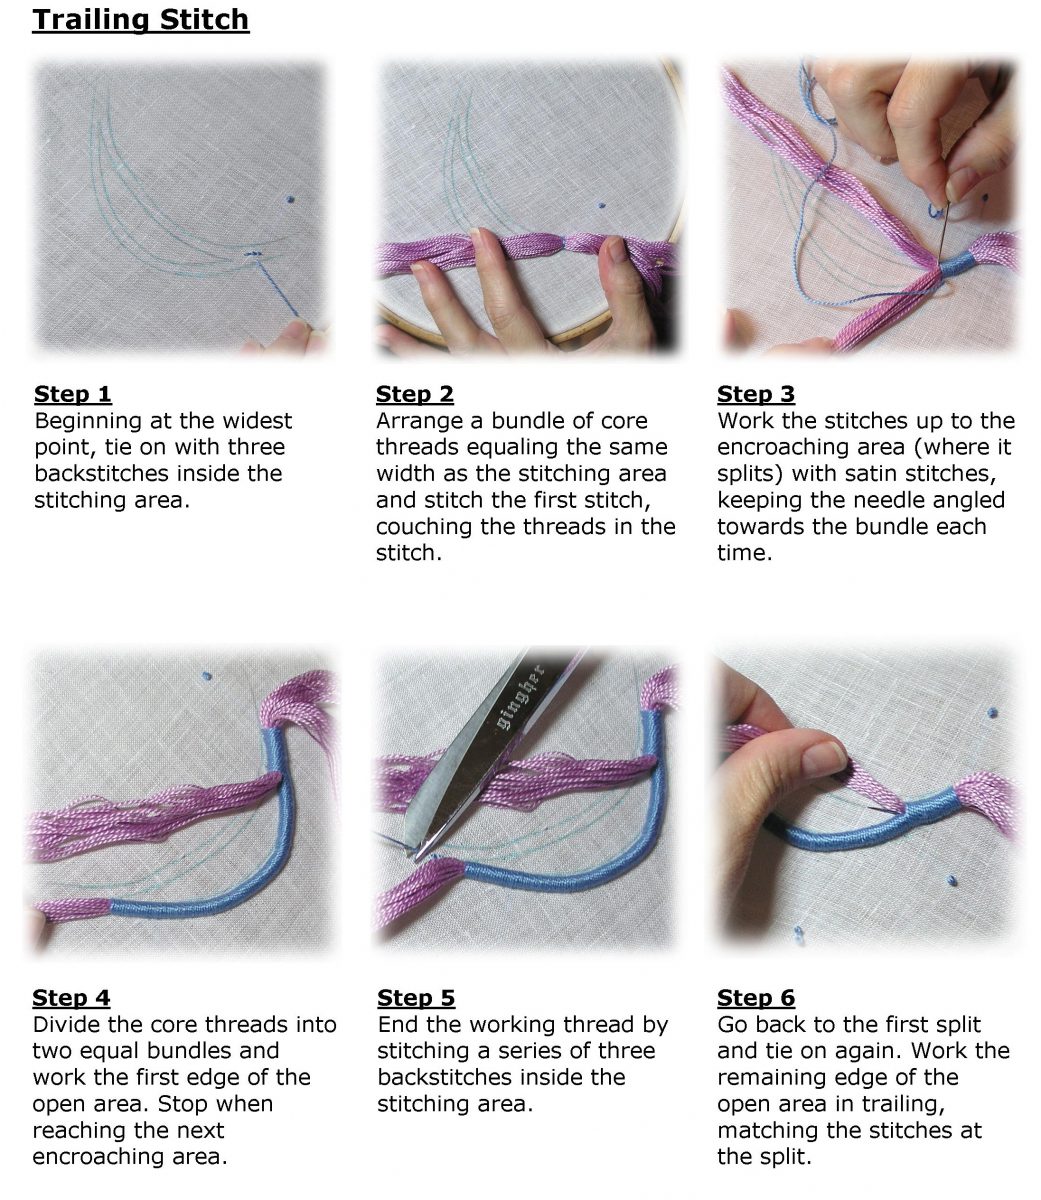
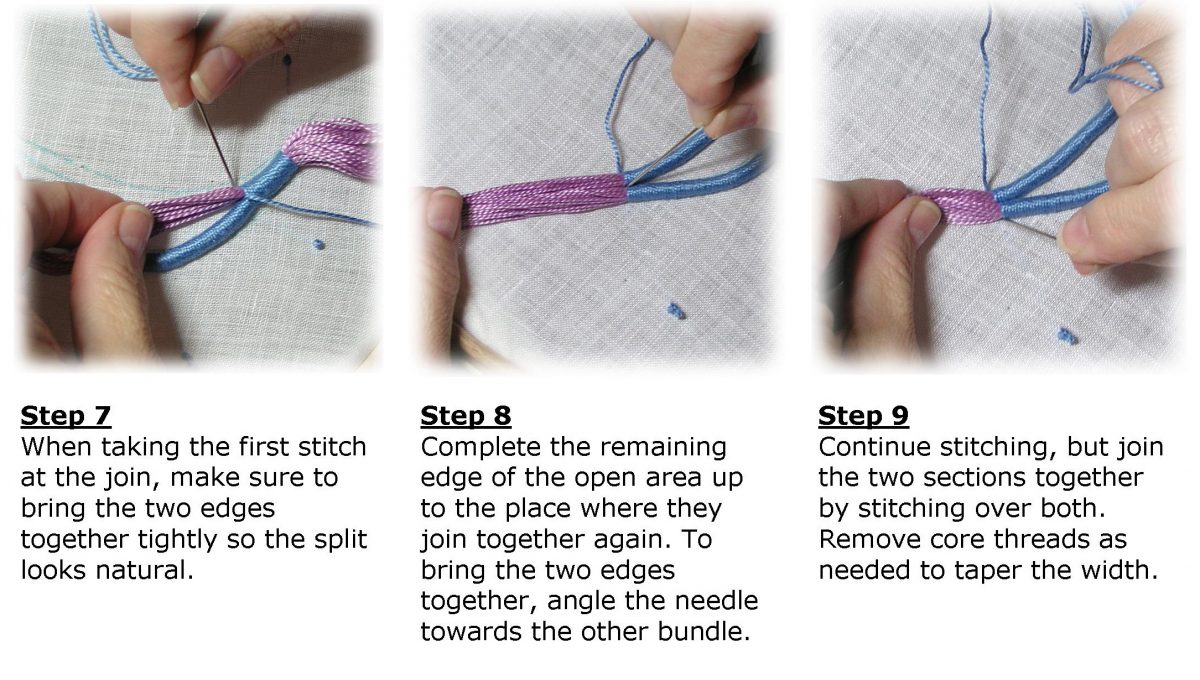
It was now time to transfer the facial features and re-create the embroidered parts. I used fusible water soluble stabilizer such as “Wet ‘N Gone Fusible” to trace the facial features then fused them onto the right side of the velour fabric. I was careful to use a large enough piece of stabilizer and fabric with which to fit entirely inside my embroidery hoop. Because the fabric was stretchy, I knew it would be more stable if I fused the entire face while embroidering. It worked beautifully. I used Floche to do all of the facial features. On the bodice front, I recreated the ducky appliqué using a scrap of pale yellow wool I had in my stash, outlining the shape in “trailing” stitch. (See stitch guide).
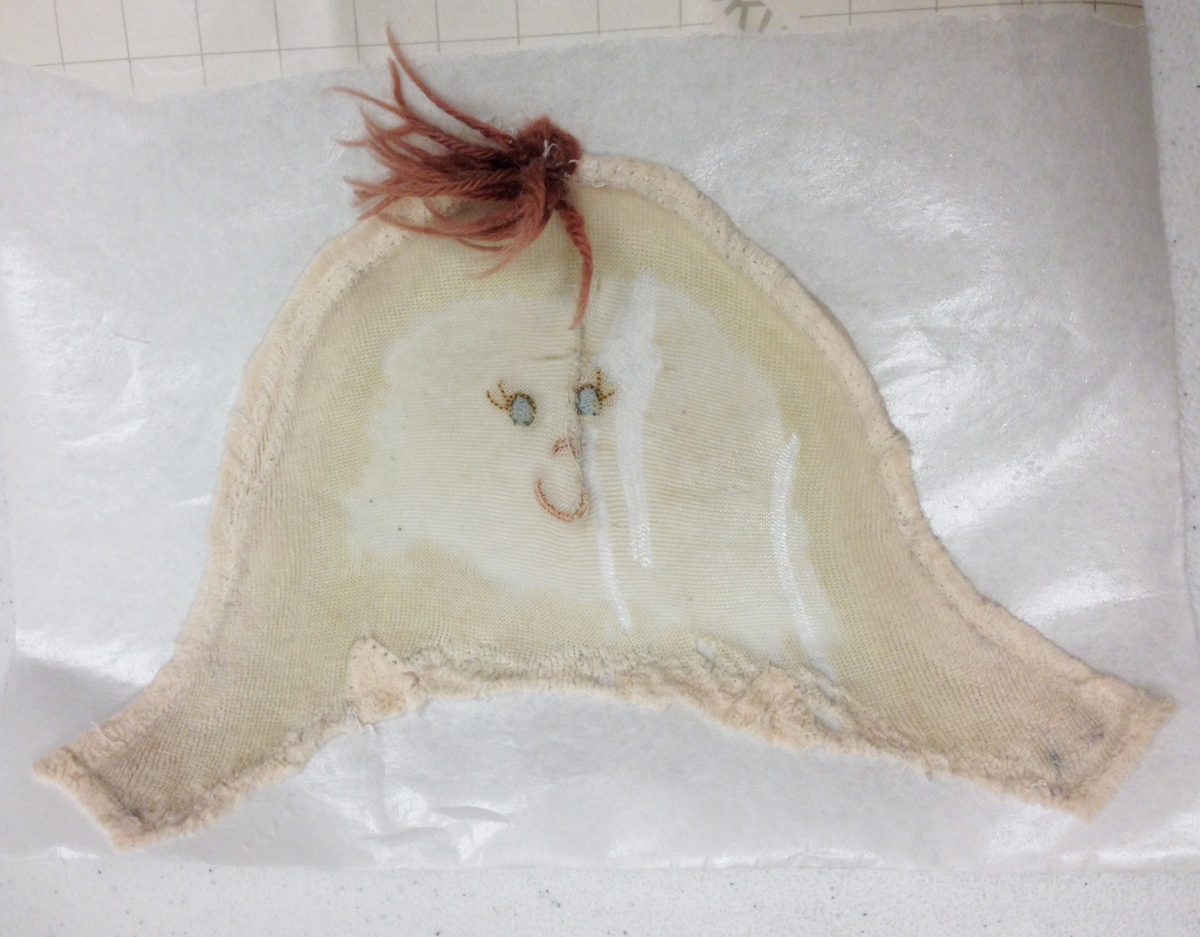
Here is a good image of the pattern pieces and embroidery template and a photo of the old doll before disassembly.Allegra’s face, the most critical of all pieces.
Next, I soaked the embroidered pieces to remove the fusible stabilizer. With a deep breath, I boldly cut out the pattern pieces and began to re-construct the cherished doll. I have to admit, I was almost distraught at the thought of the pieces not fitting but I powered through it. In the end the pieces fit well except for the mitts and boots which had to be adjusted slightly because they didn’t quite fit the body correctly. Thankfully, I purchased extra fabric to prevent undue stress which proved to be an excellent idea. I also made a small stuffed heart from the original body pieces and placed it inside the new doll so at least a small bit of the original doll was remembered.
I decided to keep the satin elements because I wasn’t sure if I could find the appropriate fabric to replace them, then later decided it was the correct choice to retain as much of the original doll as possible.
Allegra was beginning to take shape and become her old self again and I began to worry if I had taken the “restoration” a bit too far. Doubts crowded my mind as Christmas approached and the due date leered. I decided it was time to call in the professionals, so I scheduled a quick trip to the North Pole to confer with his Excellency, Santa Clause. On my arrival and after my hot chocolate, the elves inspected my work and matched against the original documents of Allegra’s birth, and only then could a reliable decision be made. It was the general consensus that I had done the correct thing and Allegra was given the stamp of approval by the experts at Santa’s workshop. After a few small nips and tucks, Allegra was ready for her cameo appearance. With a wink and nod, I was on my way back to my studio to deliver the most important commission I had ever undertaken.
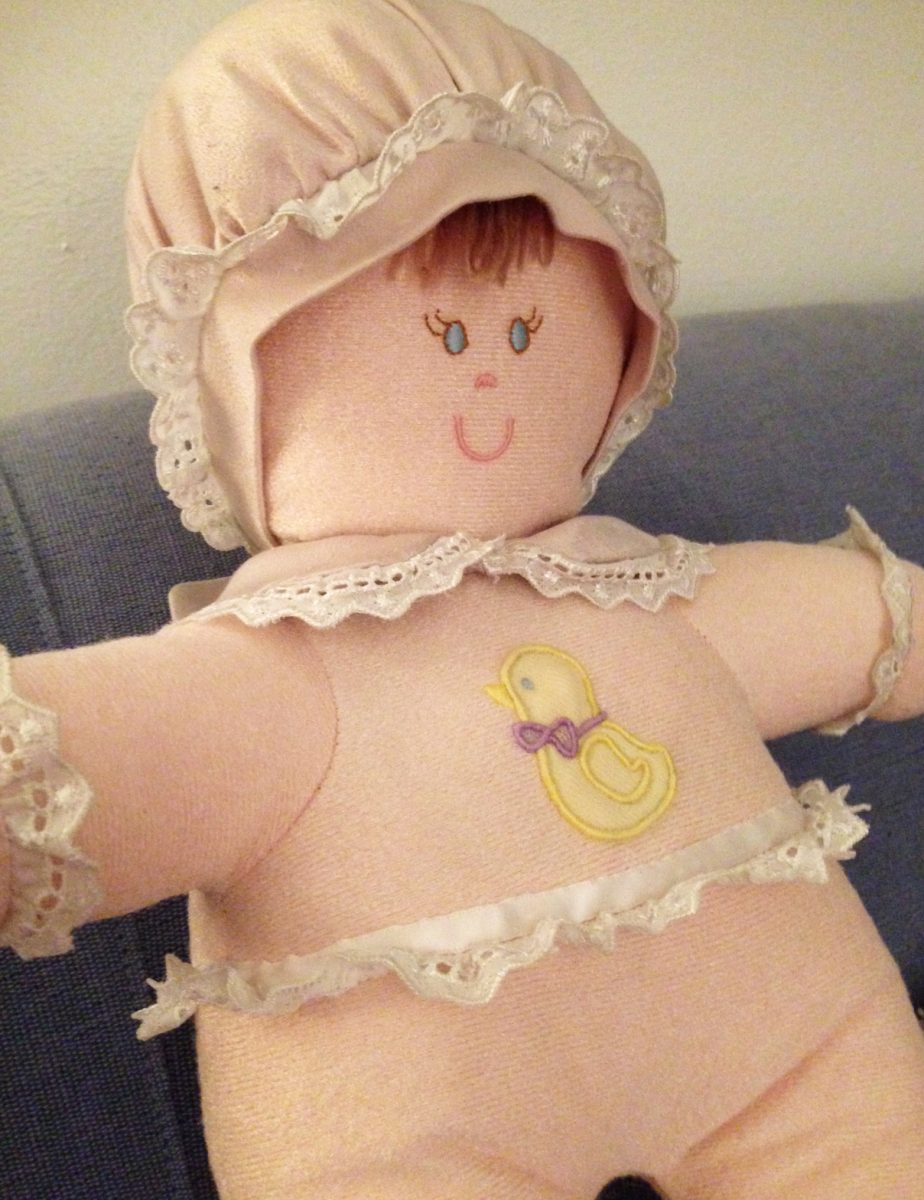
Meet the new Allegra! I know the fabric isn’t an exact match, but it had all the correct texture and stretch needed to recreate the doll.I chose to use the original wool bangs but used stronger color embroidery threads because the fabric was a bit darker than the original. I backstitched around the eyes and satin stitched inside the eyes. I used satin stitch for the nose and trailing stitch for the mouth. I think she looks lovely.As you can see, she has a new plump body with a stable head and her sweet little wings are again where they belong.
I wasn’t around when Luana unwrapped the new Allegra but I was told she was delighted with the result and her old friend had made a huge comeback. And so my Christmas t’was complete.
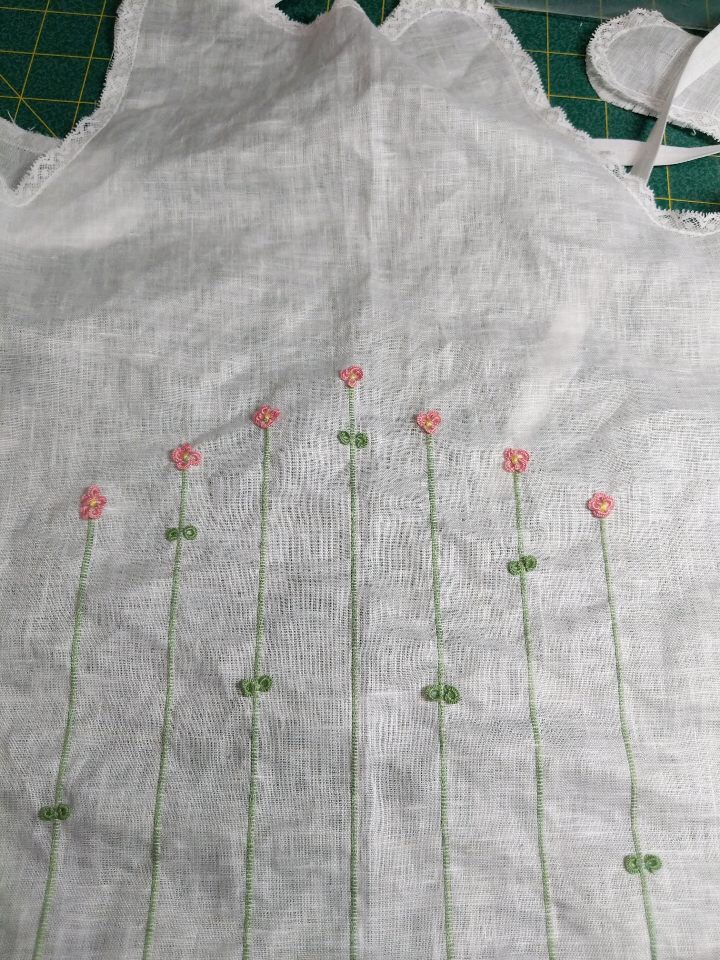
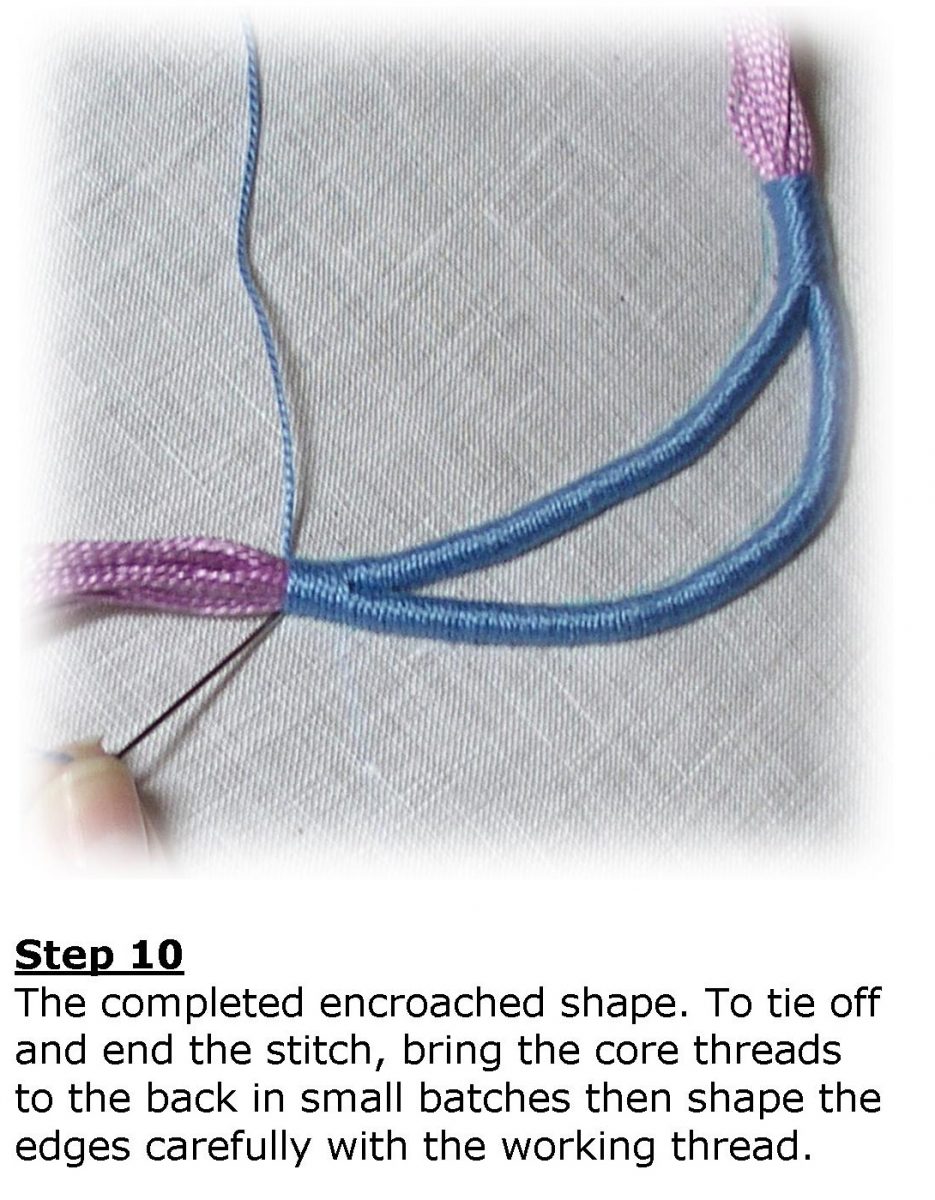
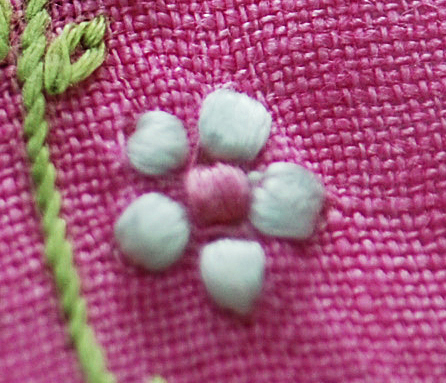
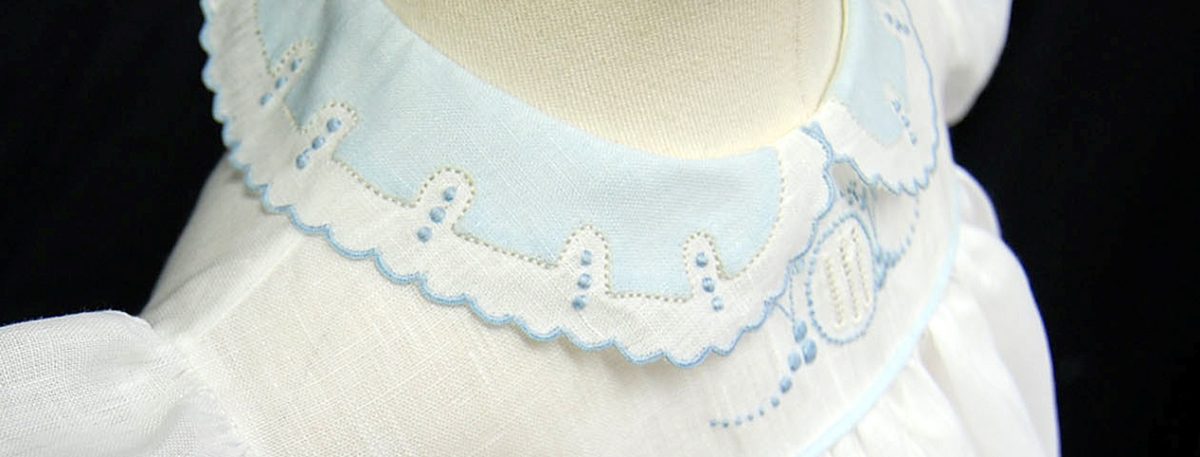
At first glance, Granitos (translated Little Grain), are pearl-like dots stitched in the fabric. The stitch requires no under-padding, but instead, the working thread is mounded continuously until the desired effect is obtained. This consists of only two stitching points, A to B, repeated over and over causing the stitches to mound over until they resemble a small dot in the fabric. This is similar to what you may have experienced while machine stitching and the foot of the machine gets stuck in one place, so the stitches keep mounding up. Granitos can be rendered correctly up to a certain size so if a larger dot is required, another technique such as padded dots can achieve the desired effect. I prefer to make my Granitos sans-hoop while working over the finger.
Padded satin dots are completely different. The area of the dot is outlined with a very secure foundation stitch such as split-stitch or stem stitch; I prefer the former. The inside of the dot is padded either with “line padding” or chain stitching. Line padding can be layered by alternating stitch directions from one layer to the next, first beginning in the centermost point of the dot and gradually getting wider as the layers are added. The final layer should lay perpendicular to the satin stitches so planning is essential.
It is said that every embroiderer is judged by her skill in making padded satin dots so can be quite challenging to master. It’s easy to go completely wrong while stitching these tricky little round circles, but with a little practice and the correct techniques, you can achieve mastery with a few tidbits of techniques and a lot of practice. Padded dots are best worked in hoop to prevent the dots going oval.
I hope you try both techniques and before you know it, you’ll be including them in your embroidery projects regularly. The accomplishment is enormously rewarding and the effect is absolutely intriguing.
Please check back for additional stitch techniques pertaining to this design. If you would like to purchase a copy of Babes in Blue pattern, please contact me via email: wendschoen@aol.com.
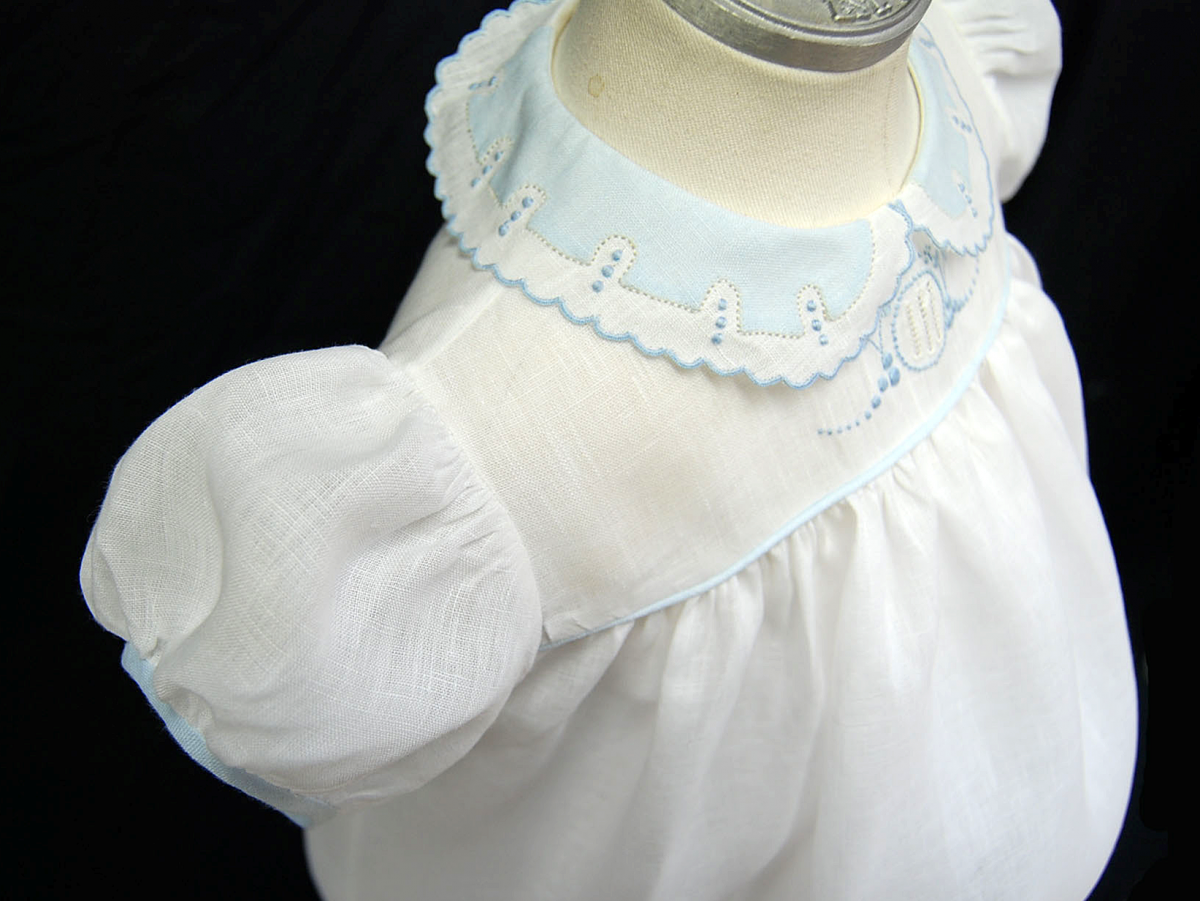
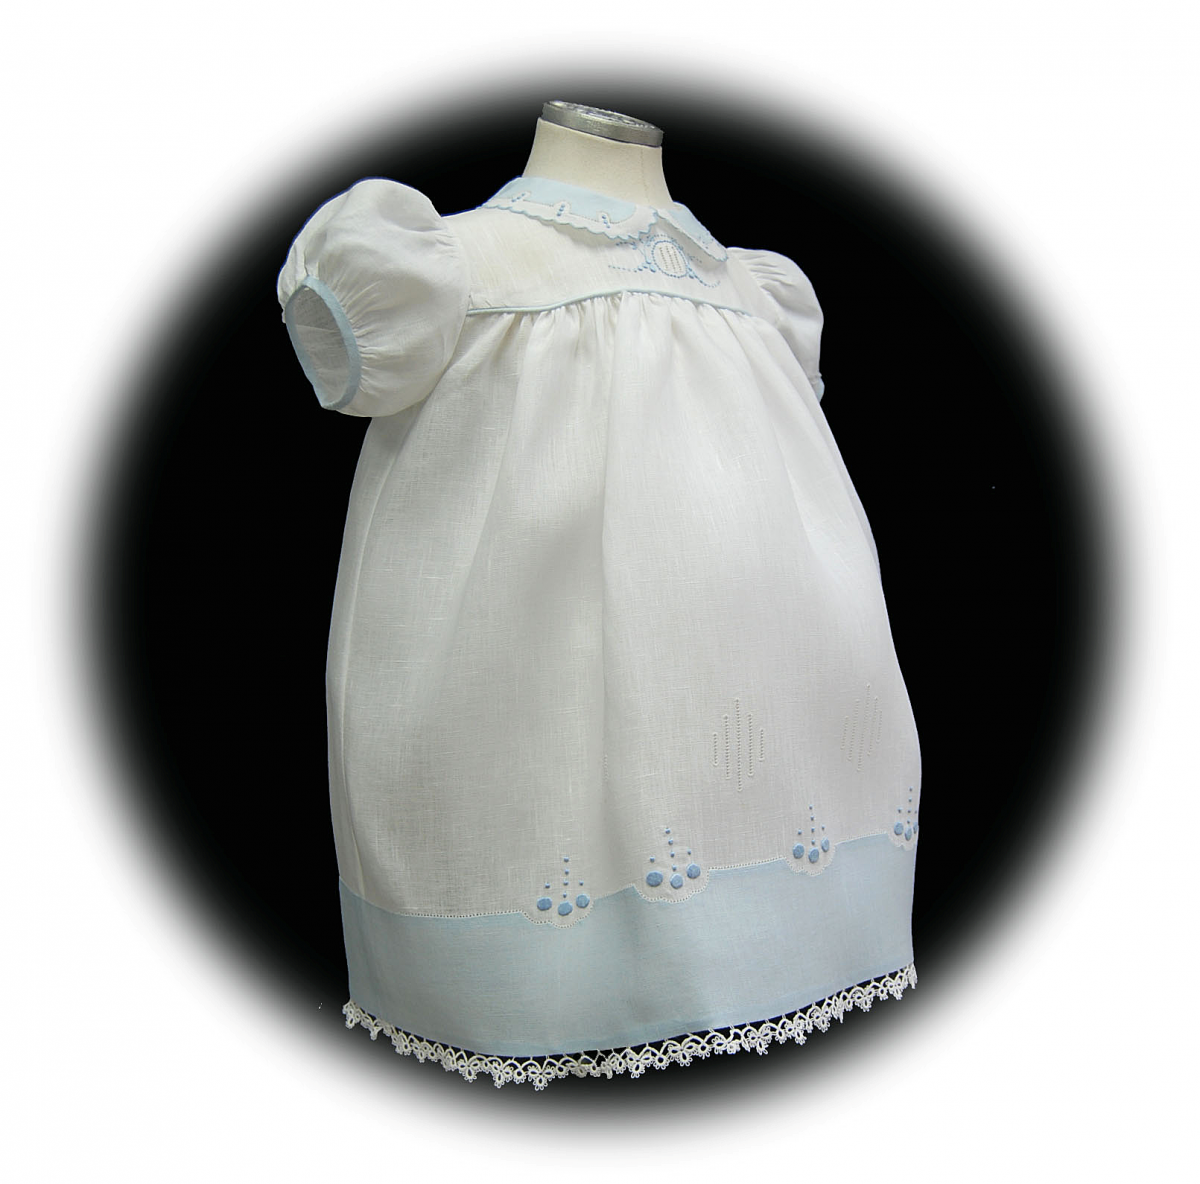
This little dress is created using a vintage baby dress from my vast and ever-growing collection of vintage baby clothes. The original was made of broadcloth, as most of the dresses from the 50s, but I chose to make it from linen. The project features Madeira Applique, Granitos, Drawn-thread, Buttonhole scalloped edging, and Satin Dots. I will cover all these stitches in my upcoming posts.
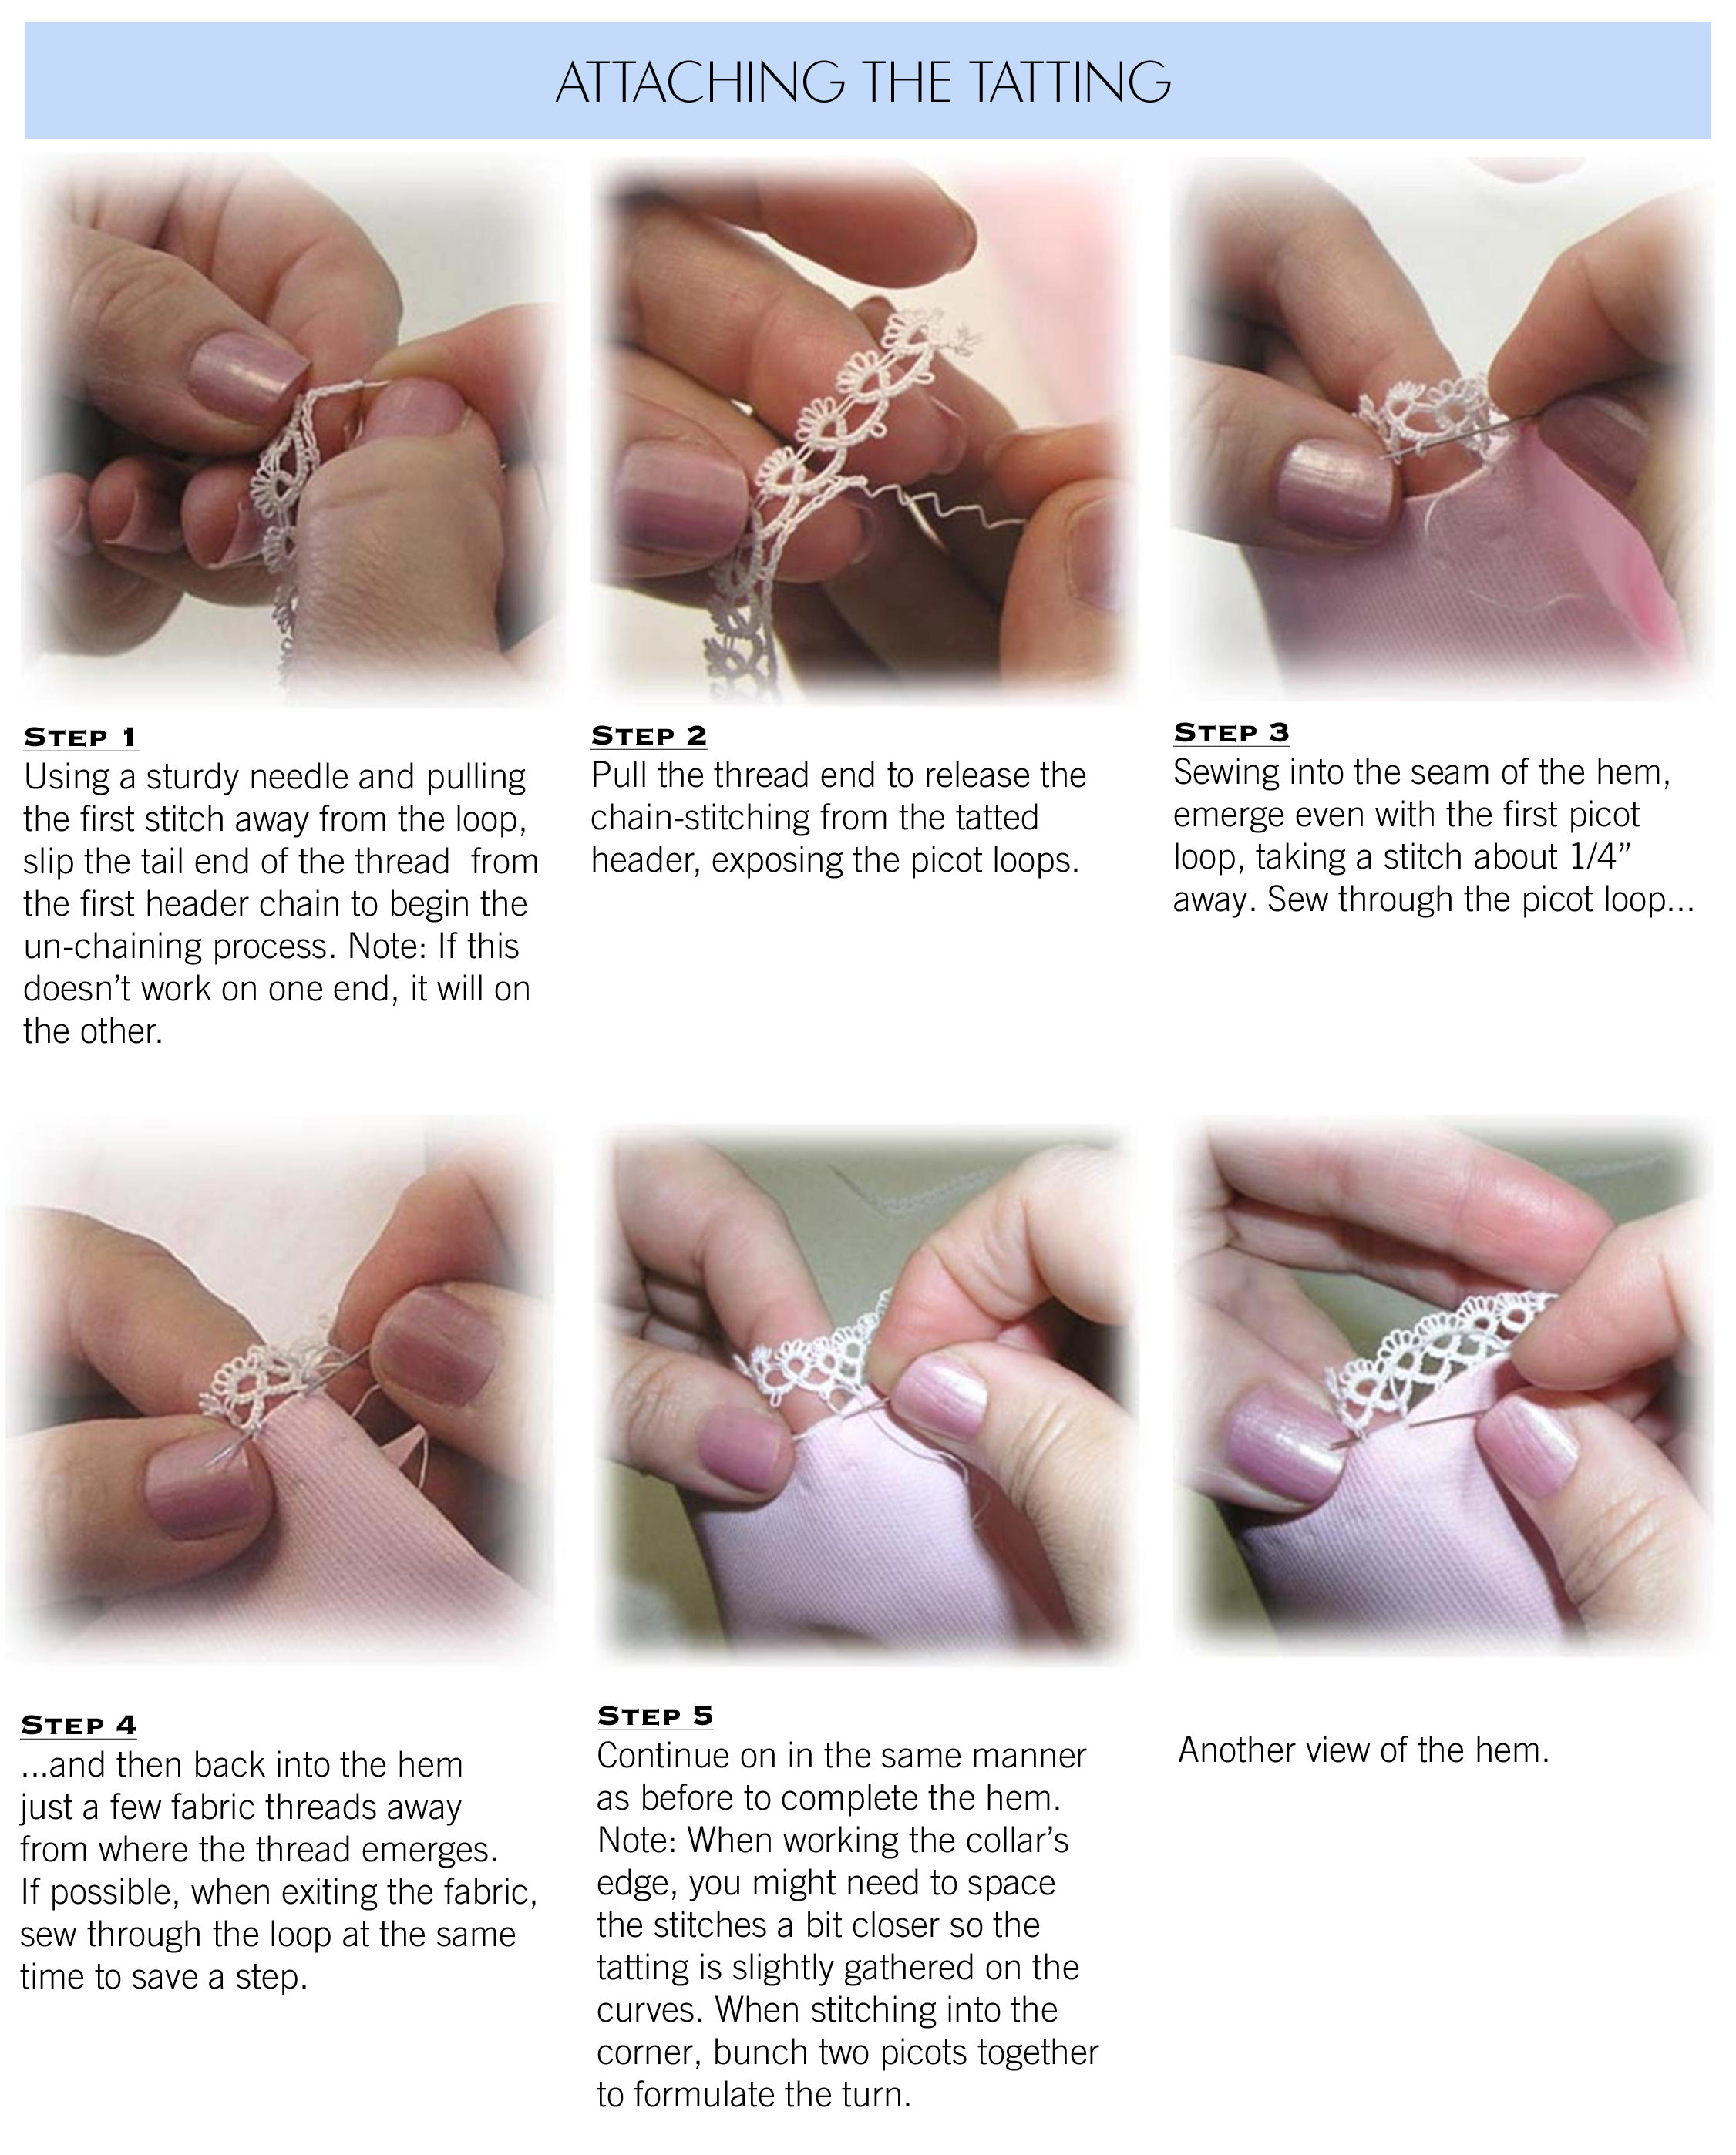
Have you ever wondered how some sewists are able to attach tatting to a garment without having the header showing? I know I did until I figured out how to remove the chain-stitched header entirely.
The technique I’m referring to pertains to tatting that has a chain-stitched header. The very narrow tatting has a thread that trails from one loop to the next. If you cut that header, the tatting will come apart, so choose carefully. If you make your own tatting (jealous me!), just leave the header off. You can often find handmade tatting on ebay and those usually never have a header. Finding vintage well-made tatting is certainly like finding hidden treasure so scoop it up for your stash.
Most of the tatting I use is made in China and it is very good quality and is available in many styles and widths. It is cost effective but only available in white or ecru. Oh how I wish I had learned to tat from my grandmother, who sat on her porch and needle tatted all afternoon while rocking in her favorite chair.
Babes in Blue is available as a project lesson. The pattern is included in one size only, Size 9-12mo. Please contact me via email if you are interested in purchasing a copy. Email: wendschoen@aol.com
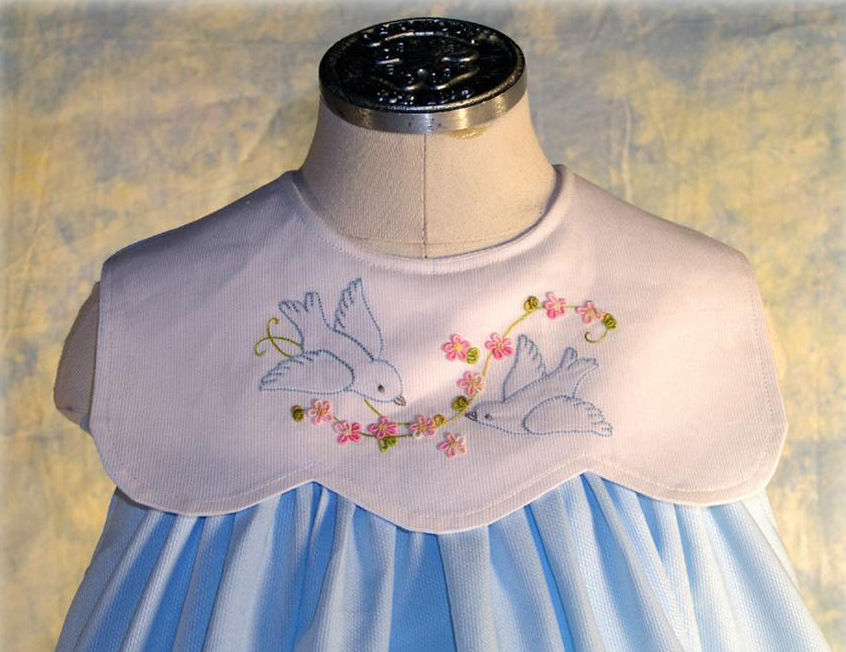
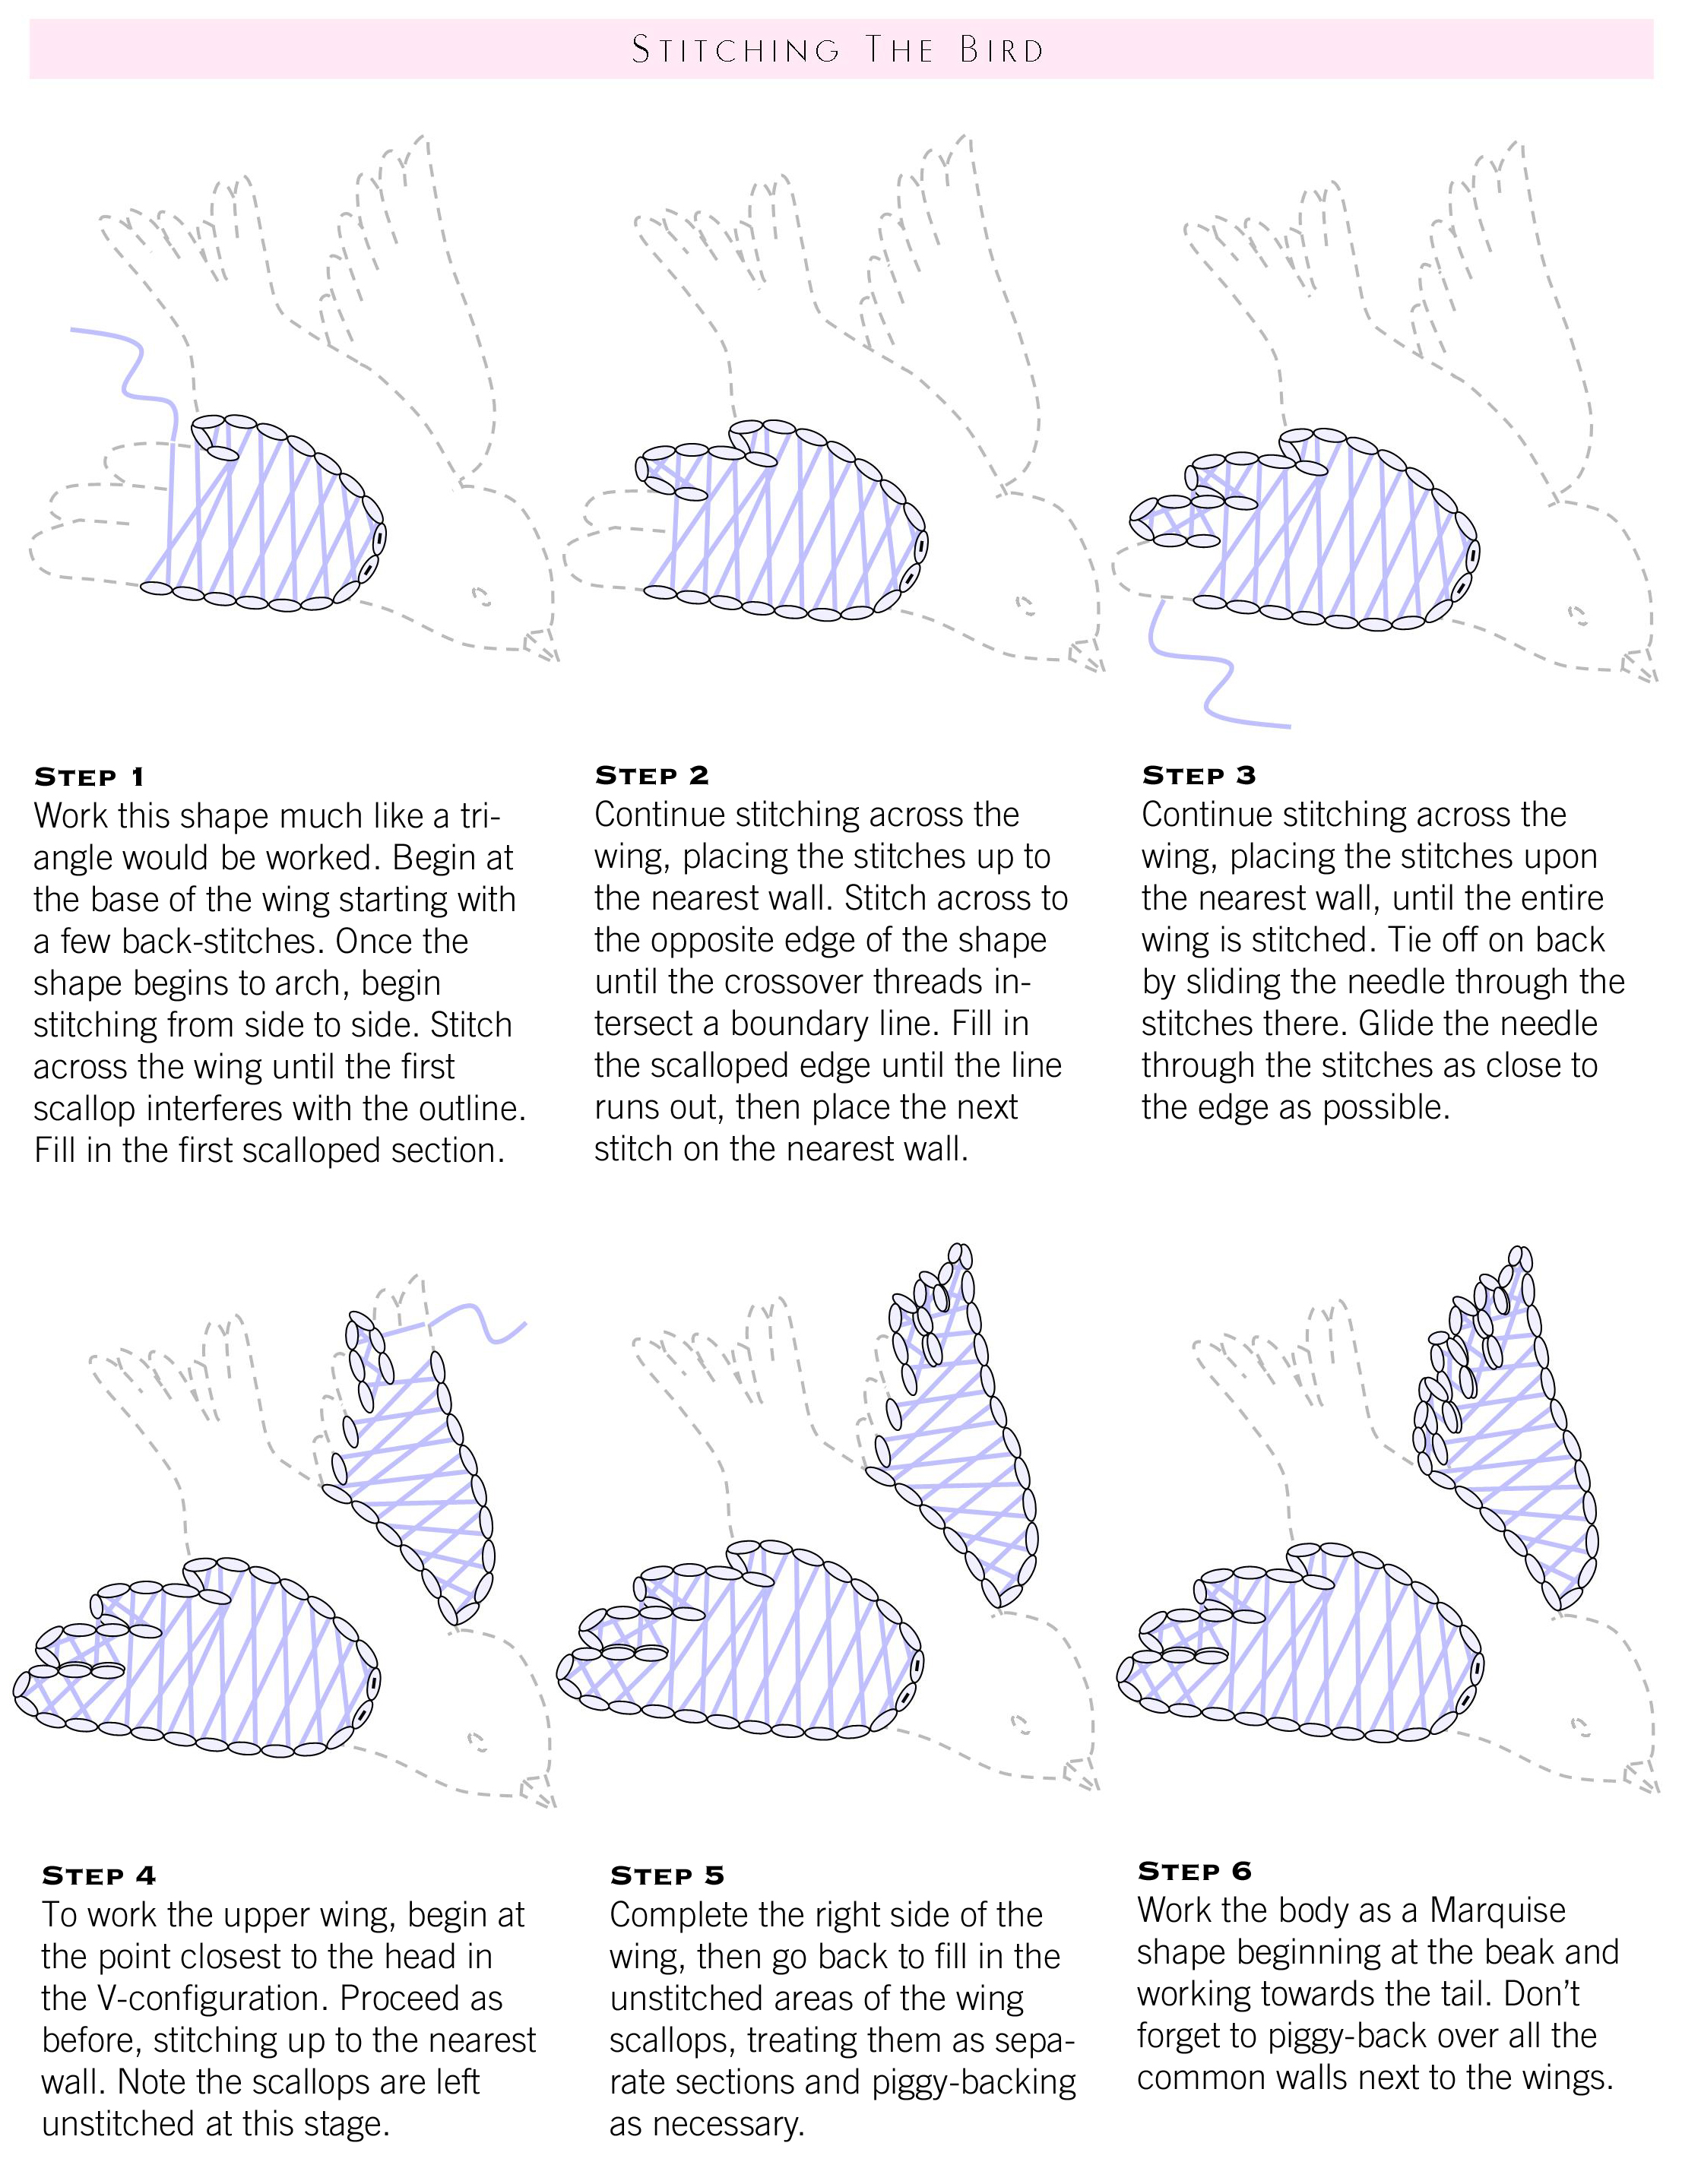
If you are at all familiar with my embroidery designs, you’ve probably come to the conclusion that shadow work is my all-time favorite technique. I began working on perfecting my technique of the art sometime in the mid-1990s. The basic love of the technique grew into an obsession which later resulted in the publishing of my fifth book, “Perfecting the Art of Shadow Work,” published by F+W Media.
The project with which I am demonstrating the technique is from my long ago ceased Wendy’s Embroidery Club. Although the Embroidery Club is no longer being published, the individual projects are still available by email request.
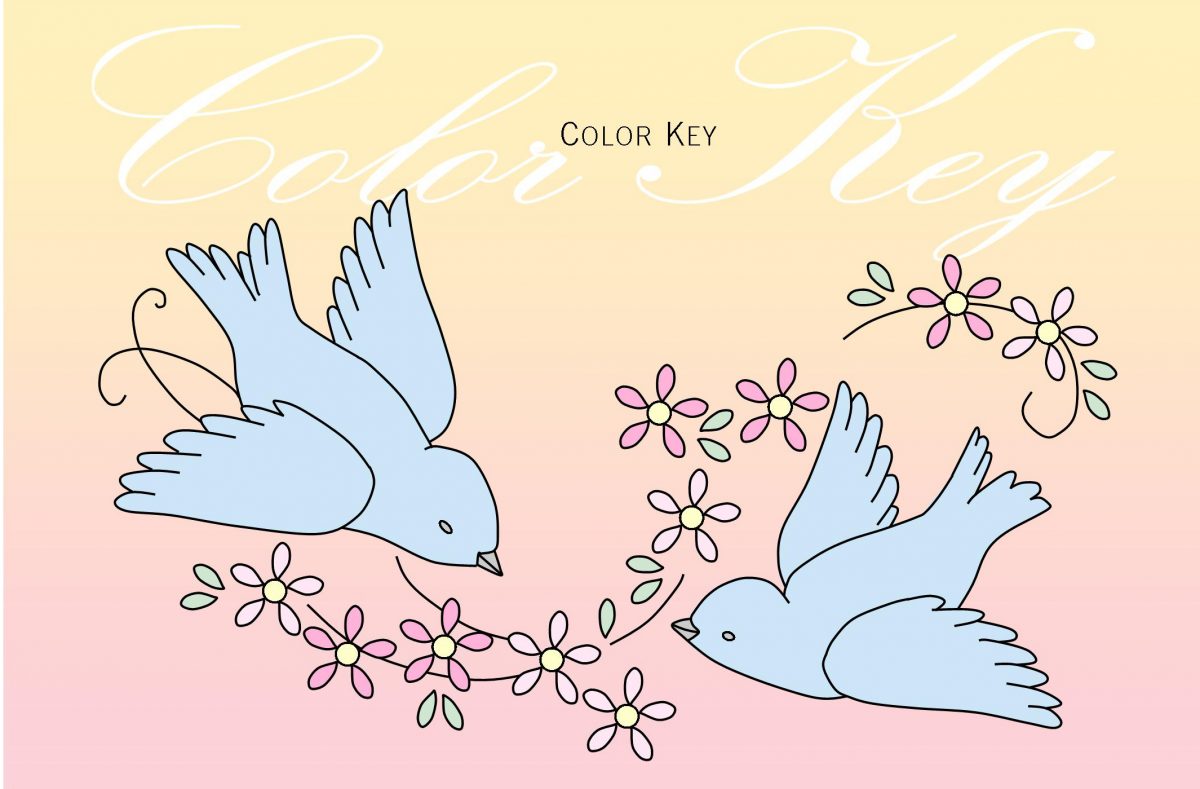
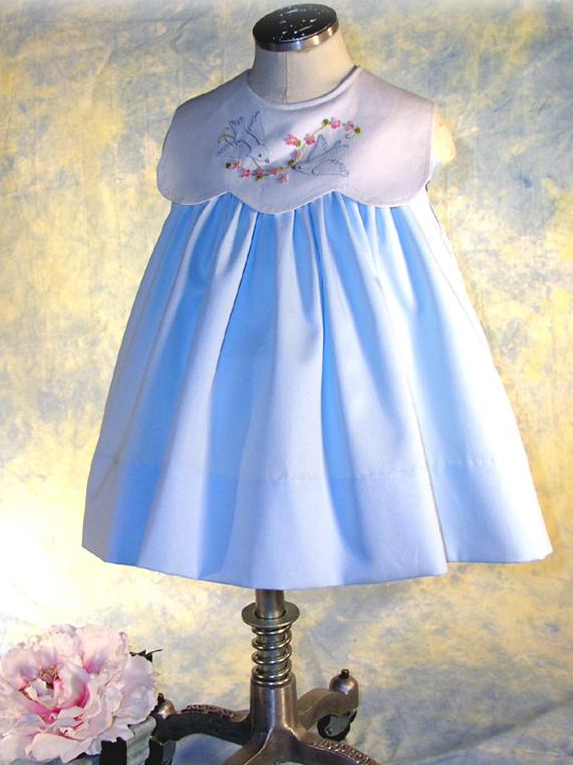
Shadow stitching animal shapes can be a bit tricky, but with a little practice, anyone can master it. The little flowers add dimension and enhance the shadow work images.I usually provide a color key in my project directions to provide a visual of the completed design.
The dress pattern includes a matching bonnet and features sizes 6 months, 1, 2, and 3.
The featured Embroidery Club project, (Volume 5; Number 1) is available via email to wendschoen@aol.com for $18.00 plus $2.00 shipping. The enclosed pattern includes sizes 6 months, 1, 2, and 3 and is tissue printed. Wendy’s Mastering Shadow Work is only available from Wendy’s Sewing Studio in limited quantities for $25.00 plus shipping. Please inquire.
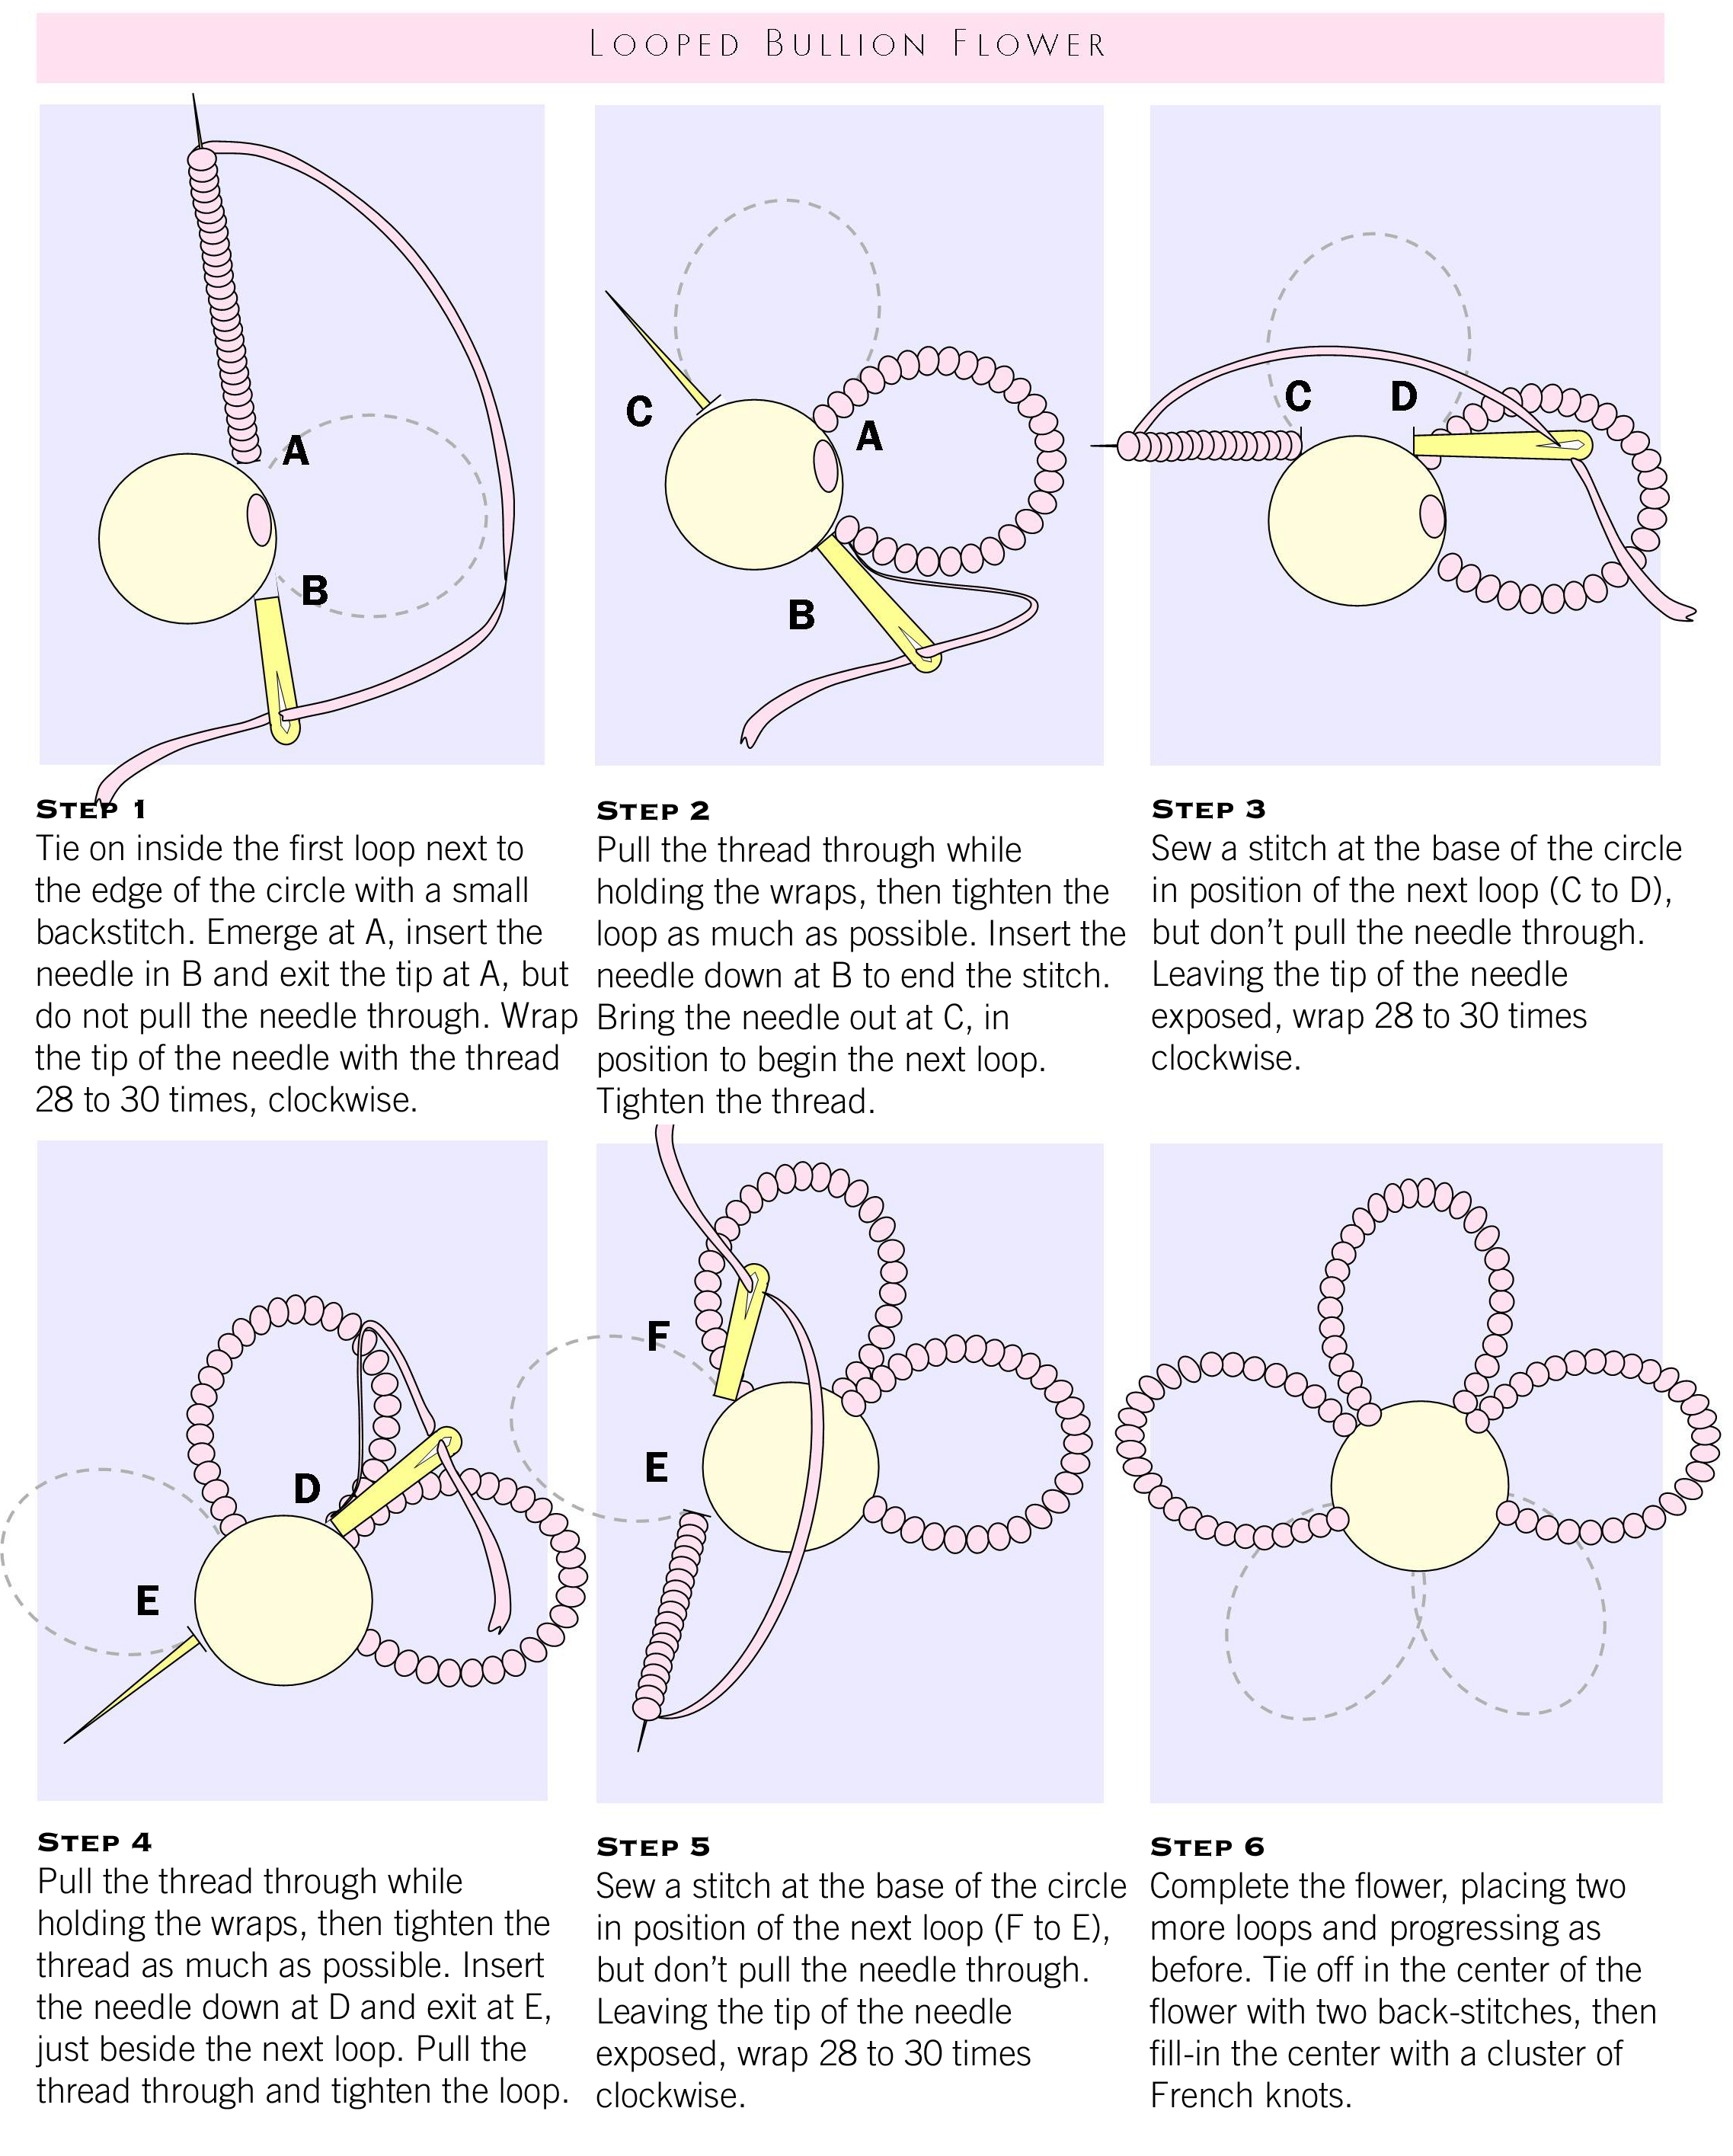
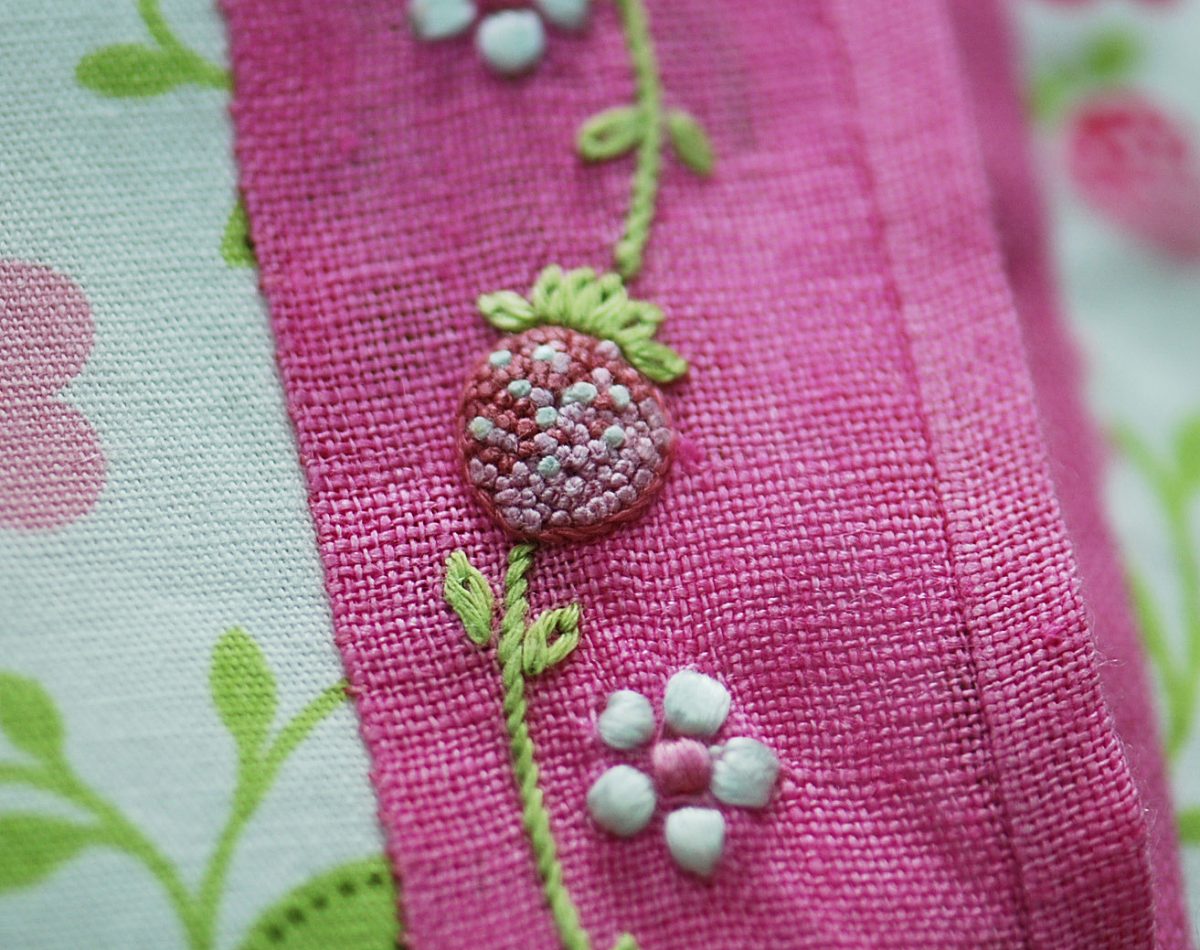
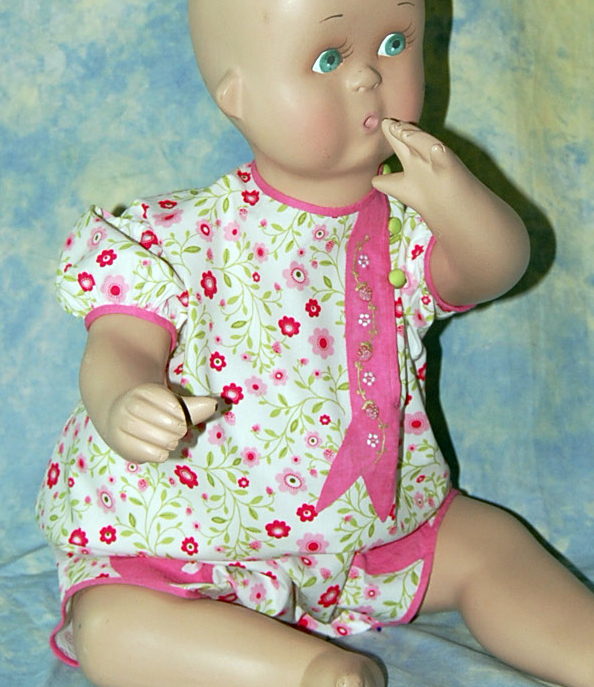
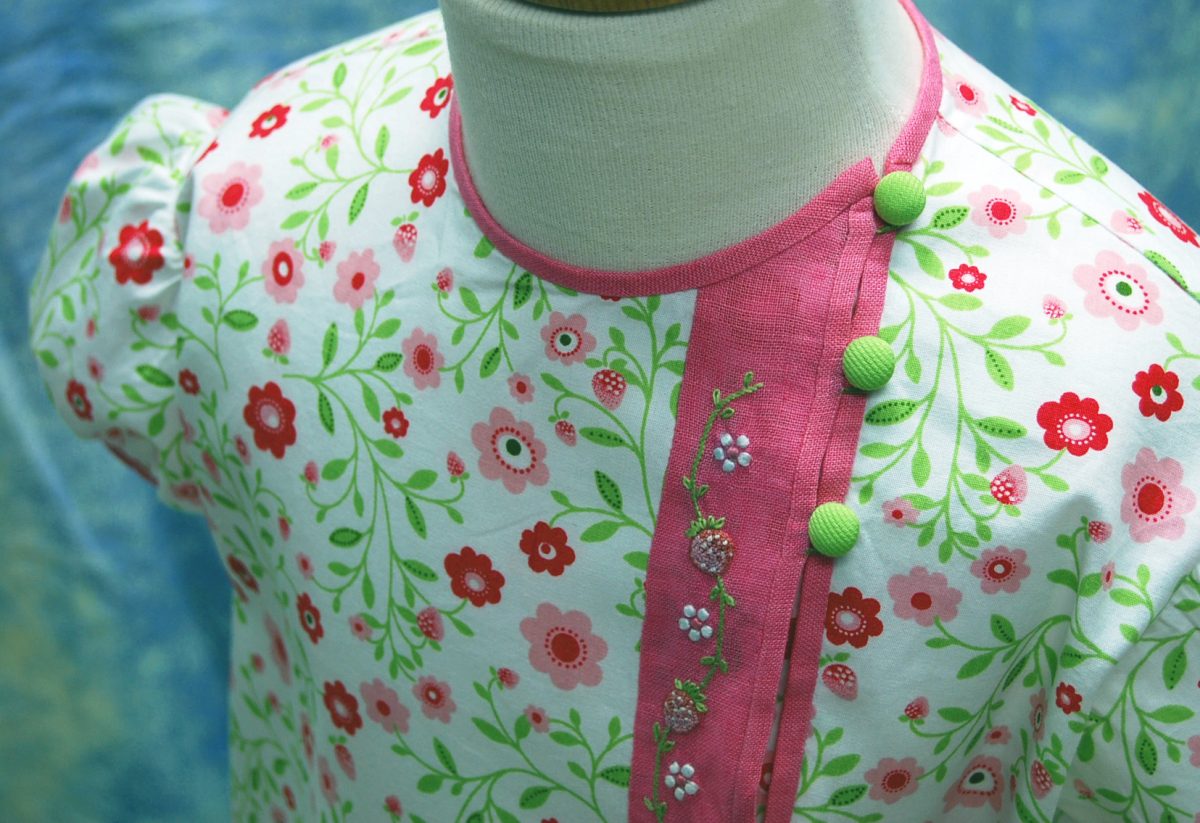
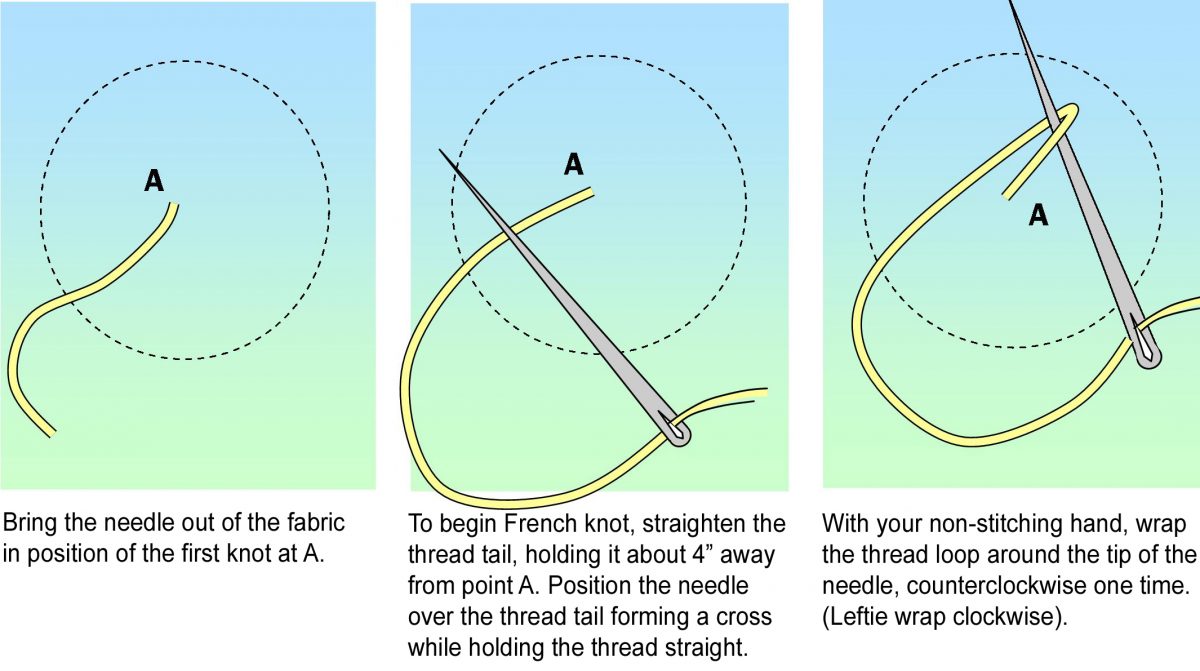
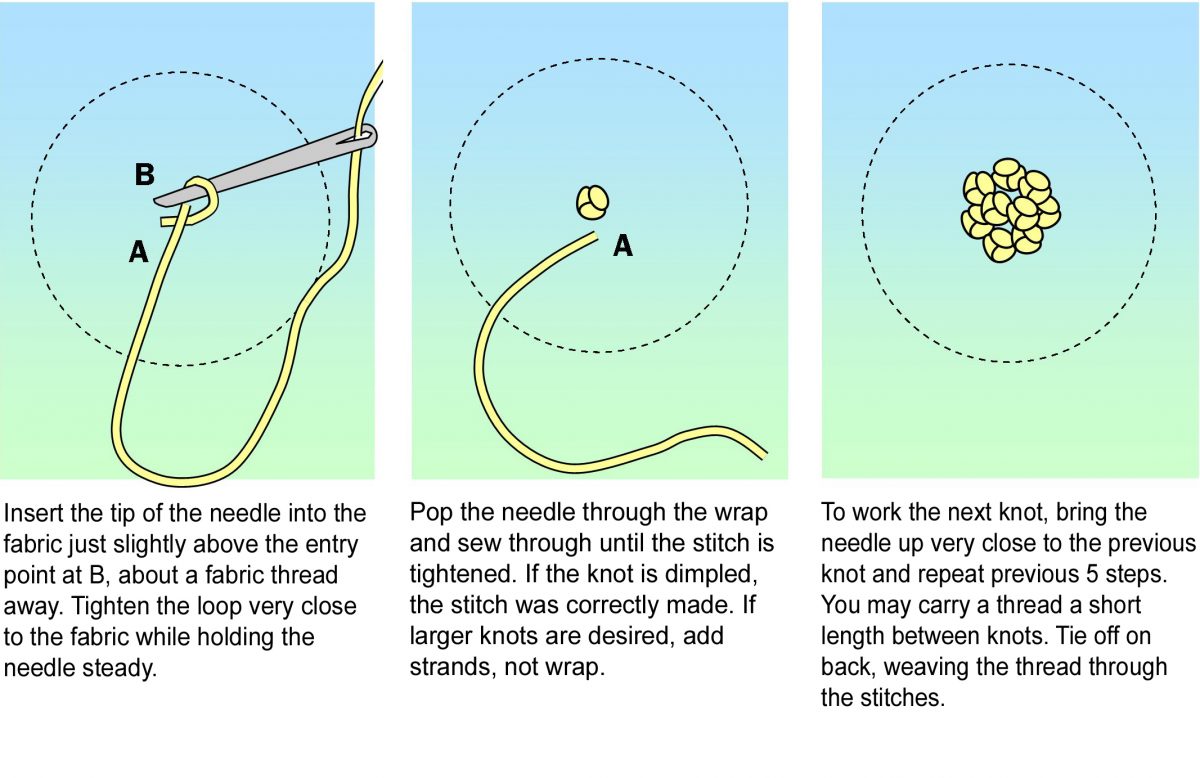
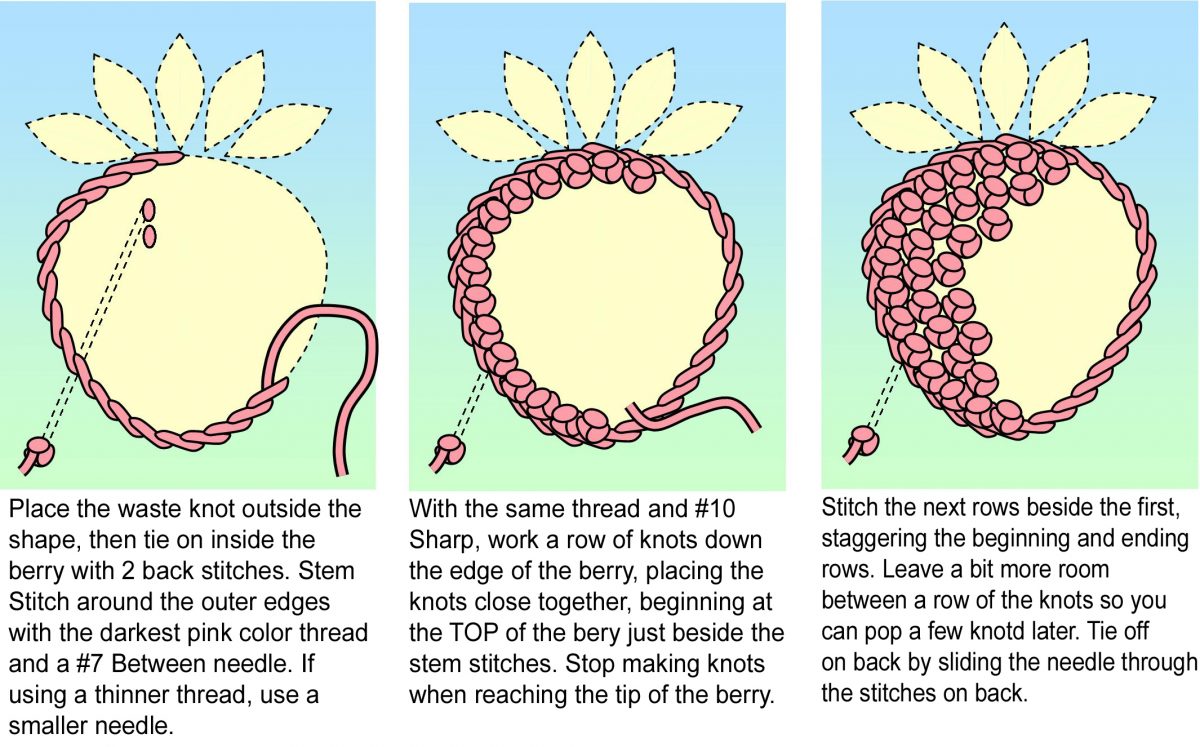
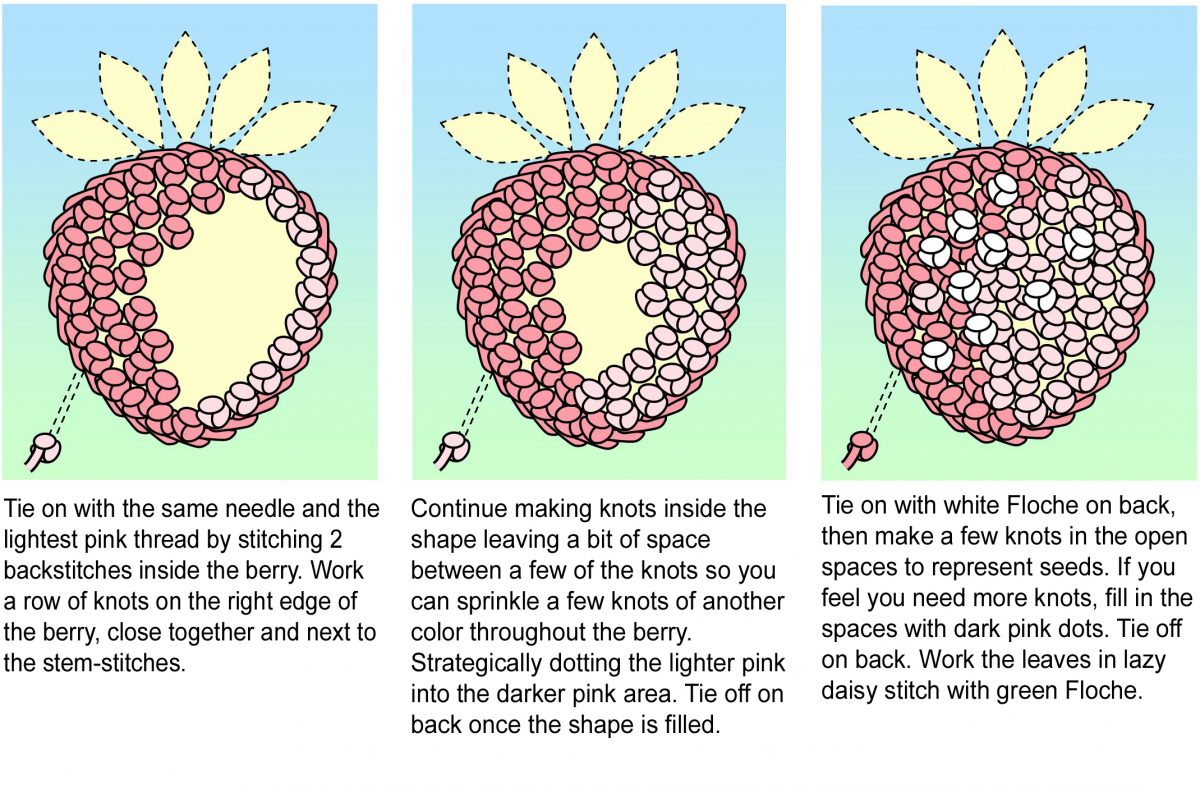
I’m often asked about my embroidered French Knot stitched clusters. Sometimes it’s difficult to recognize the stitch due to the fact that I make my stitches using only one thread, usually Floche (a luxury embroidery cotton), and with only one wrap over the needle. I always outline the area to be stitched with short stem stitches in the same color as the knots inside the area. The knots are purposely crammed together with only enough space to allow for the size of the knot. If possible, I avoid placing the knots in an aligned pattern, but instead choosing to place them randomly. The result is almost sculptural and quite interesting.
A very tight closeup of the stitched berry.The cute baby romper project was featured in Wendy’s Embroidery Club. The pattern is only available in Size 2.Shoulder detail showing actual size ratio of embroidery to garment.
If you are interested in obtaining a pattern for this project, please contact me at wendschoen@aol.com. The complete pattern and detailed handout costs $20 including shipping. Please reference Embroidery Club, Volume 7, Number 1, Passion Posies.
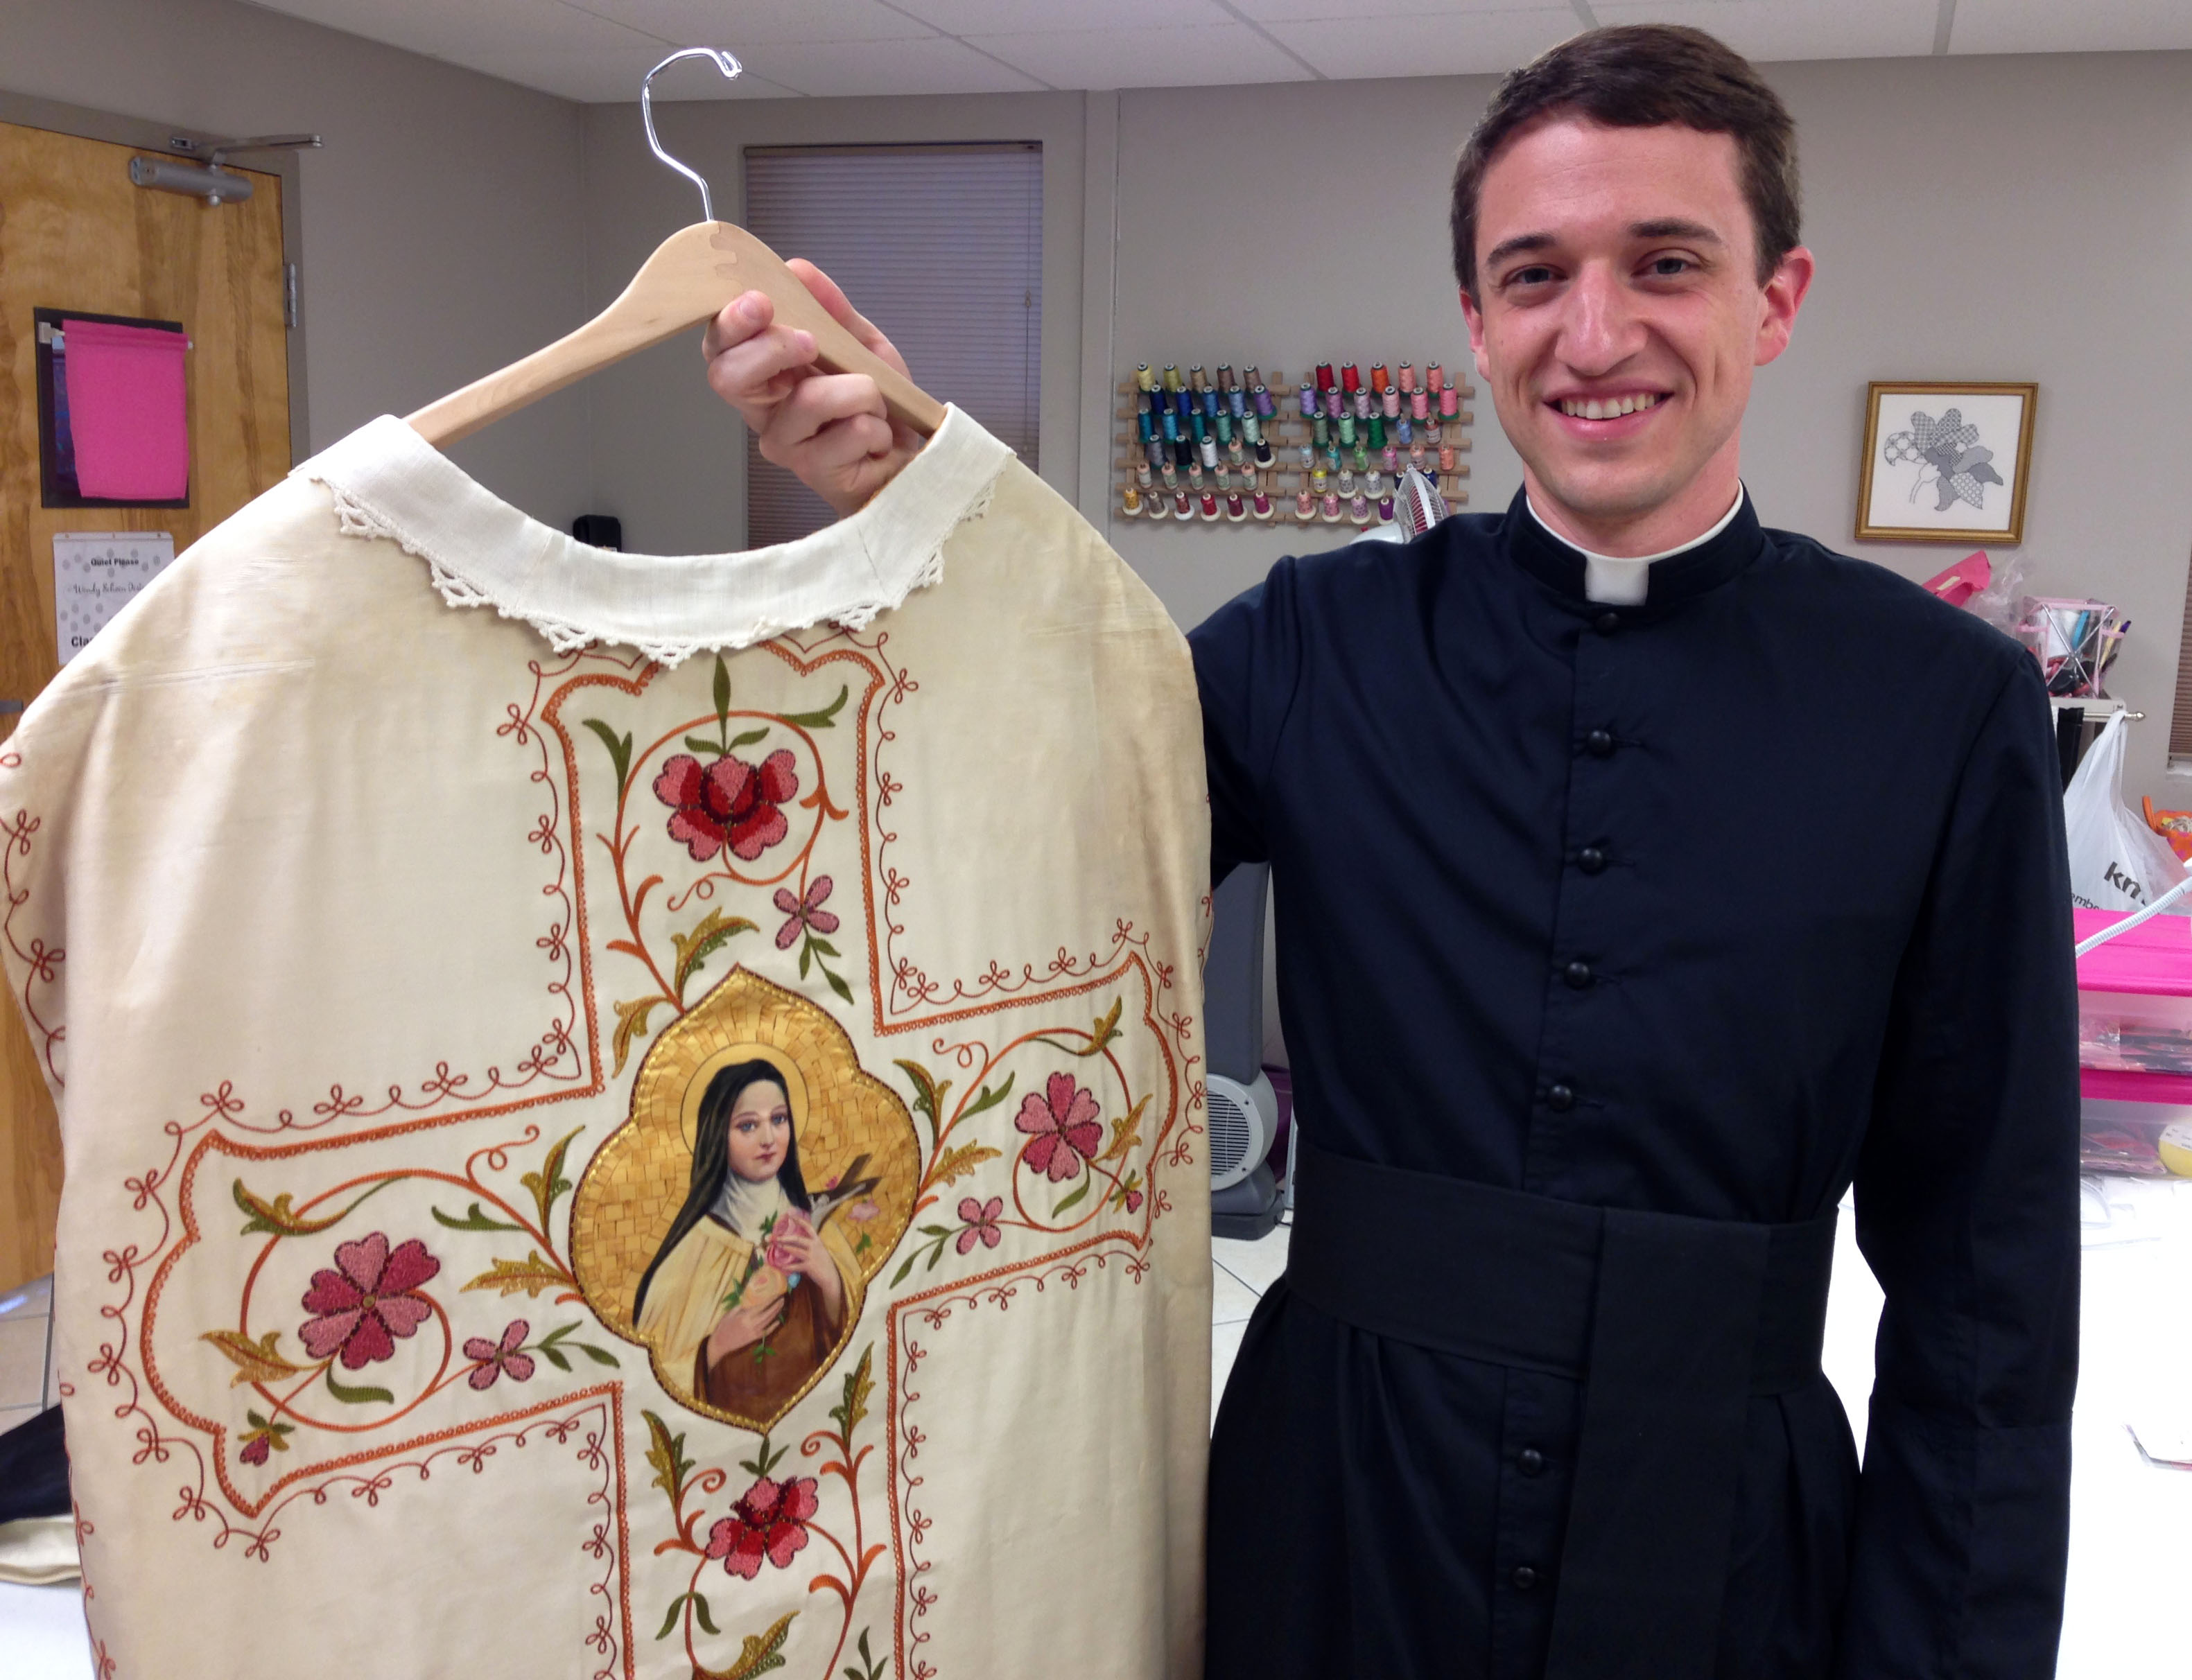
This gorgeous antique vestment was purchased by Fr. Garrett O’Brien sometime after his ordainment into the Catholic priesthood. The day I received Fr. Garrett’s phone call, I happened to be between projects and his request was quite unusual and interesting. I love a challenge so I was intrigued with the opportunity. He was seeking someone to recreate missing elements of his antique vestment, which he planned to gift another young priest at his ordainment the following year. He happened to be in the vicinity of my studio so I decided to meet with him at once. It would be the beginning of my friendship with a very young priest with very good taste in antique vestments.
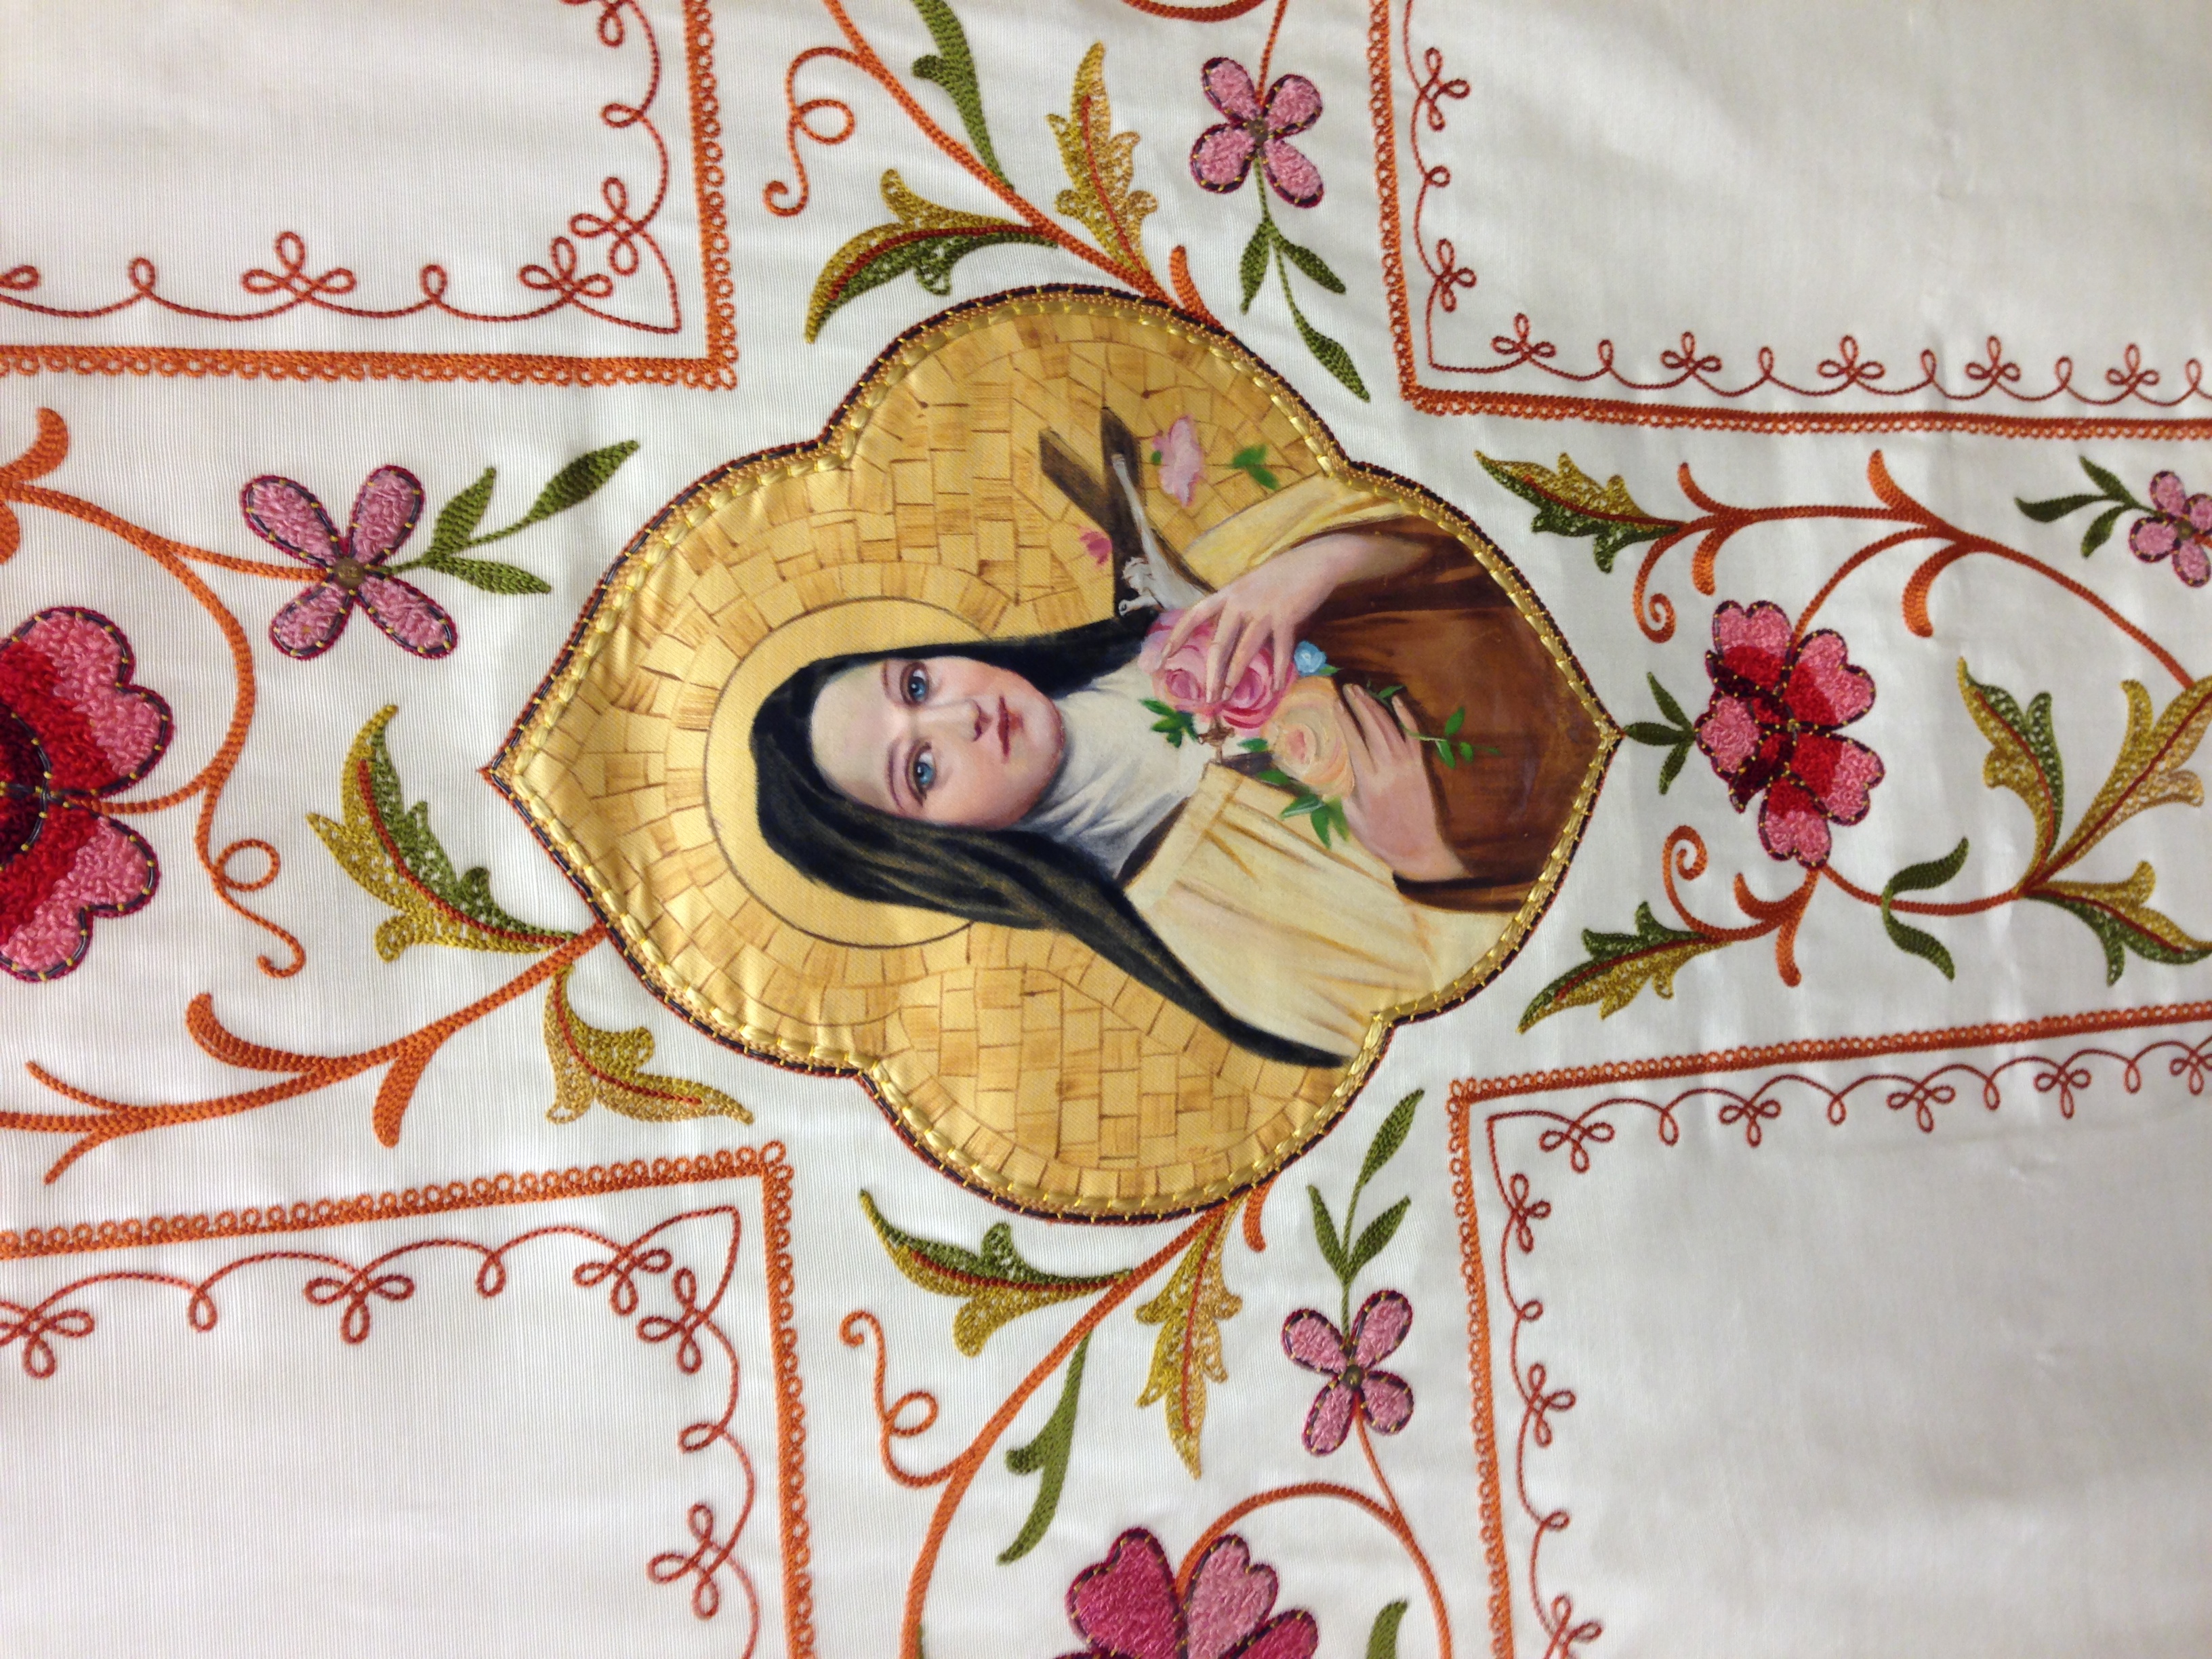
Fr. Garett O’Brien with his antique hand embroidered vestment with thread painting and goldwork.The gorgeous hand embroidered and painted antique vestment of Fr. Garett O’Brien, which was restored by another source.
As it turned out, I was recommended to Fr. Garrett by someone from my church in downtown New Orleans. Word travels quickly in New Orleans, a place of undeniable heritage and intrigue. In other words, everybody knows everybody and I suspect he just happened to speak to the one person who knew of me. He was seeking someone to recreate the missing elements of the vestment ensemble for his friend and given I had almost a full year to complete it, I readily accepted the commission. At last, the opportunity to utilize the skills I learned while achieving a Certificate from the Royal School of Needlework in London.
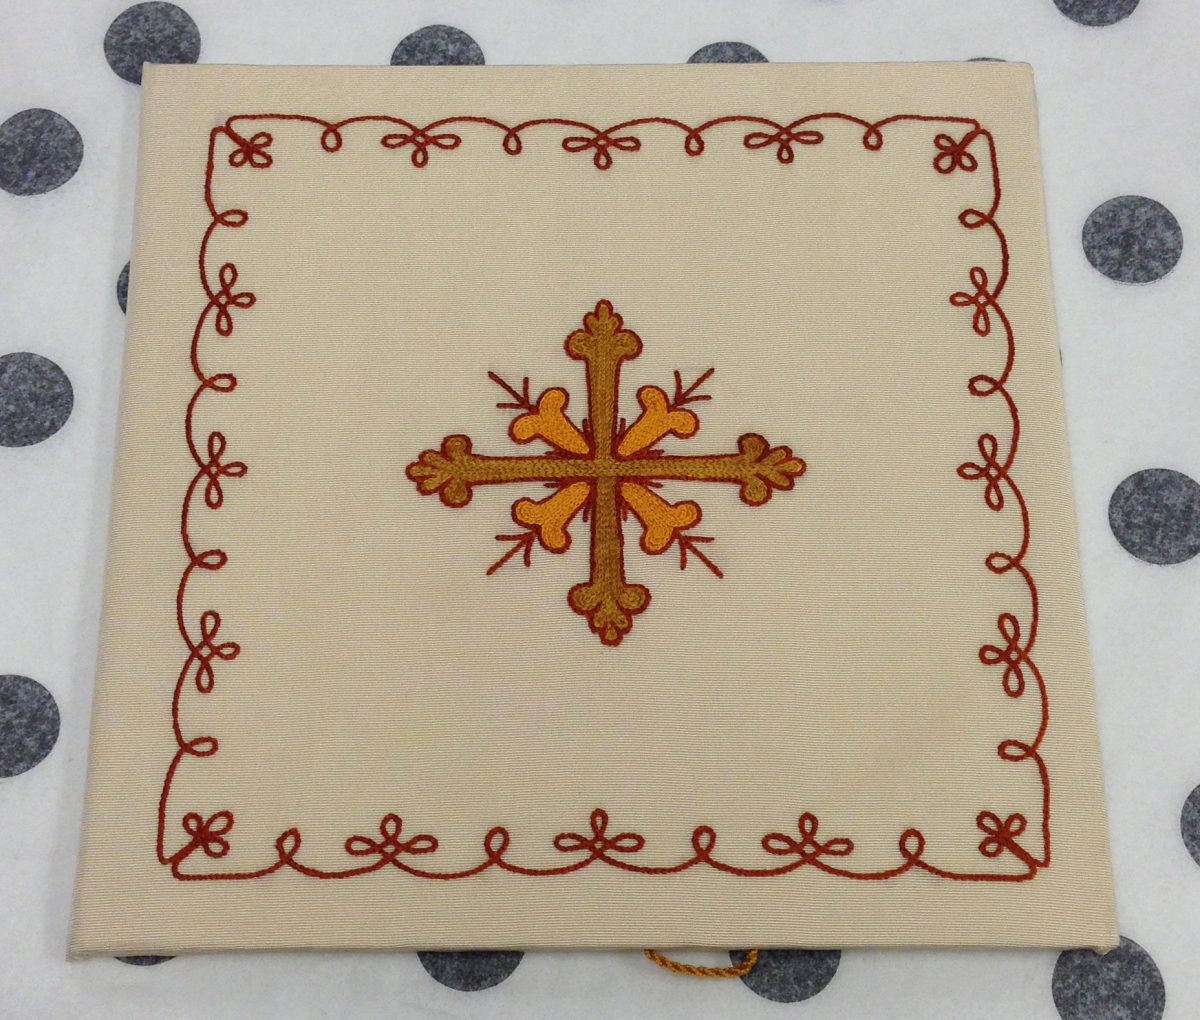
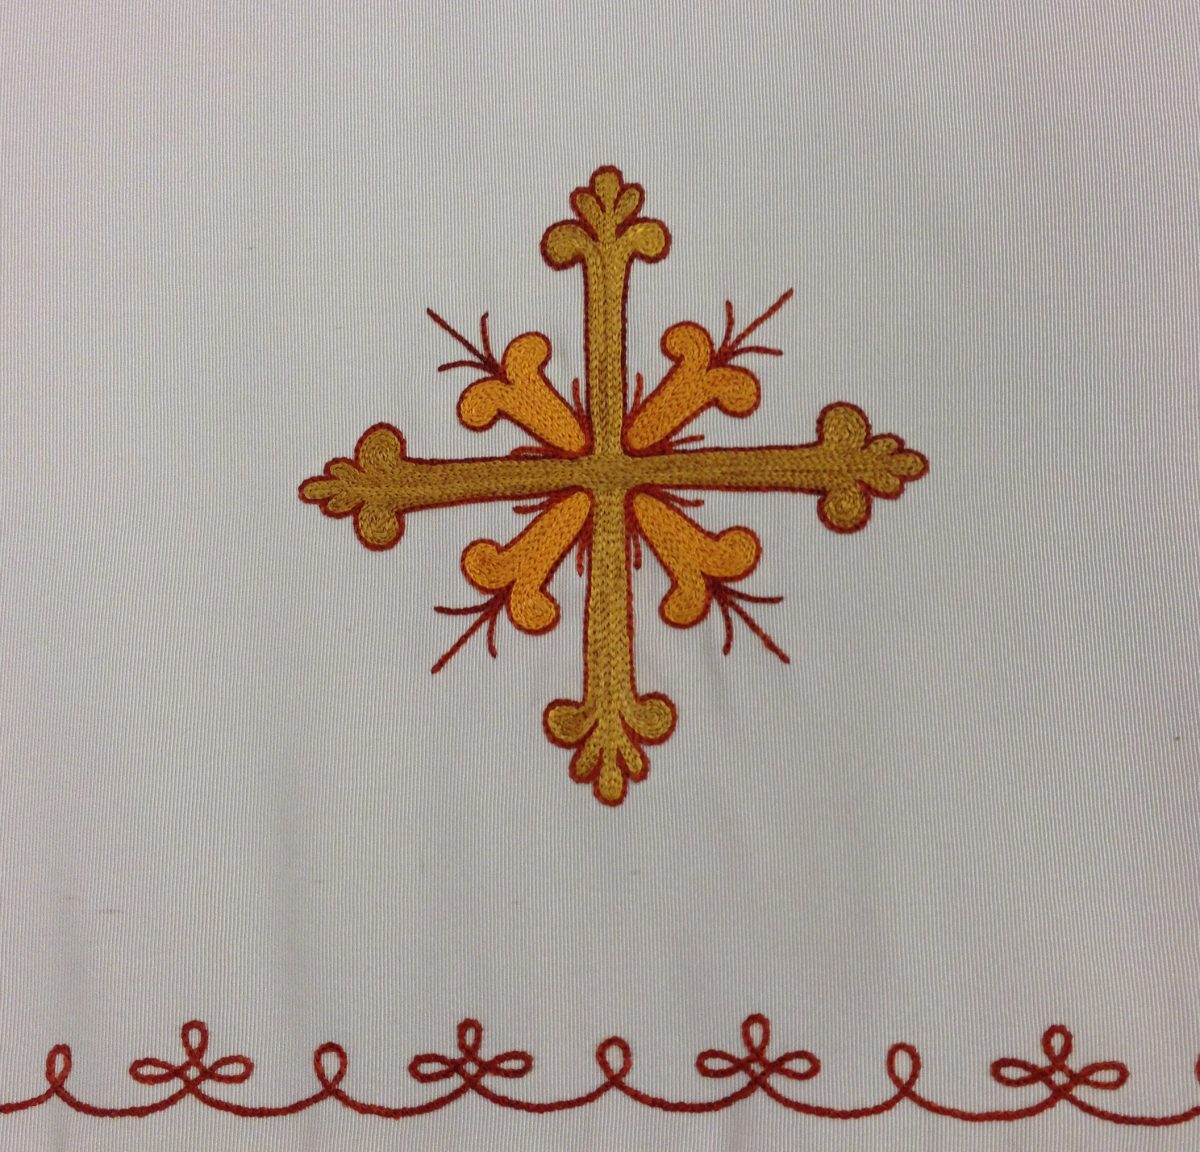
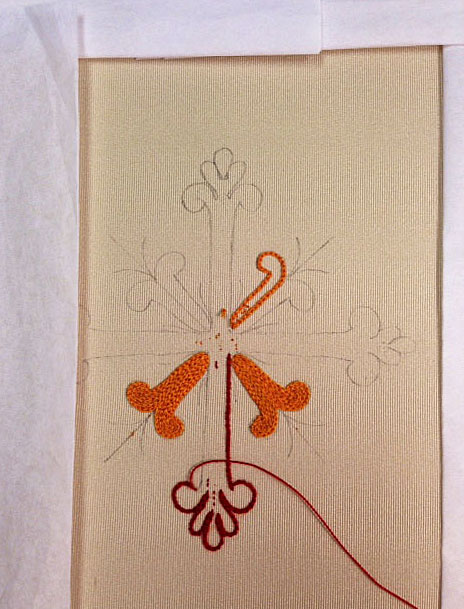
The elements he was missing was a burse, which purpose is to protect the hosts while in the chalice, and the shall, which is laid over the burse, much like a small square tablecloth. The design was taken from the piece that the priest drapes over his arm and was made to match the embroidery on the vestment. The embroidery was done in three colors and was stitched in Beauvais stitch, or chain stitch. The challenge was to find the appropriate fabric and the exact color threads so the reproduction pieces would match the originals to exacting specifications.
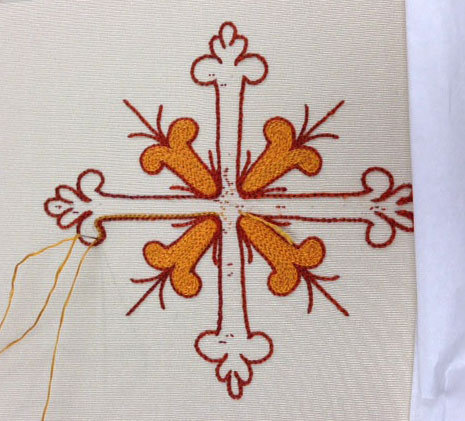
This photo is the completed burse with front and backs joined together at the side and held in place with a twisted cord holding thread. The embroidery is mounted on acid free card and lined with goldenrod colored silk fabric on the inside of the “book-like” accessory.
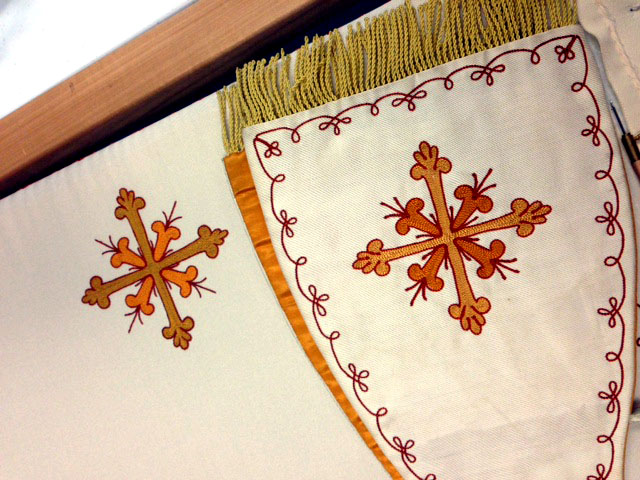
A tight close-up of the center of the burse showing the stitch pattern and looped border which frames the central figure.Here is the completed shall I reproduced placed beside the original antique sleeve drape which is lined with goldenrod silk and trimmed with bullion fringe.A close-up comparison of the arm drape and shall.
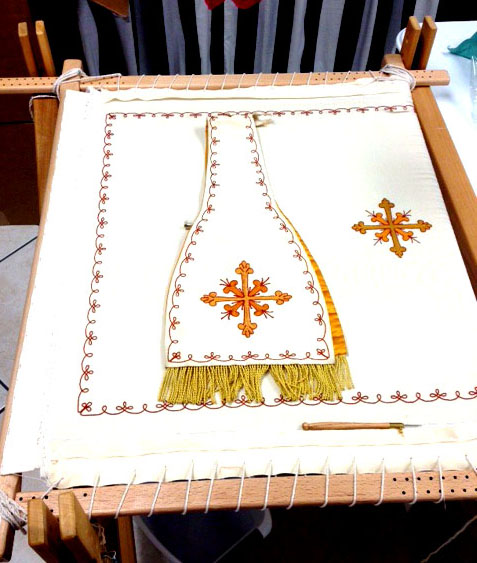
The fabric was easy to find, but imported faille is quite costly and most important to the work. Finding the thread proved much more difficult. It seemed there never was a thread made to match these three colors in shade, intensity, and weight. I finally decided to use silk thread, which matched the antique almost exactly. And I decided to use my slate frame and trestle stands rather than hoop. I determined to try my hand at Tambour stitching, which would have been the best application of this work, but that darn needle was tricky and I didn’t have time for the “learning curve” which was required to become proficient at the art. I settled on using a hand needle with a bit of bee’s wax to tame the fibers slightly and darken the color a bit for a more pleasing match.
I worked diligently on the project between other projects and teaching jobs and finally, it was done in time for the newly ordained priest and my friend, Fr. Garrett O’Brien.
The design of the shall is transferred to the fabric with pounce and carefully painted with a fine brush and a steady hand. The lightest color areas were echo stitched first.The work in progress. The entire design is outlined in the darkest color using chain stitch.
If you have an antique garment you wish to have restored, please inquire via email. I am open to complying within your budgetary requirements. Please allow ample time to complete the project. wendschoen@aol.com
I have a small group of sewing buddies that visit me every Tuesday in my New Orleans Studio. We call this gathering “Stitch Therapy Tuesday”.
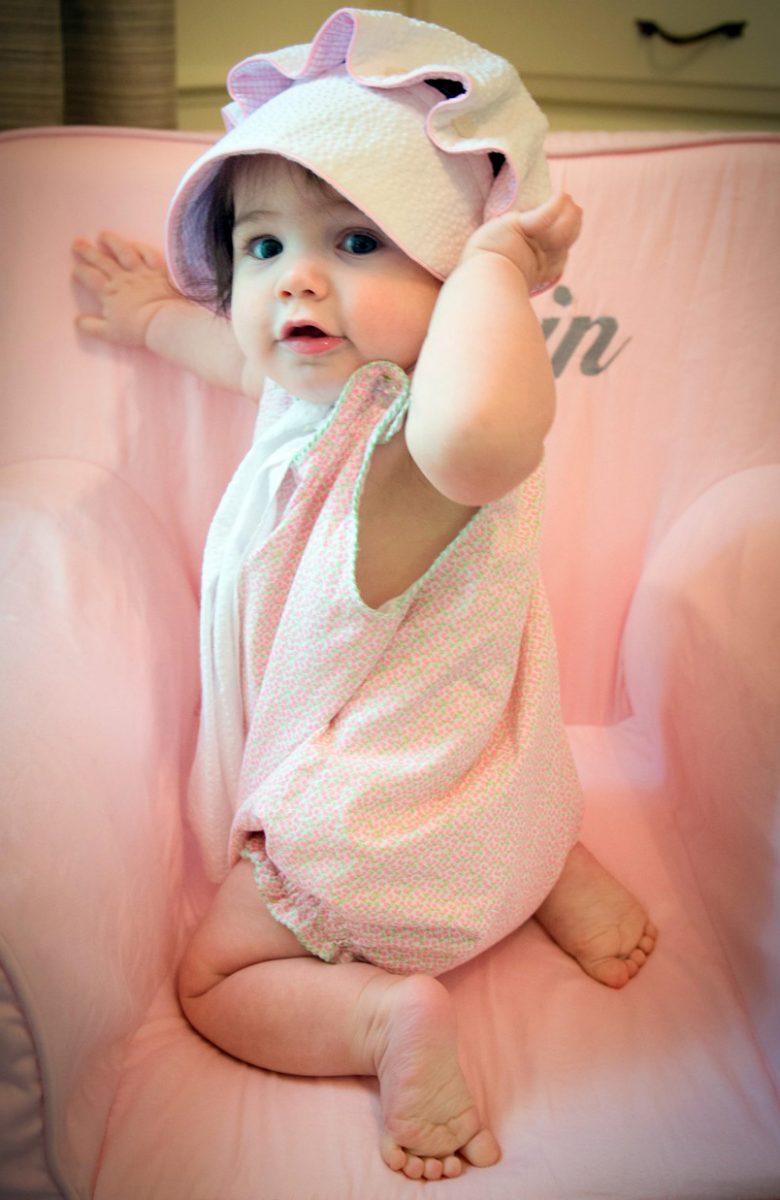
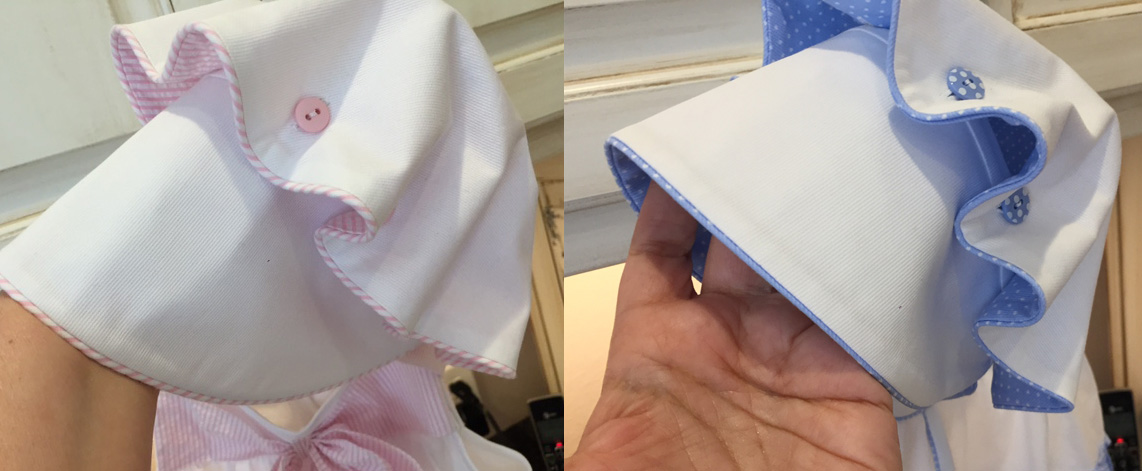
Margie made this seersucker bonnet for her precious granddaughter, Marin. Honestly, have you ever seen anything so cute?
This group consists of my Smocking Arts Guild members and a few others I’ve invited to join. It’s a lot of fun to discuss our projects and to encourage each other in our endeavors. Sometimes we work on UFO (un-finished objects) projects and other times we work on structured projects such as quilts and the drafting of patterns to handle fitting issues. I’m on hand to help with the technical stuff, but these ladies are so proficient at sewing, they actually help me with my projects.
Around 11:30 pm, we retreat to the kitchen and get lunch ready. We take turns making lunch and we truly enjoy our time together. Lately, the “regulars” have been contributing and bringing glorious concoctions of their own recipes and we delight in each other’s cooking expertise.
I decided to hold my first “Guinea Pig” class in order to test out the new bonnet pattern I was drafting, so I announced one day we would work on bonnets the following week. I really needed help and they truly came through for me. Each sewist chose a different fabric combination and size and the class was formed.
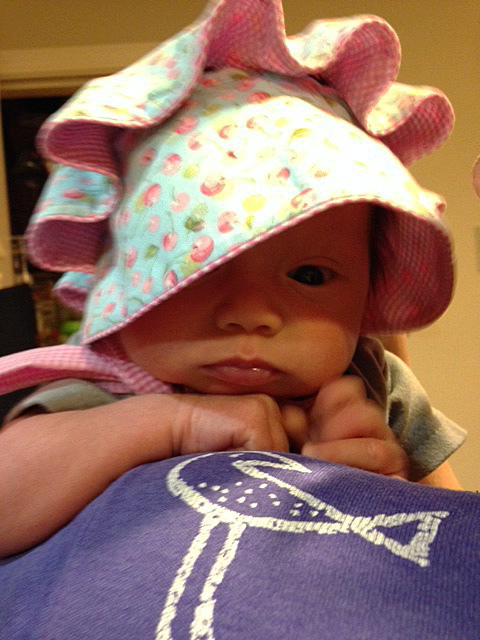
This little cutie is quite new to our group. It’s May’s first granddaughter, Kay looking spiffy in her new bonnet with gingham lining. So precious!
The Le Petite Enfant bonnet pattern, which was first published in 1996, was having a come-back and lots of folks had been requesting it in larger sizes. I couldn’t imagine why anyone would put a bonnet on an older child, but it was explained that it was perfect for the beach and the hot southern climate. After two years of requests, I decided to republish the pattern in larger sizes. It has been a huge hit and it has inspired me to design more Guinea Pig classes for my group.
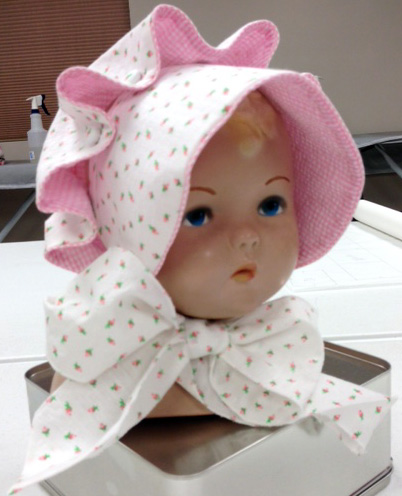
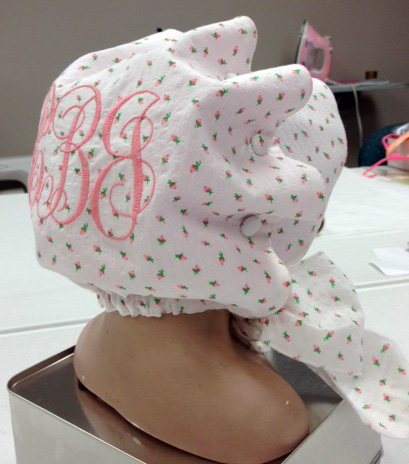
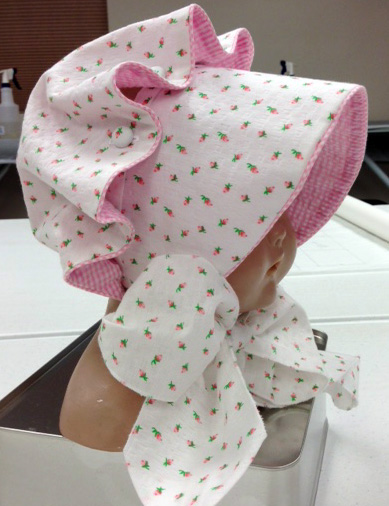
These little cuties were made by Suzette for her grandmother’s hope chest. Aren’t the color combinations adorable?This adorable rosebud and gingham bonnet was carefully piped around the edges with covered piping. Covered buttons complete the look.
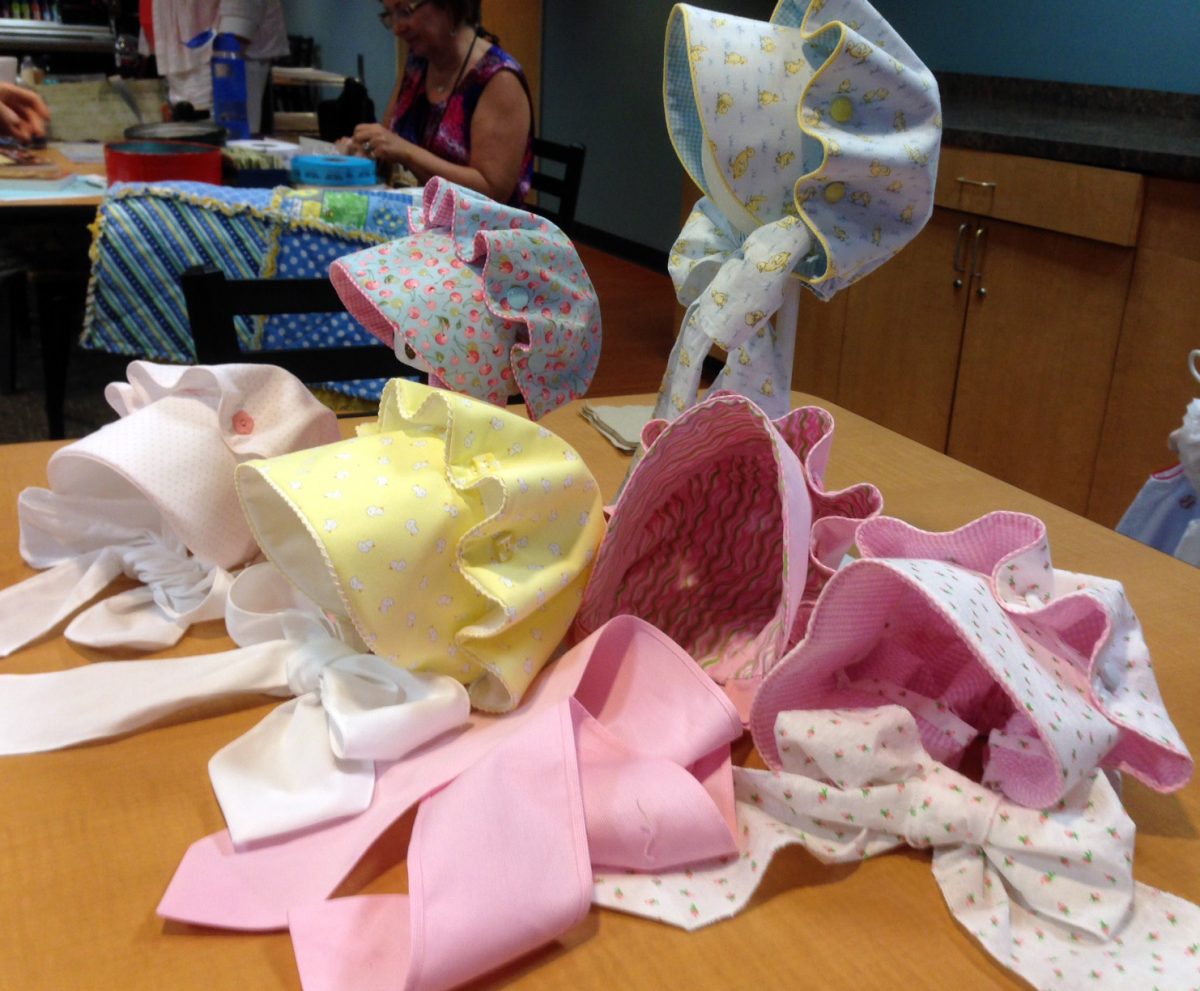
Results from the “Guinea Pig” class was amazing and I was thrilled to see how creative they had been with choice of fabric combinations and button choices. Every bonnet turned out adorably and I’d like to share the results with you.
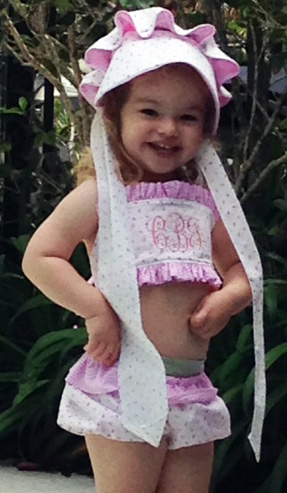
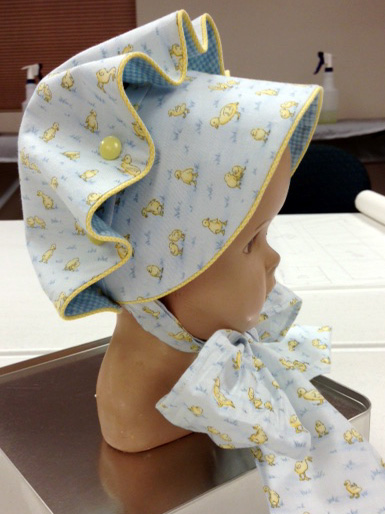
Here is a whole pile of bonnets ready for “show ‘n share” at our SAGA meeting. Each is cuter than the next.Jane’s adorable granddaughter, Caroline looks especially precious in her matching bonnet and bikini ensemble.Shirley made this adorable bonnet from duckie fabric and gingham lining. The piping is in contrast to the two fabrics.